• Skip to primary navigation
  • Skip to main content
  • Skip to primary sidebar
  • Skip to footer

Southern Made Simple

Keeping things simple with a smidge of Southern charm

  • Home
  • About Me
    • Policies
    • Work With Me / Media Kit
  • Home Cookin’
    • Appetizers
    • Breakfast
    • Main Course Meals
    • Desserts
    • Recipe Index
  • My Favorite Things
    • DIY Projects
    • Farmhouse Finds
    • Product Reviews
    • VBS Resources
  • For the Kids
    • Cloth Diapering
    • Kids Fashion
    • Parenting and Lifestyle
  • Etsy Shop
  • Contact

Home Cookin'

Irish Soda Bread Pudding with Bailey’s Caramel Cream Sauce

February 22, 2021 by Laura Tucker 2 Comments

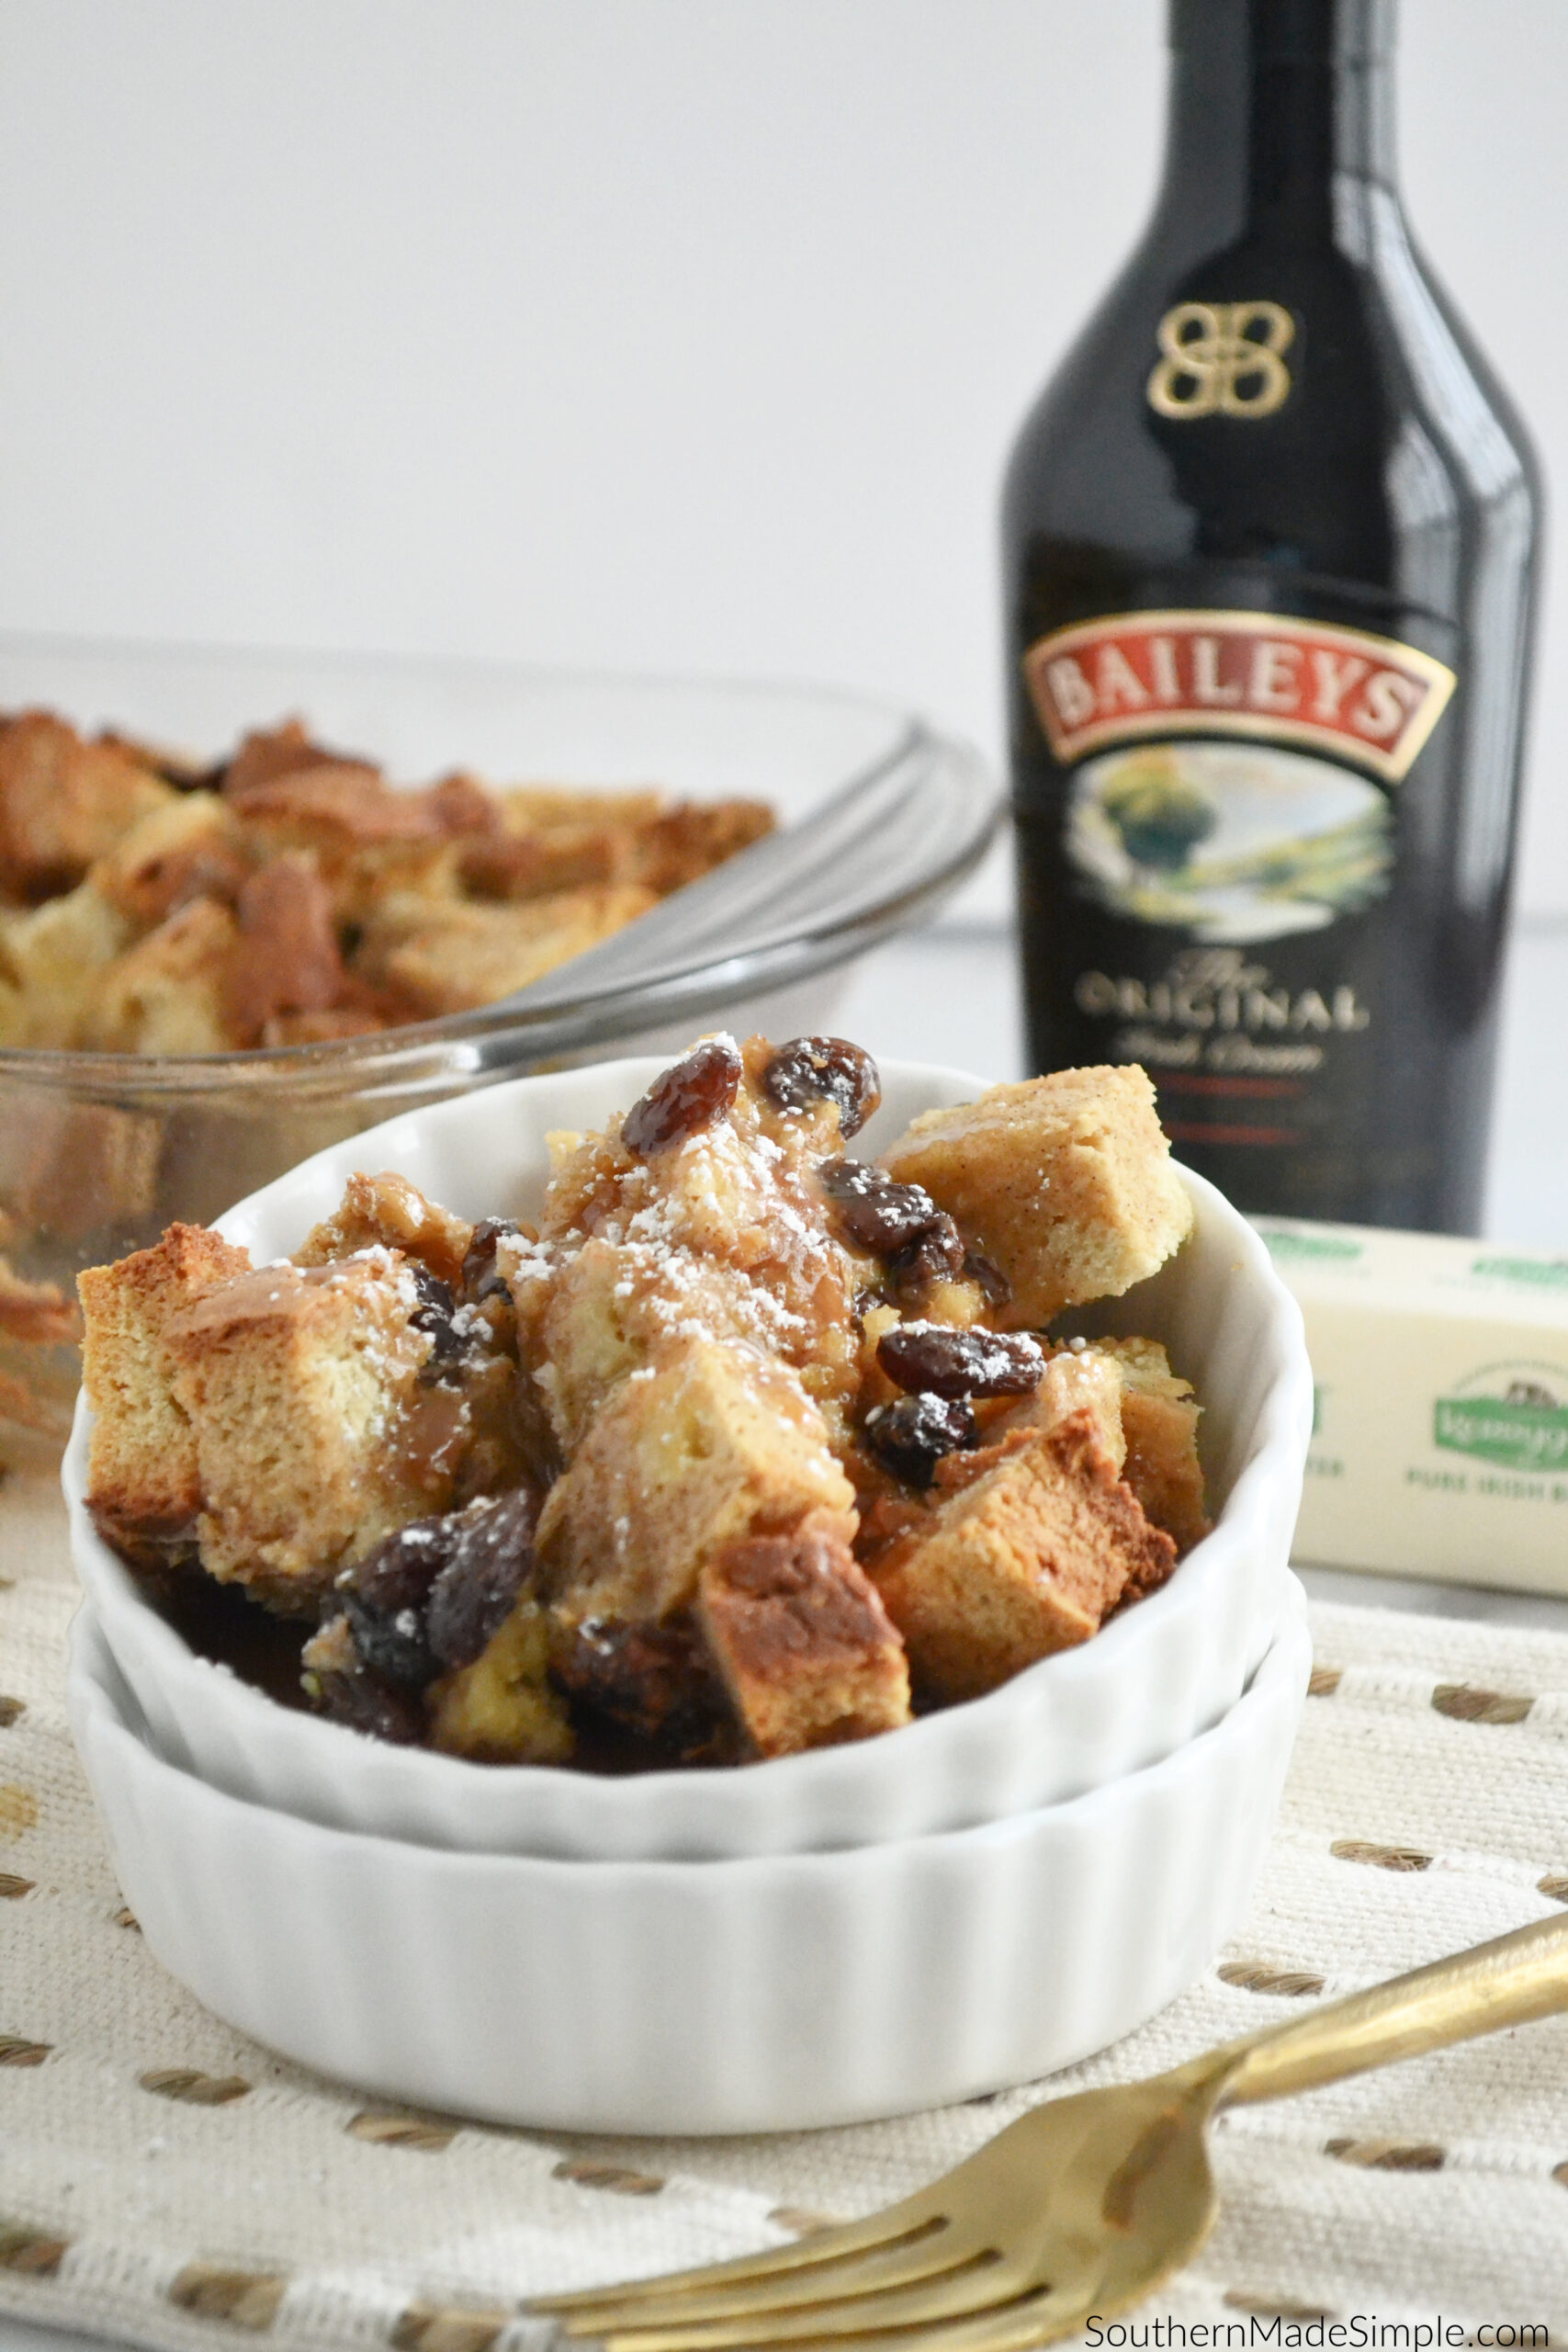
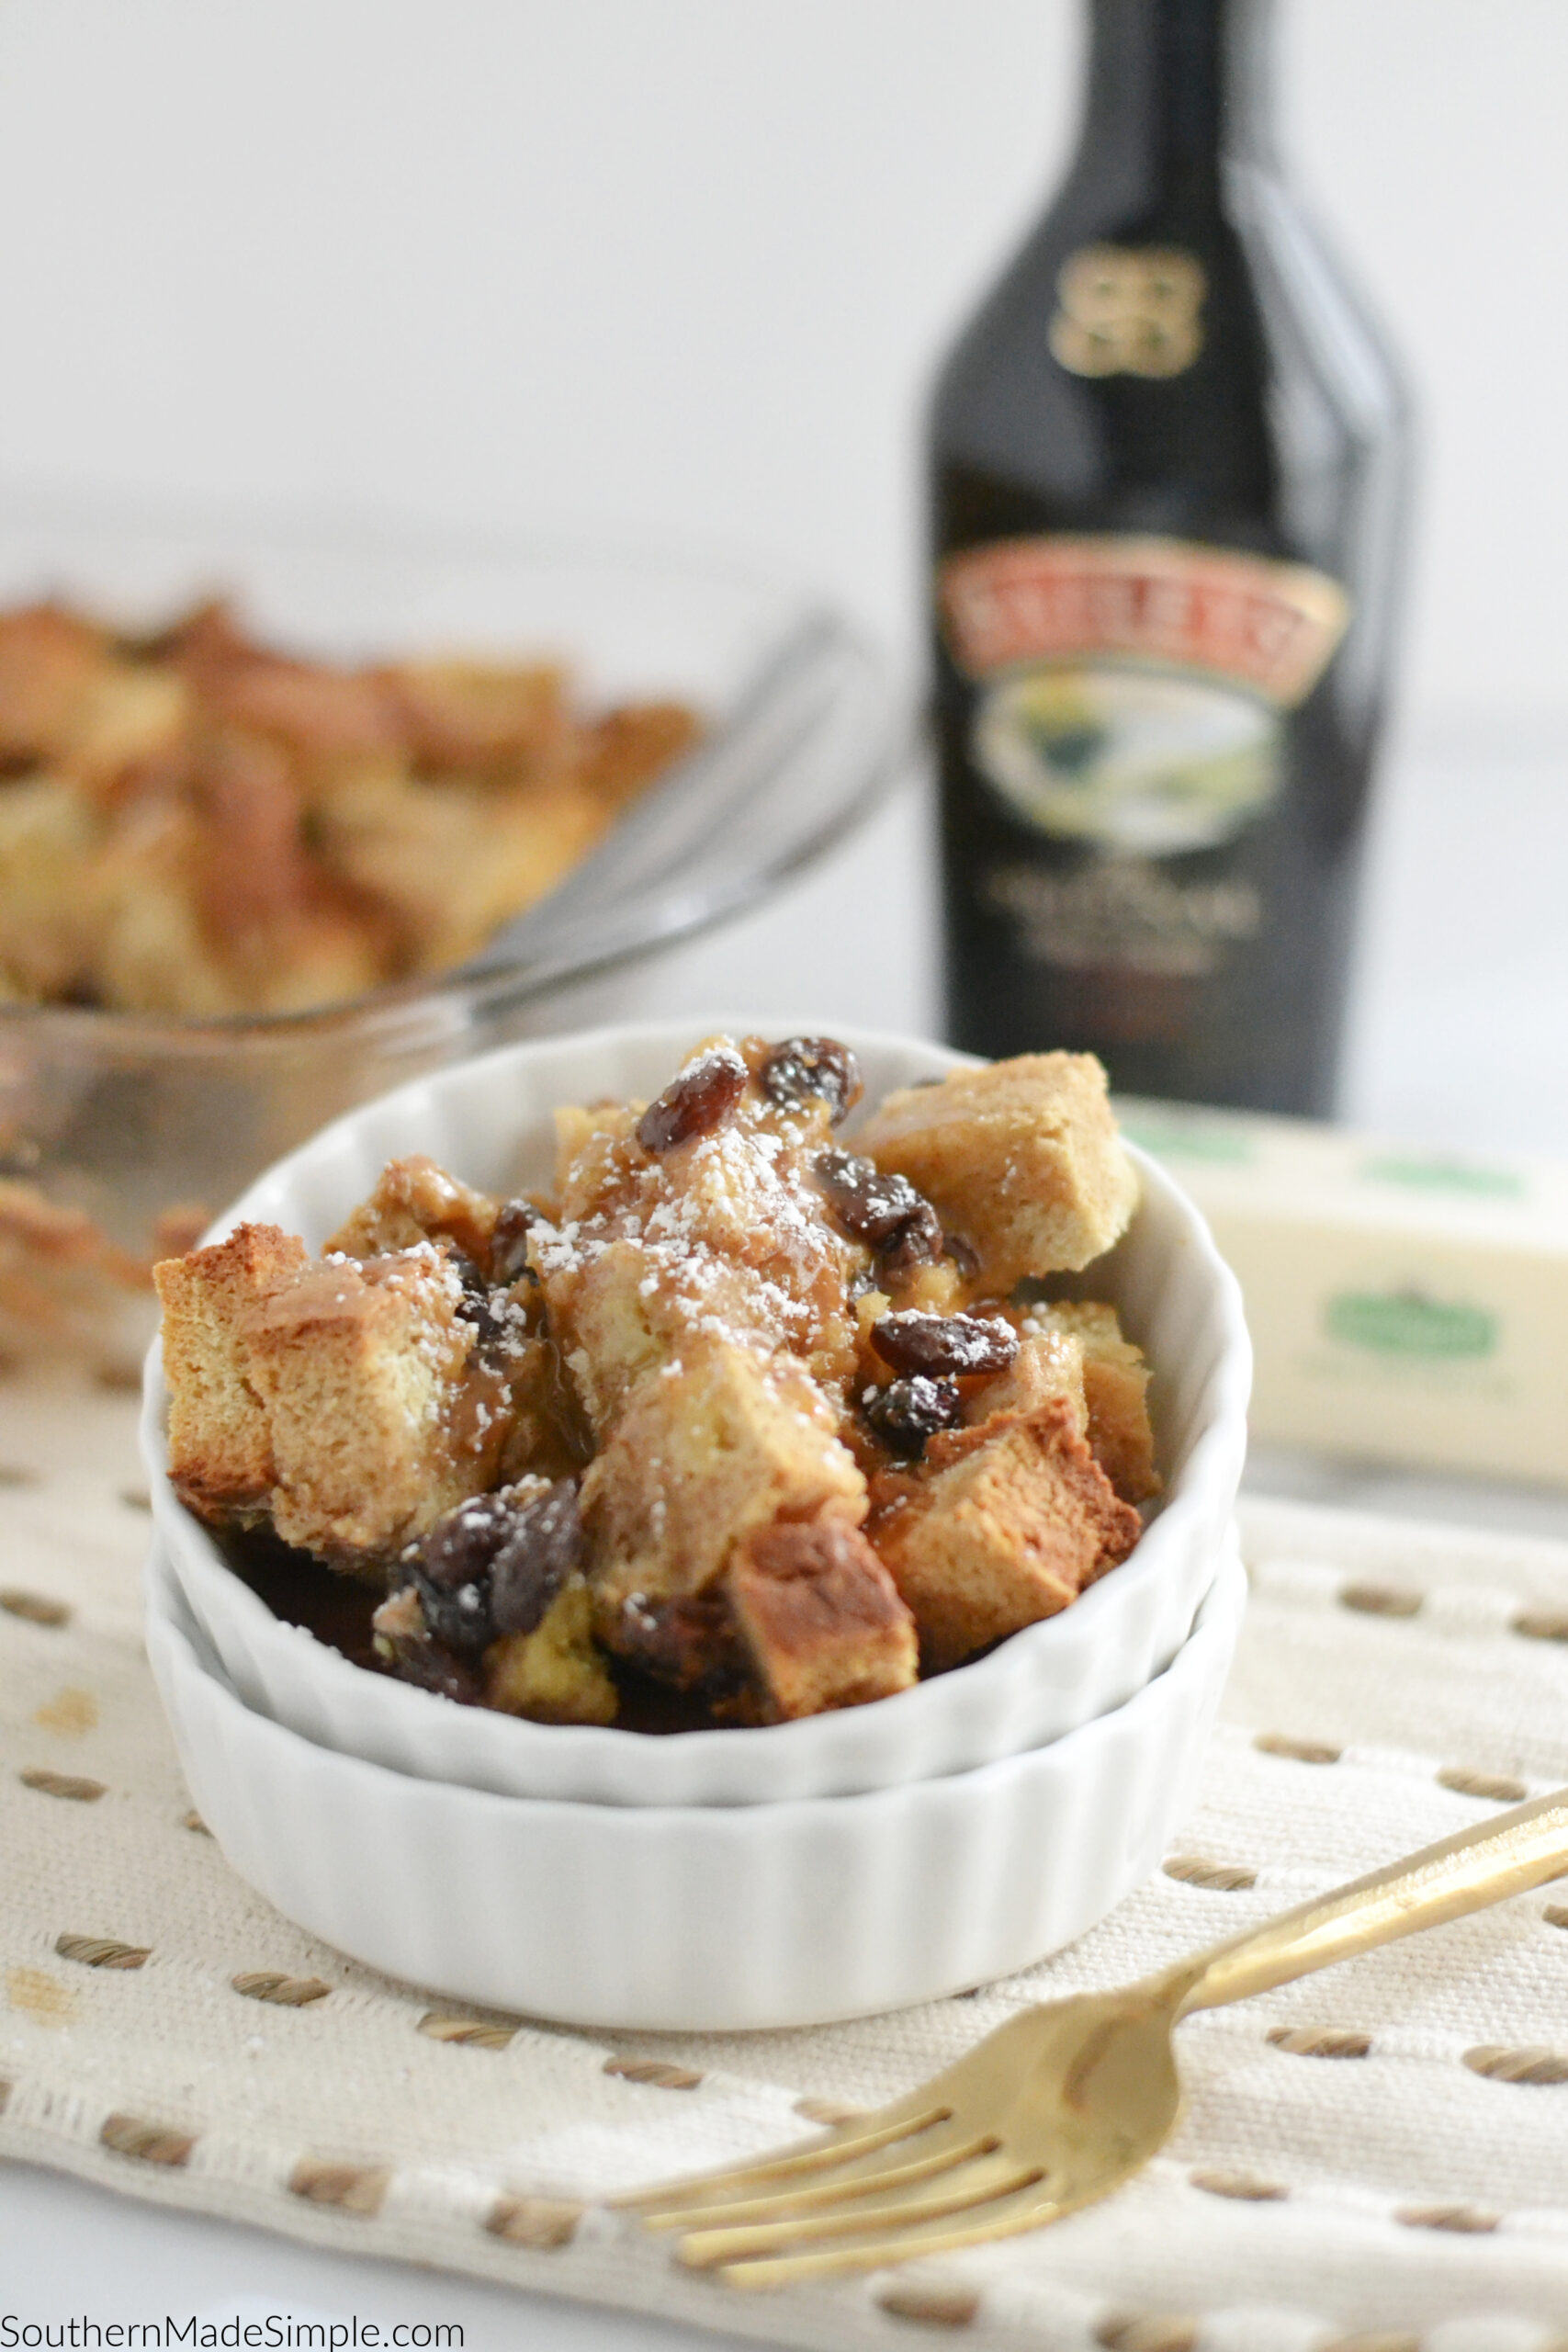
This recipe for Irish Soda Bread Pudding with Bailey’s Caramel Cream Sauce is a delicious way to liven up traditional Irish Soda Bread and transform it into a scrumptious breakfast with a hint of Bailey’s Irish Cream liqueur – just in time for St Patrick’s Day!  

Irish Soda Bread Pudding with Bailey's Caramel Cream Sauce

This past weekend we broke out a few St. Patrick’s Day decorations and began decorating our home with lots of green,  sparkly shamrocks and a few lovely little leprechaun figurines.  Last year was the first year we actually put out decorations for the holiday, but because we’re homeschooling until the end of this school year I thought it would be a great way to tie our heritage into our curriculum and to freshen up our “classroom” with something new and fun to look at. I put a loaf of Irish Soda Bread into the oven and asked Alexa to play Irish music for us to tap our toes to while we decorated. It was such a fun way to spend our Saturday!

Irish Soda Bread Pudding with Bailey's Caramel Cream Sauce

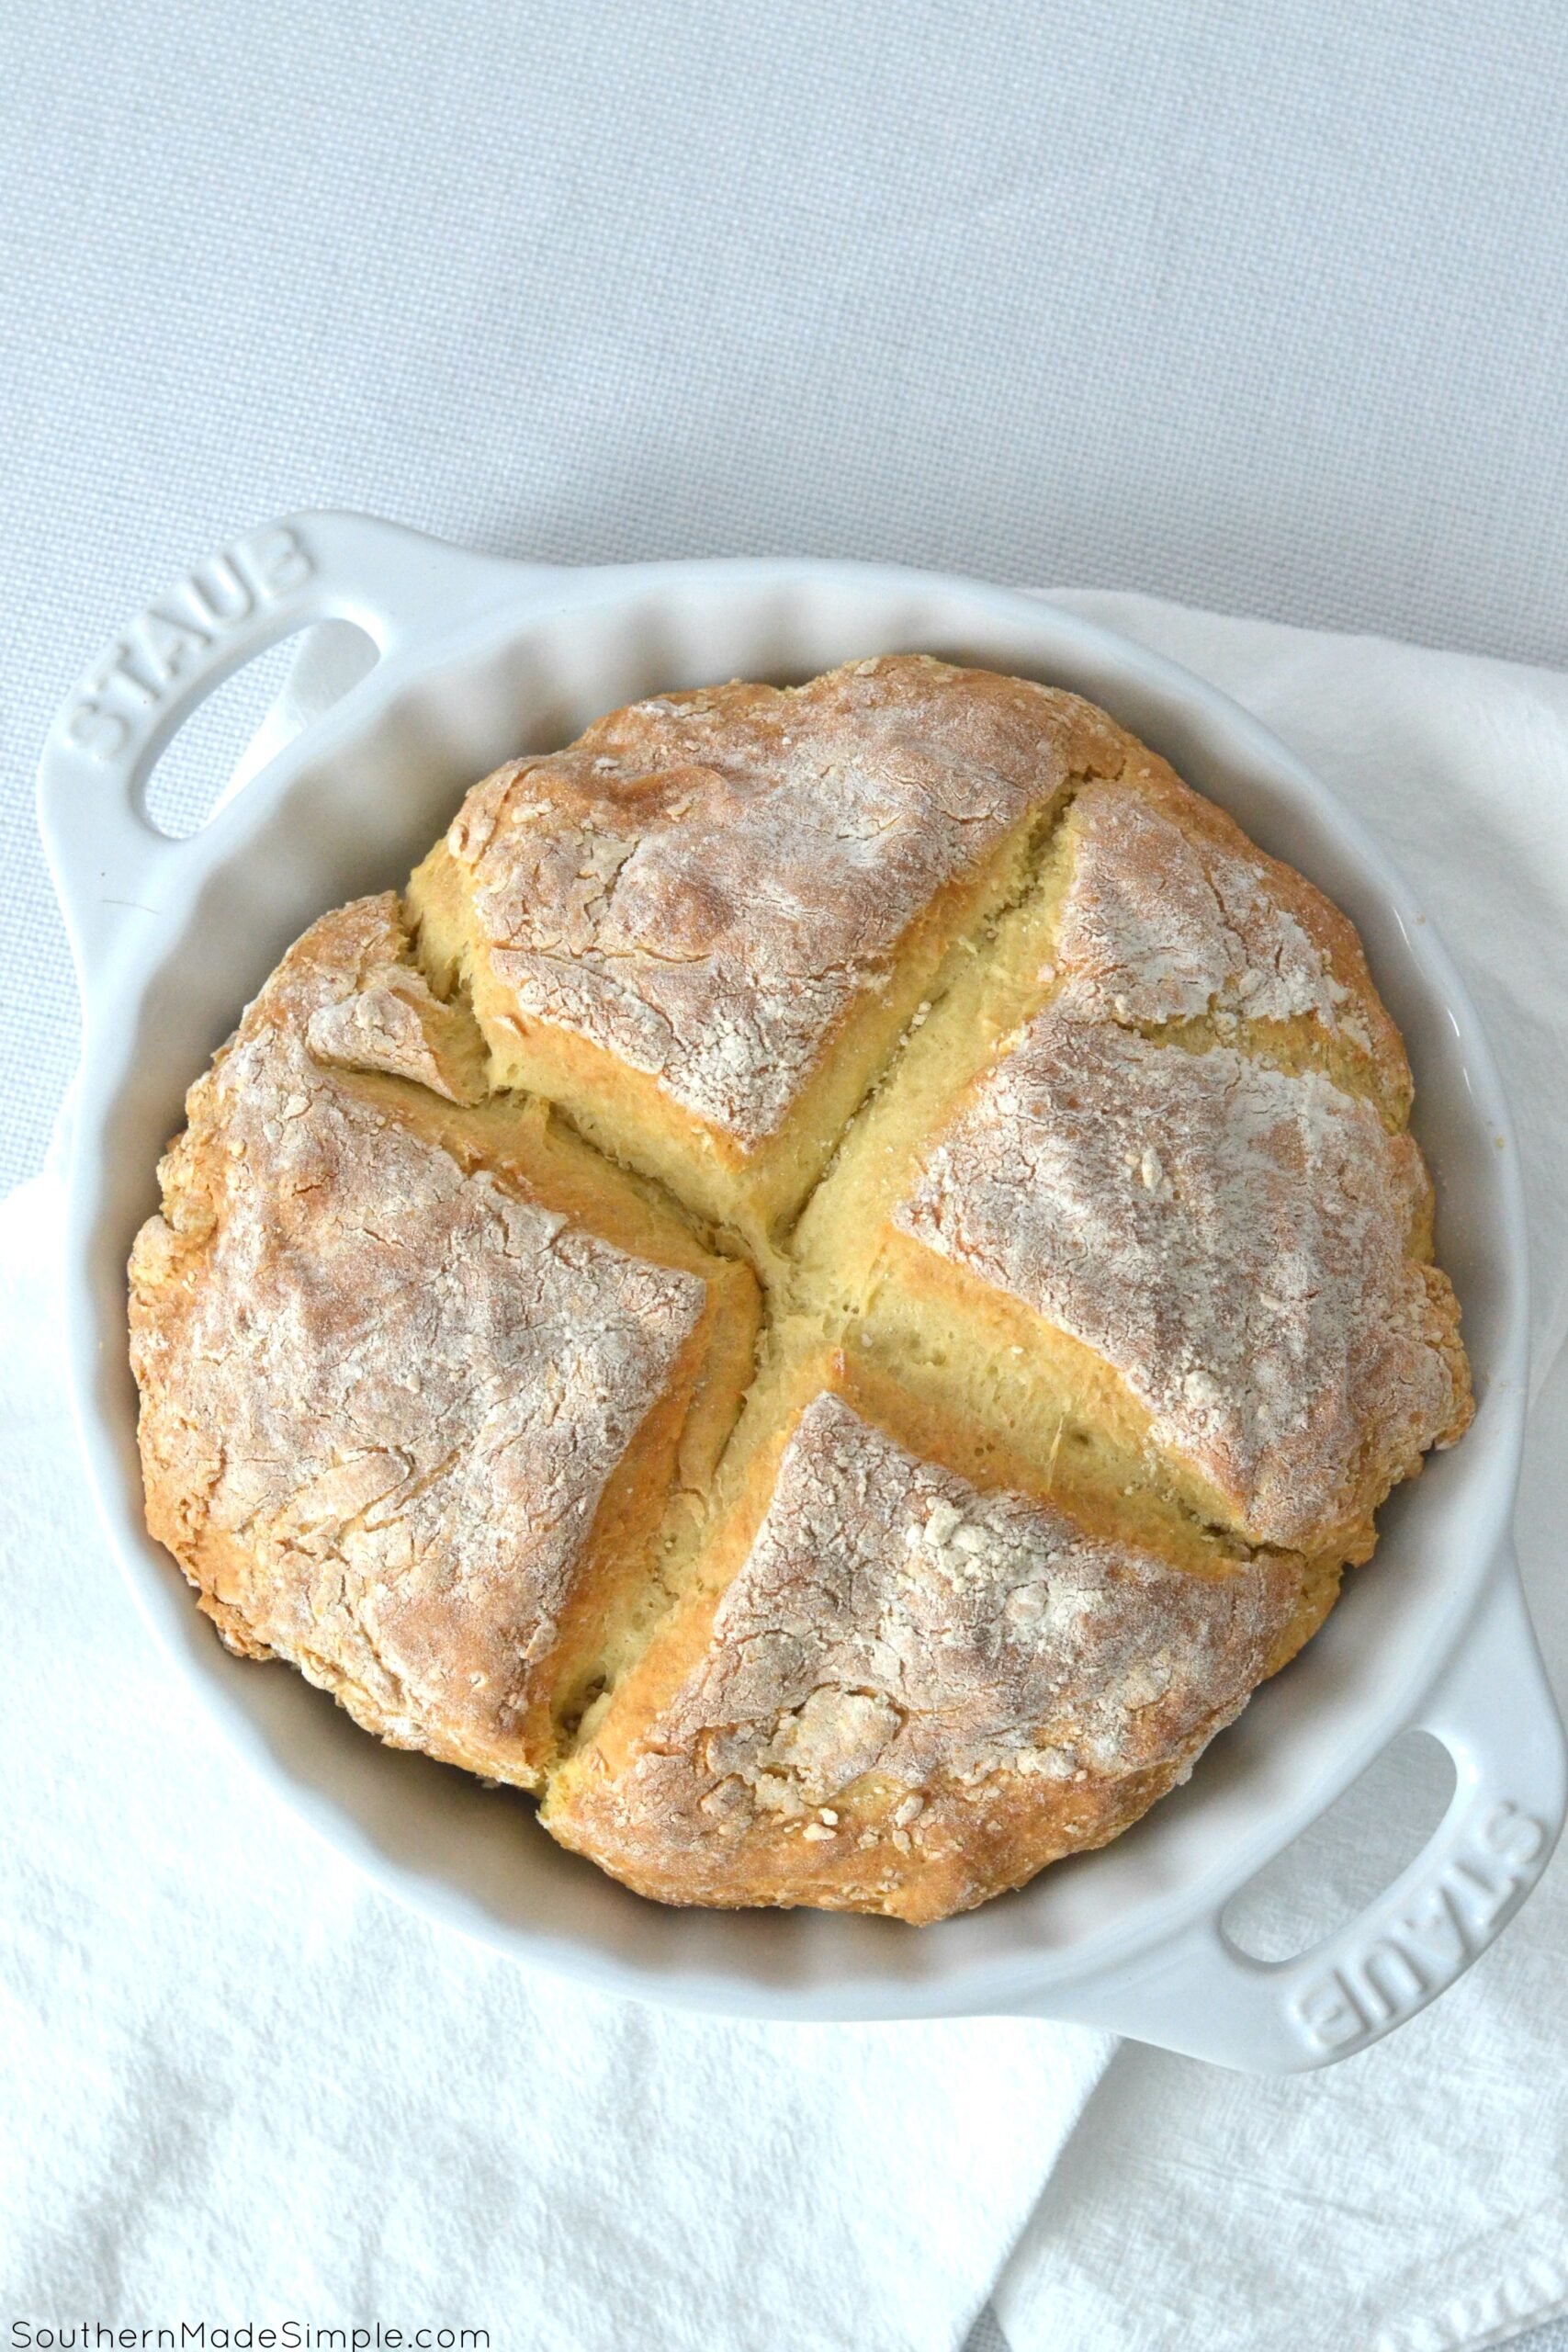
Last year around this time I shared a recipe for how to make Irish Soda Bread with you all. When I was a teenager I had the opportunity to travel to Ireland, and while visiting a rural farm there I got to make Irish Soda Bread and dance the night away to Irish folk music with local teens my age. It’s one of my favorite memories to date, and for that reason Irish Soda Bread will always hold a very special place in my heart. Soda bread is a very no-frills type of bread. You only need 4 ingredients to make it, and you don’t even have to knead it! The acid in the buttermilk combined with the baking soda give this bread a bit of a rise, and the “X” carved into the center is said to ward off the devil in your home. It also helps the center of the dough cook all the way through, but I like the thought of keeping the devil out of my home (and my bread) much better! ?
Irish Soda Bread Pudding with Bailey's Caramel Cream Sauce

We always enjoy our soda bread with a pad of butter and a little jam on top, but this time I had a specific vision in mind to transform our loaf of soda bread into something extra sweet to enjoy for breakfast the next day.

Irish Soda Bread Pudding with Bailey's Caramel Cream Sauce

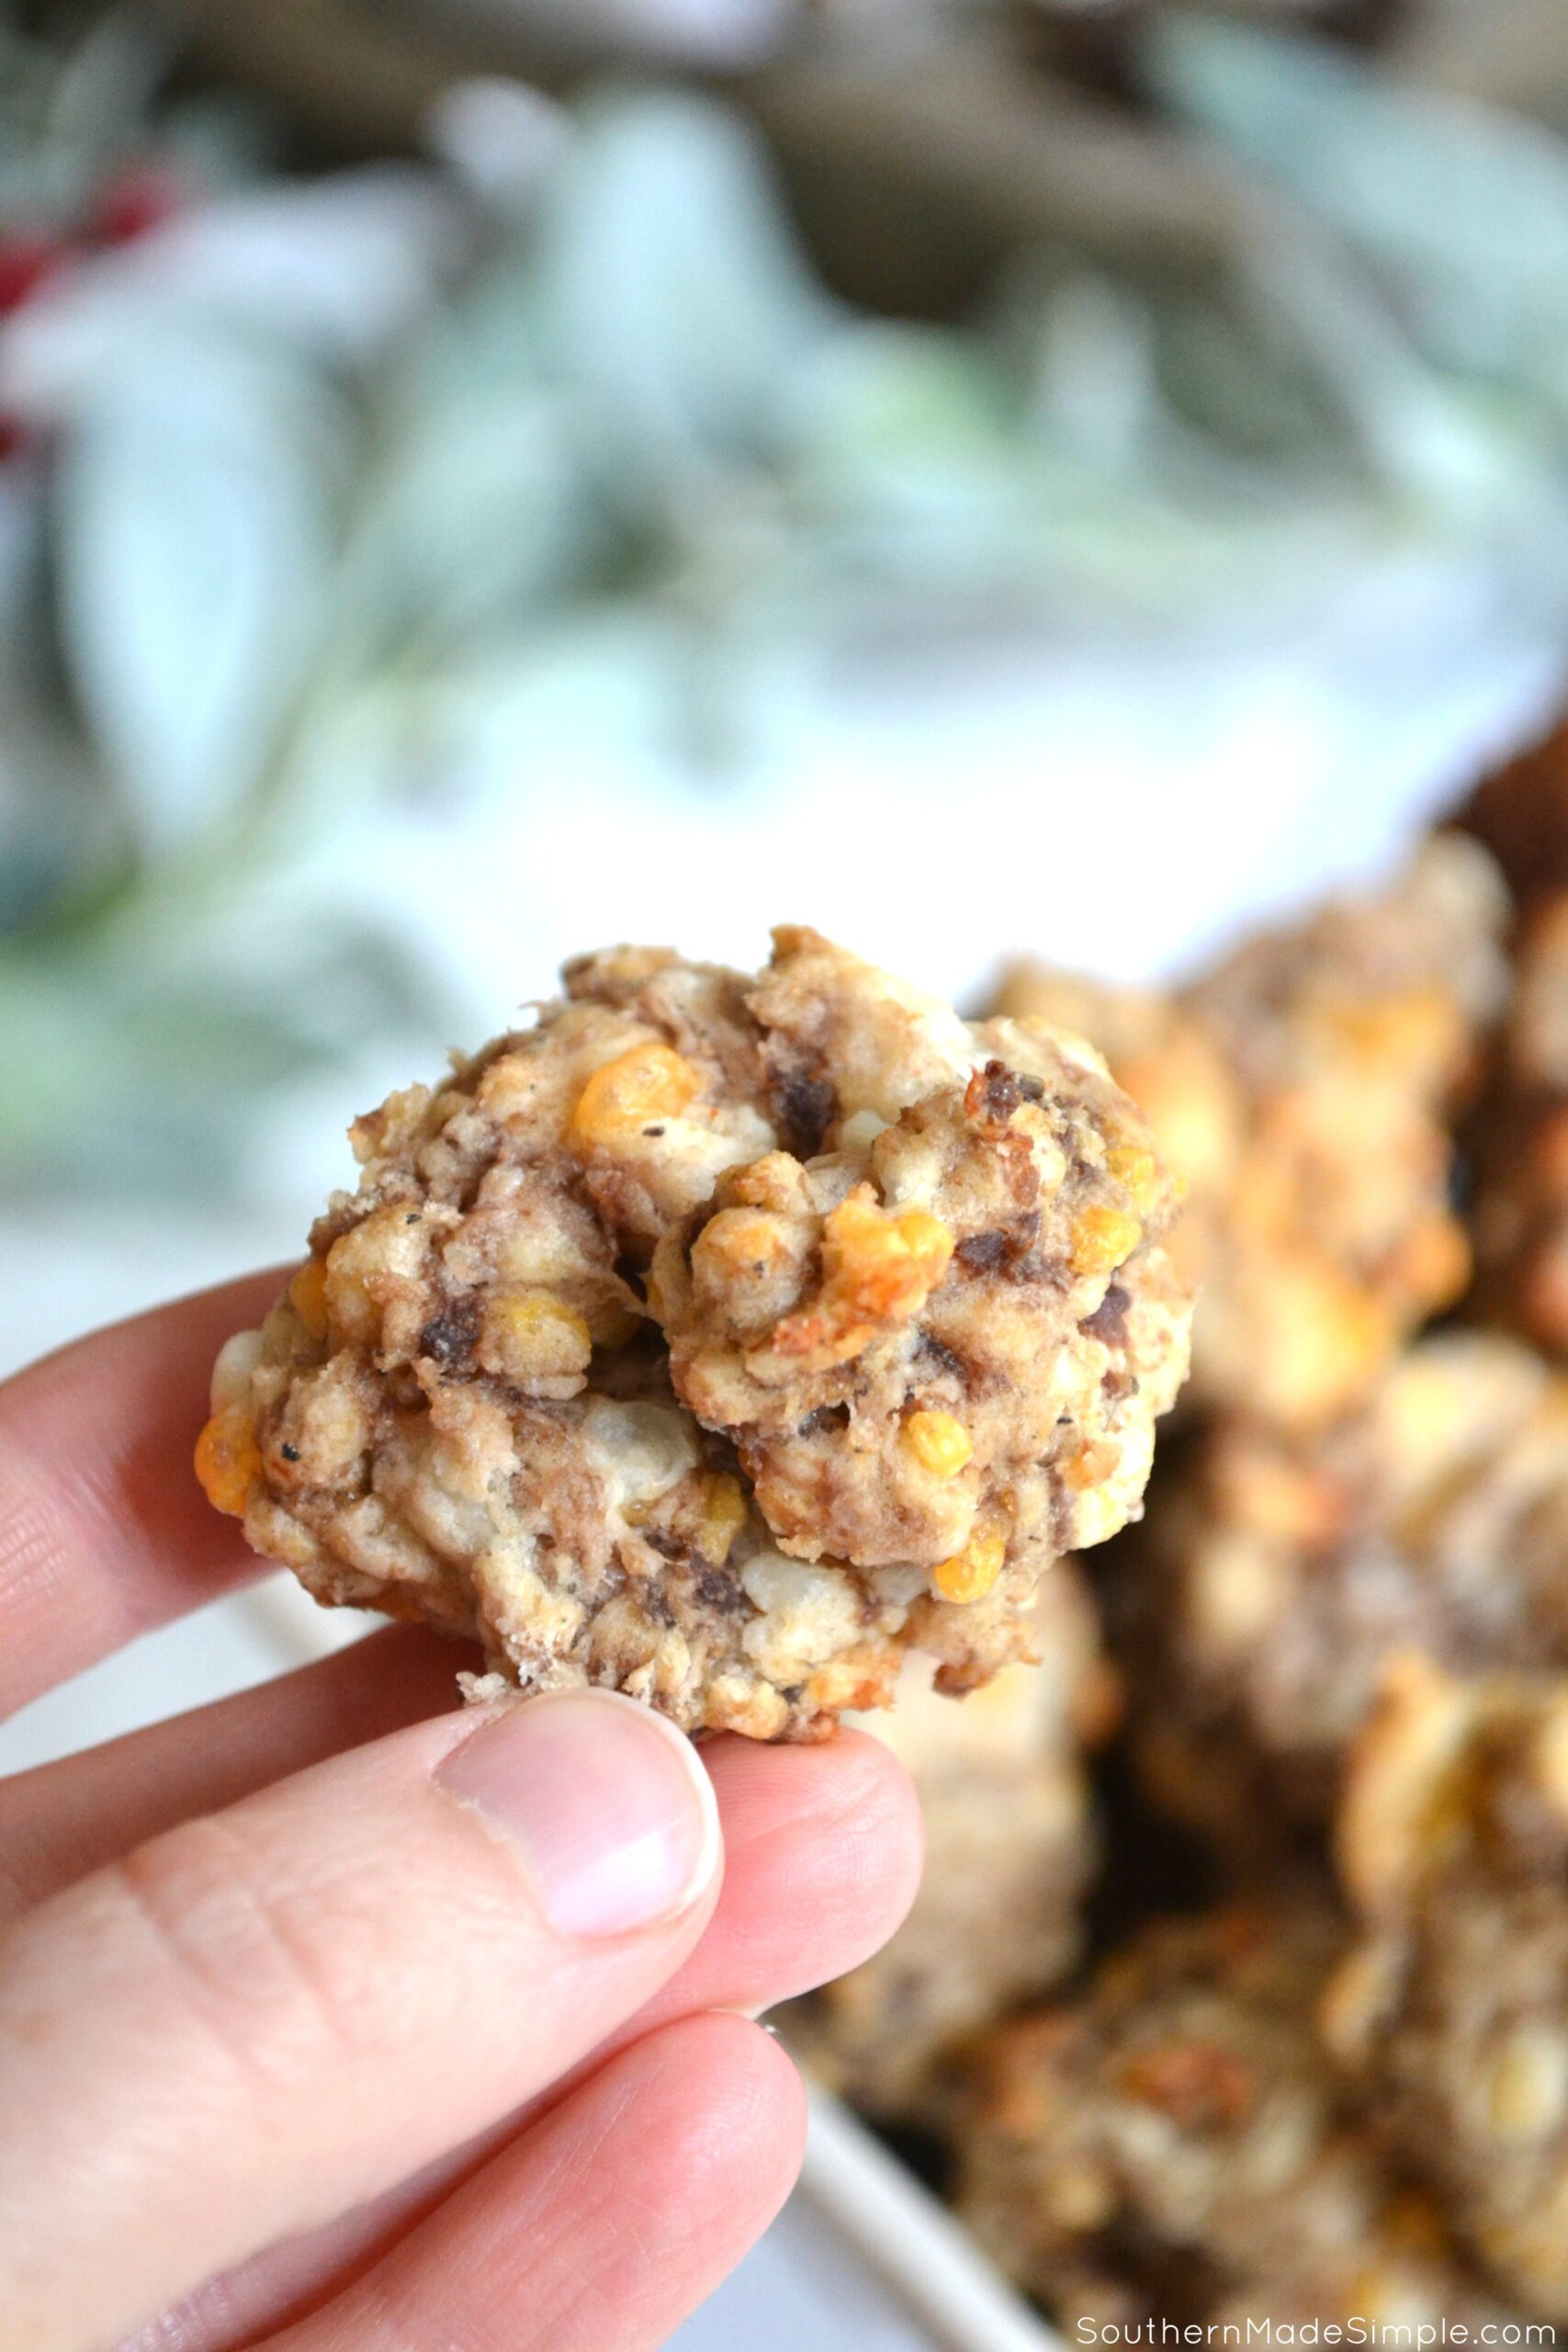
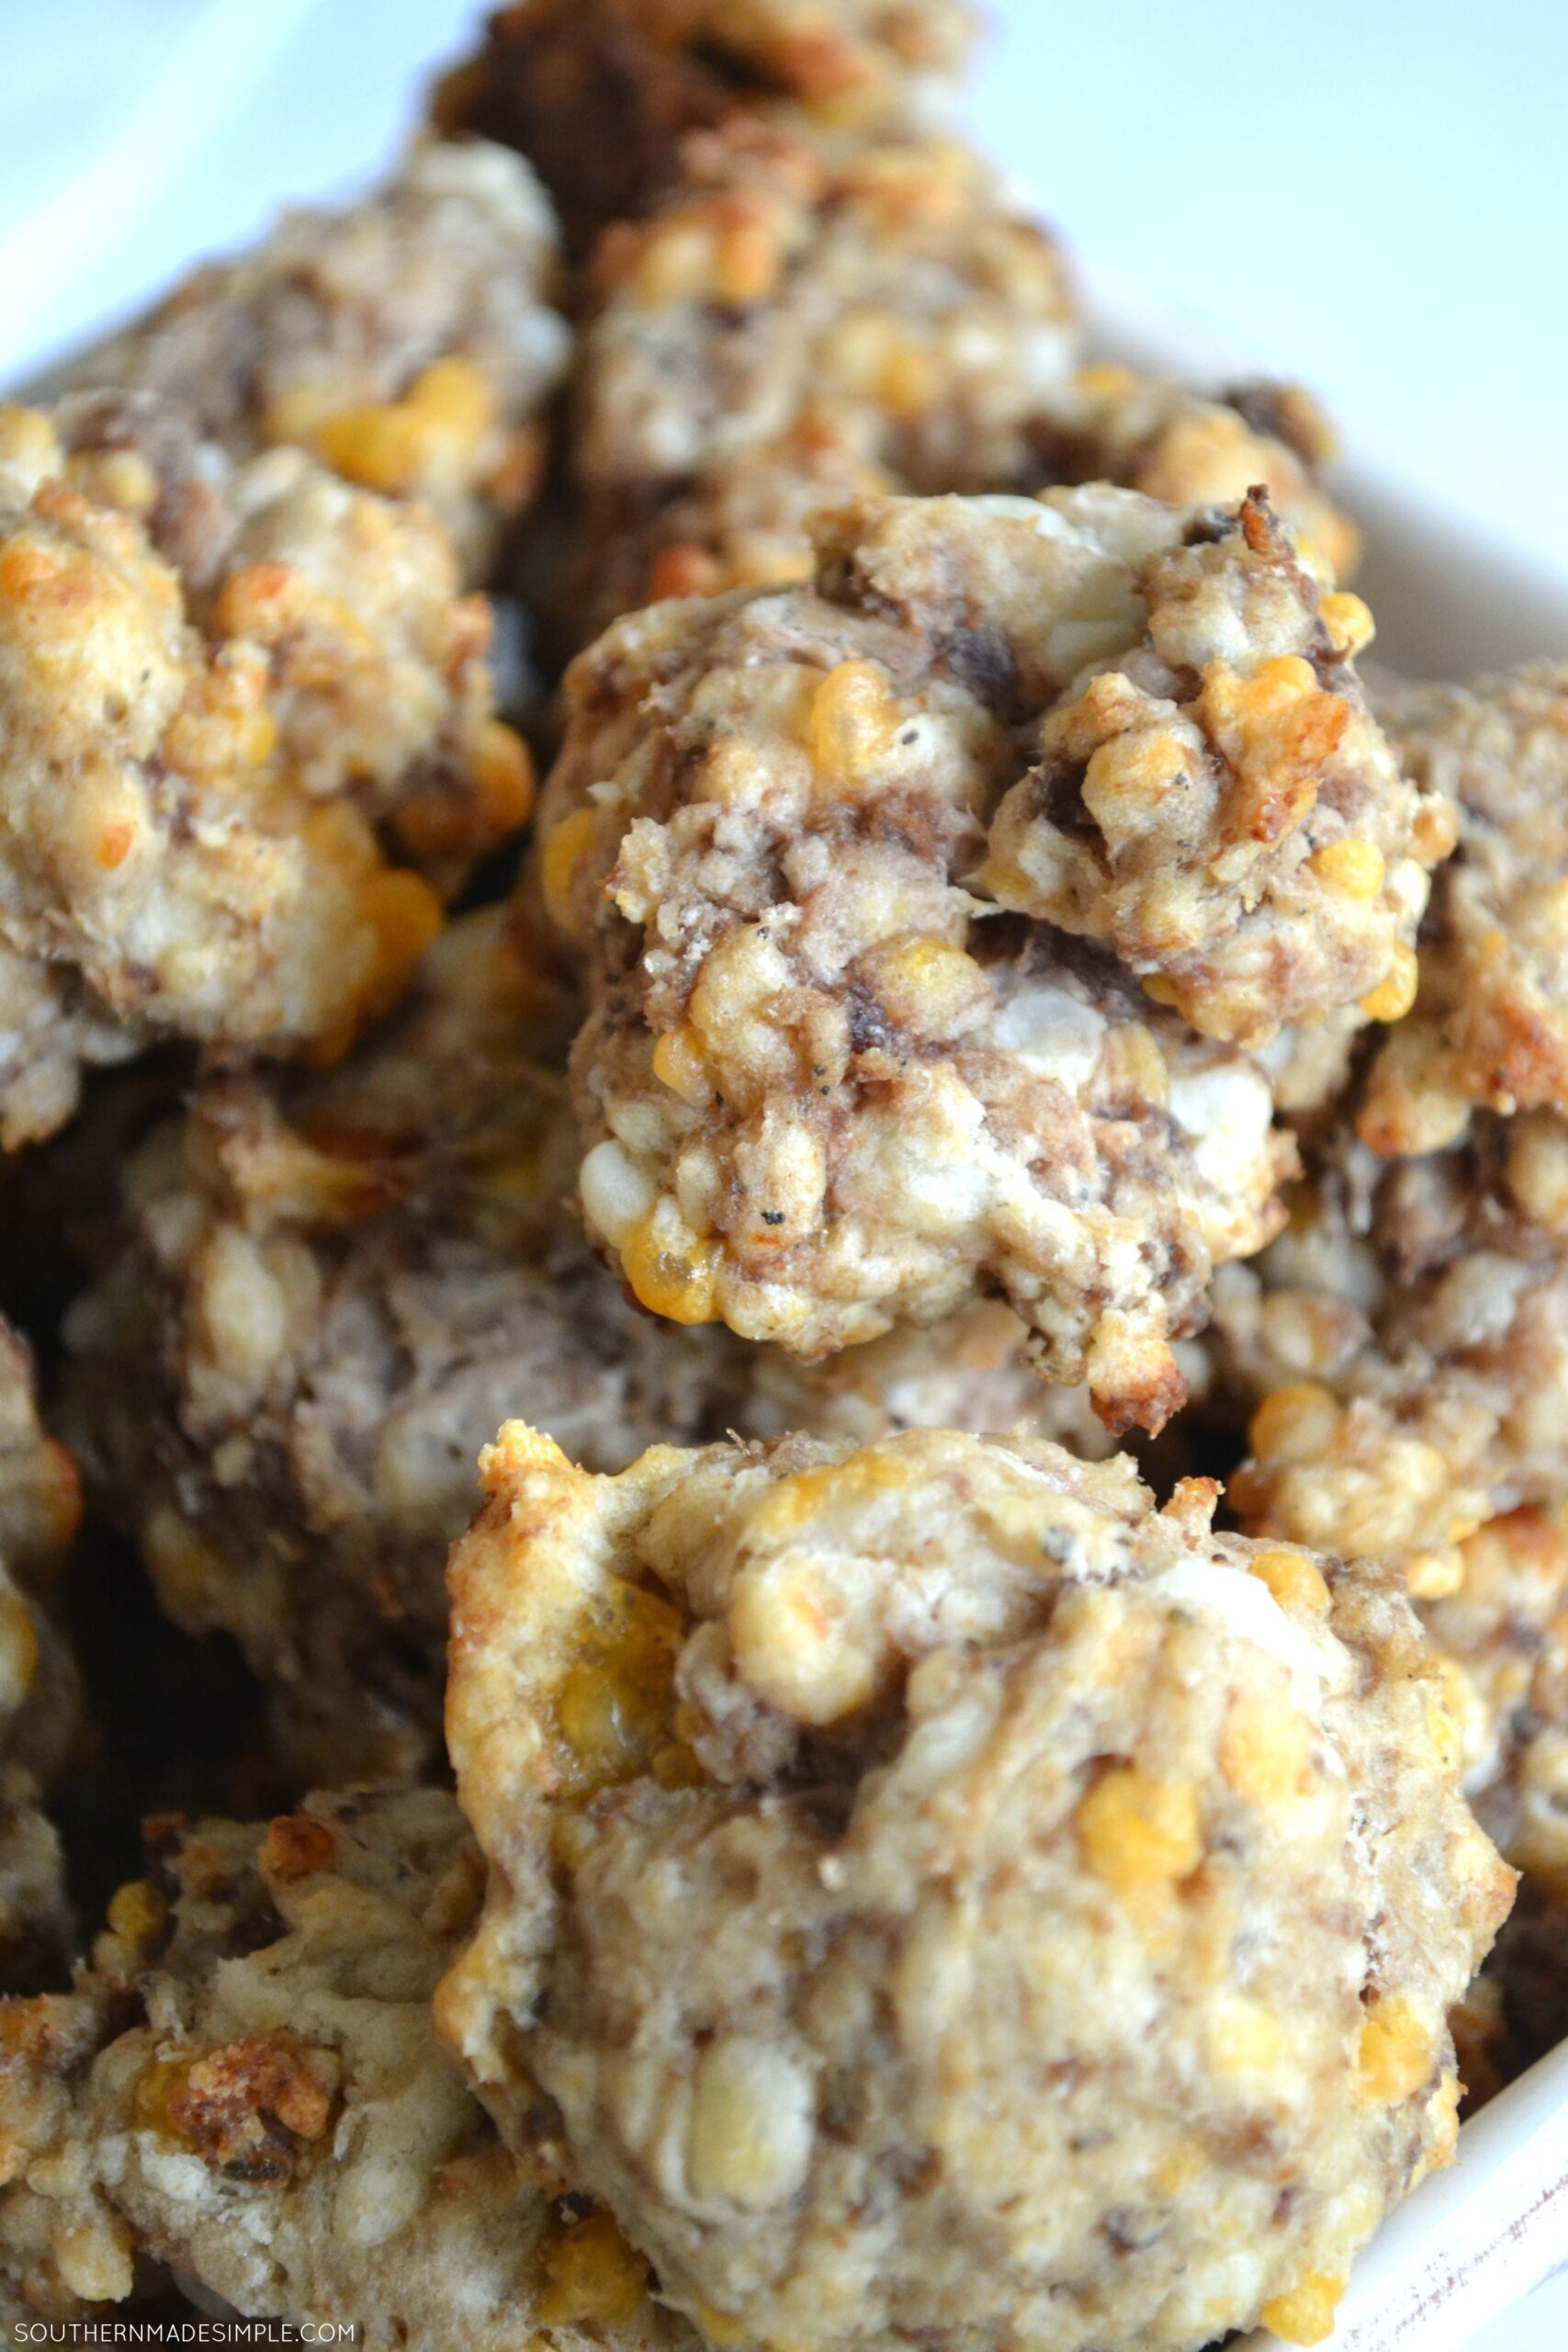
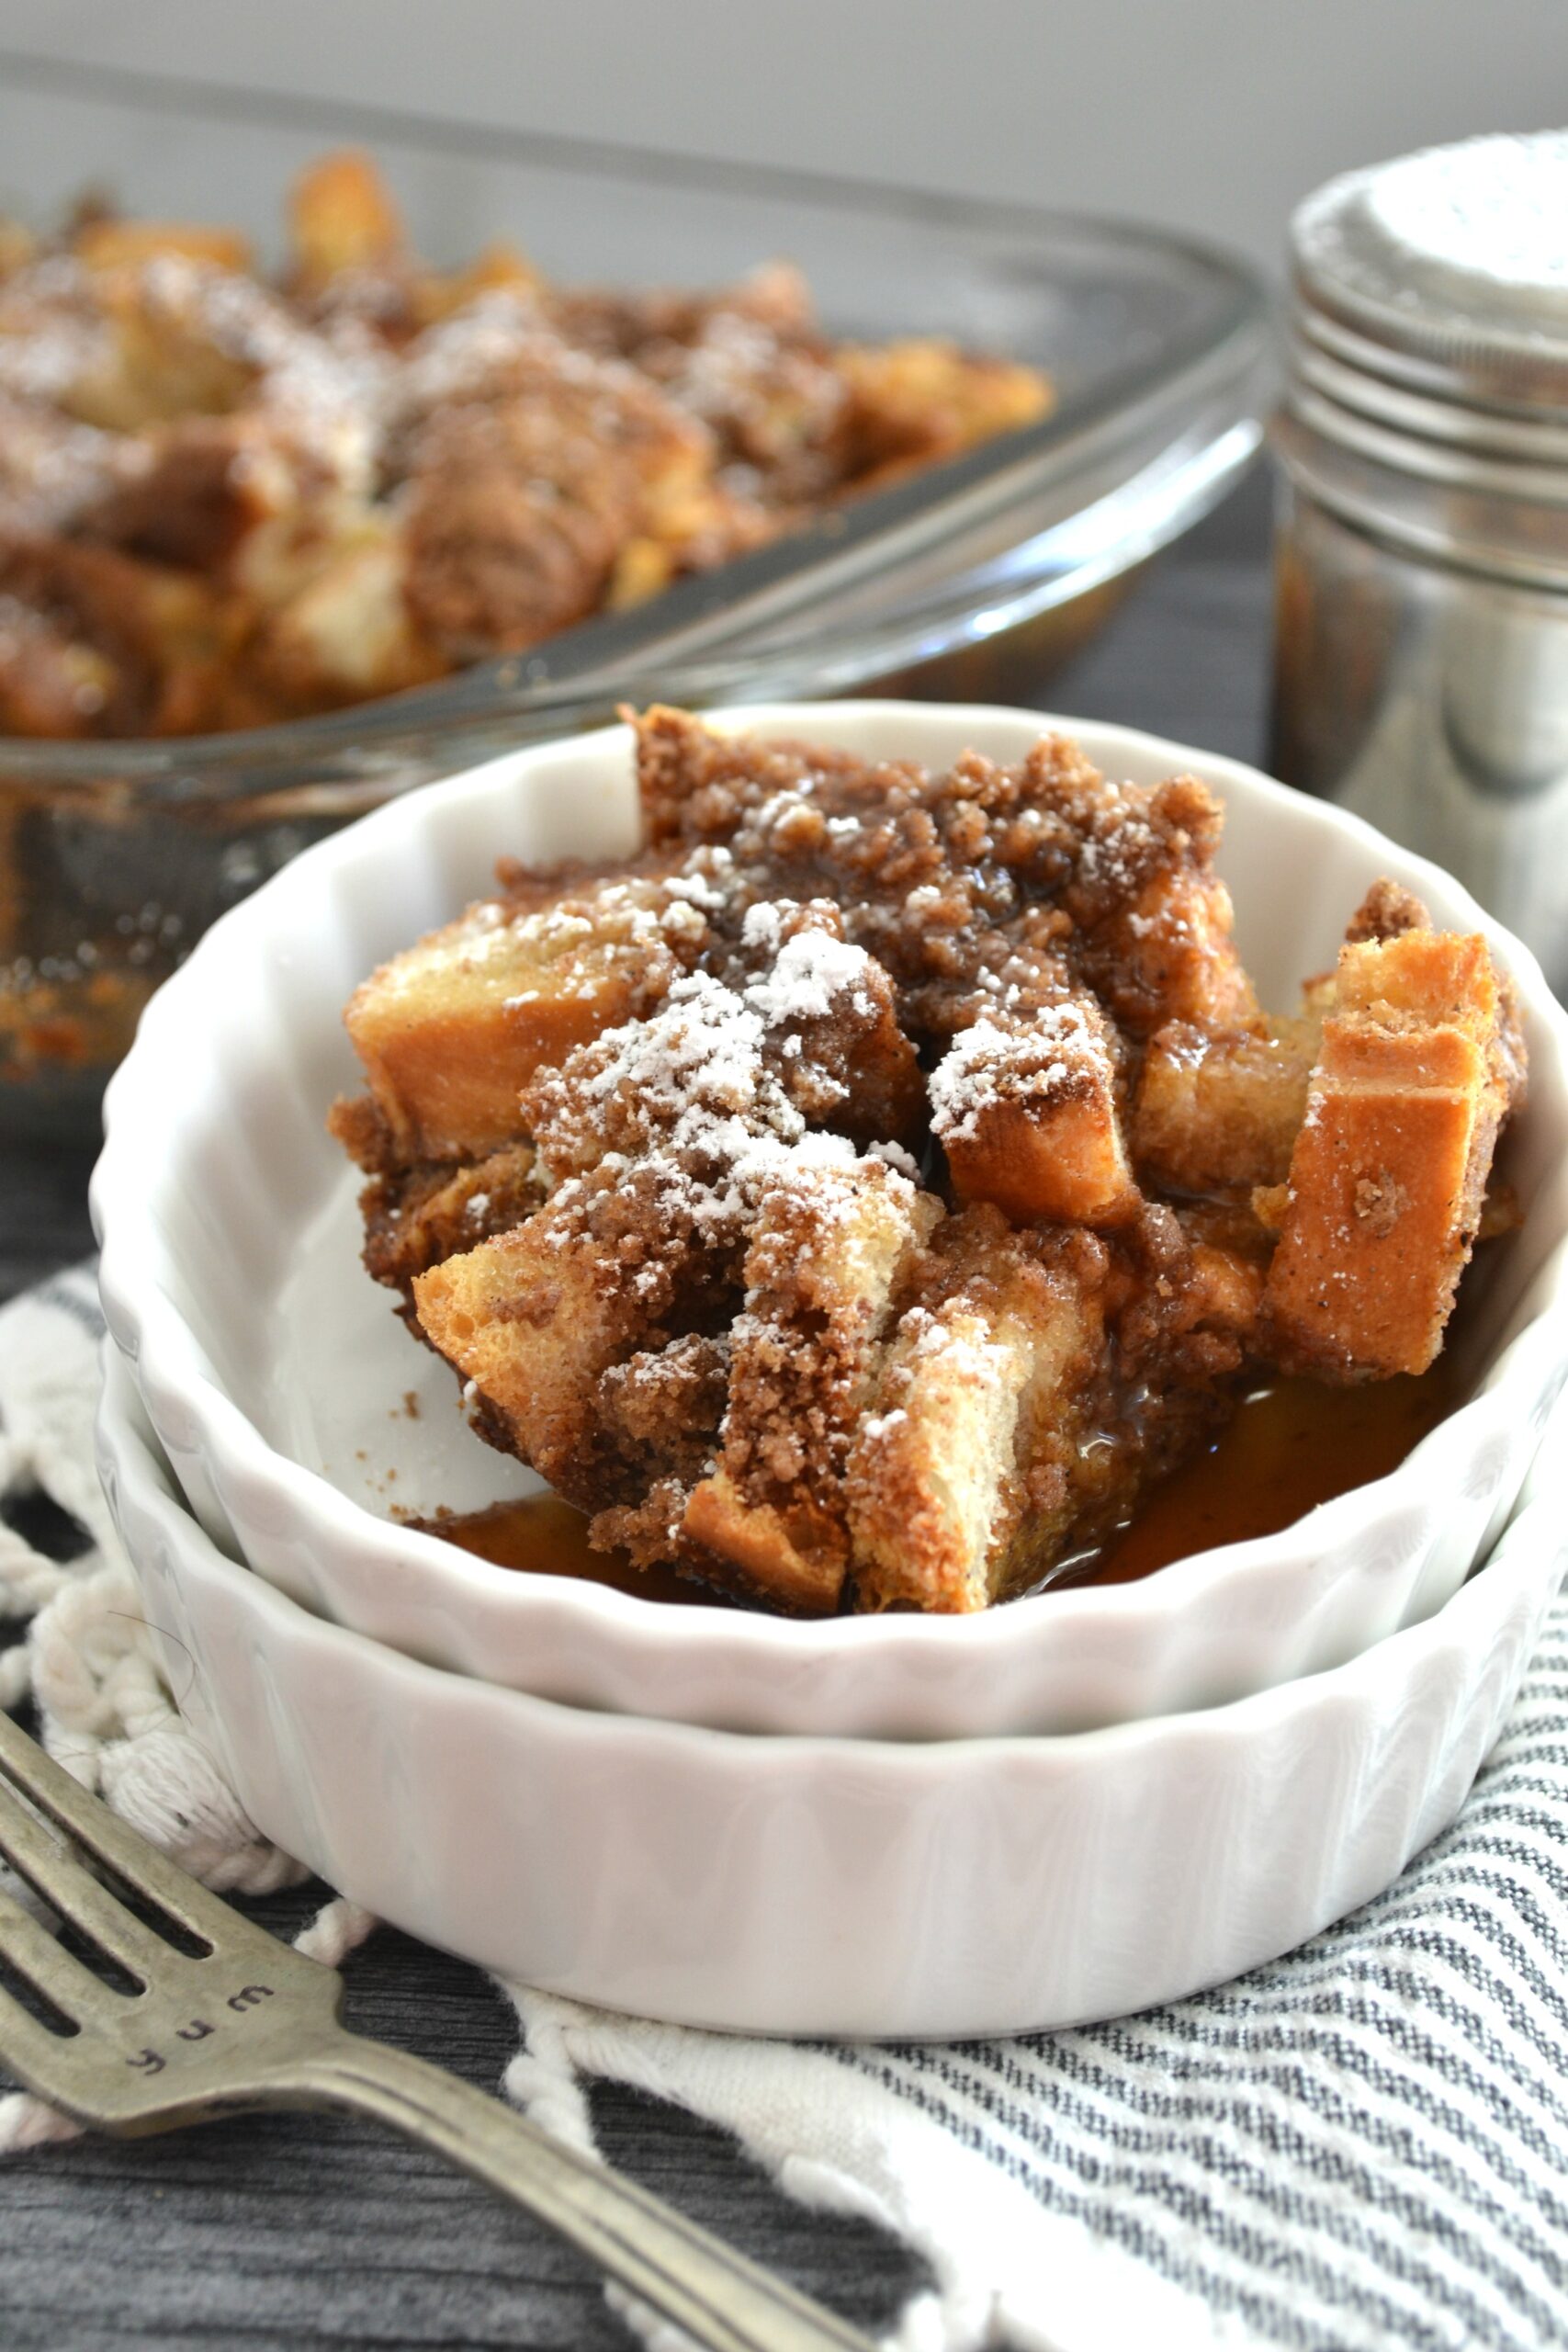
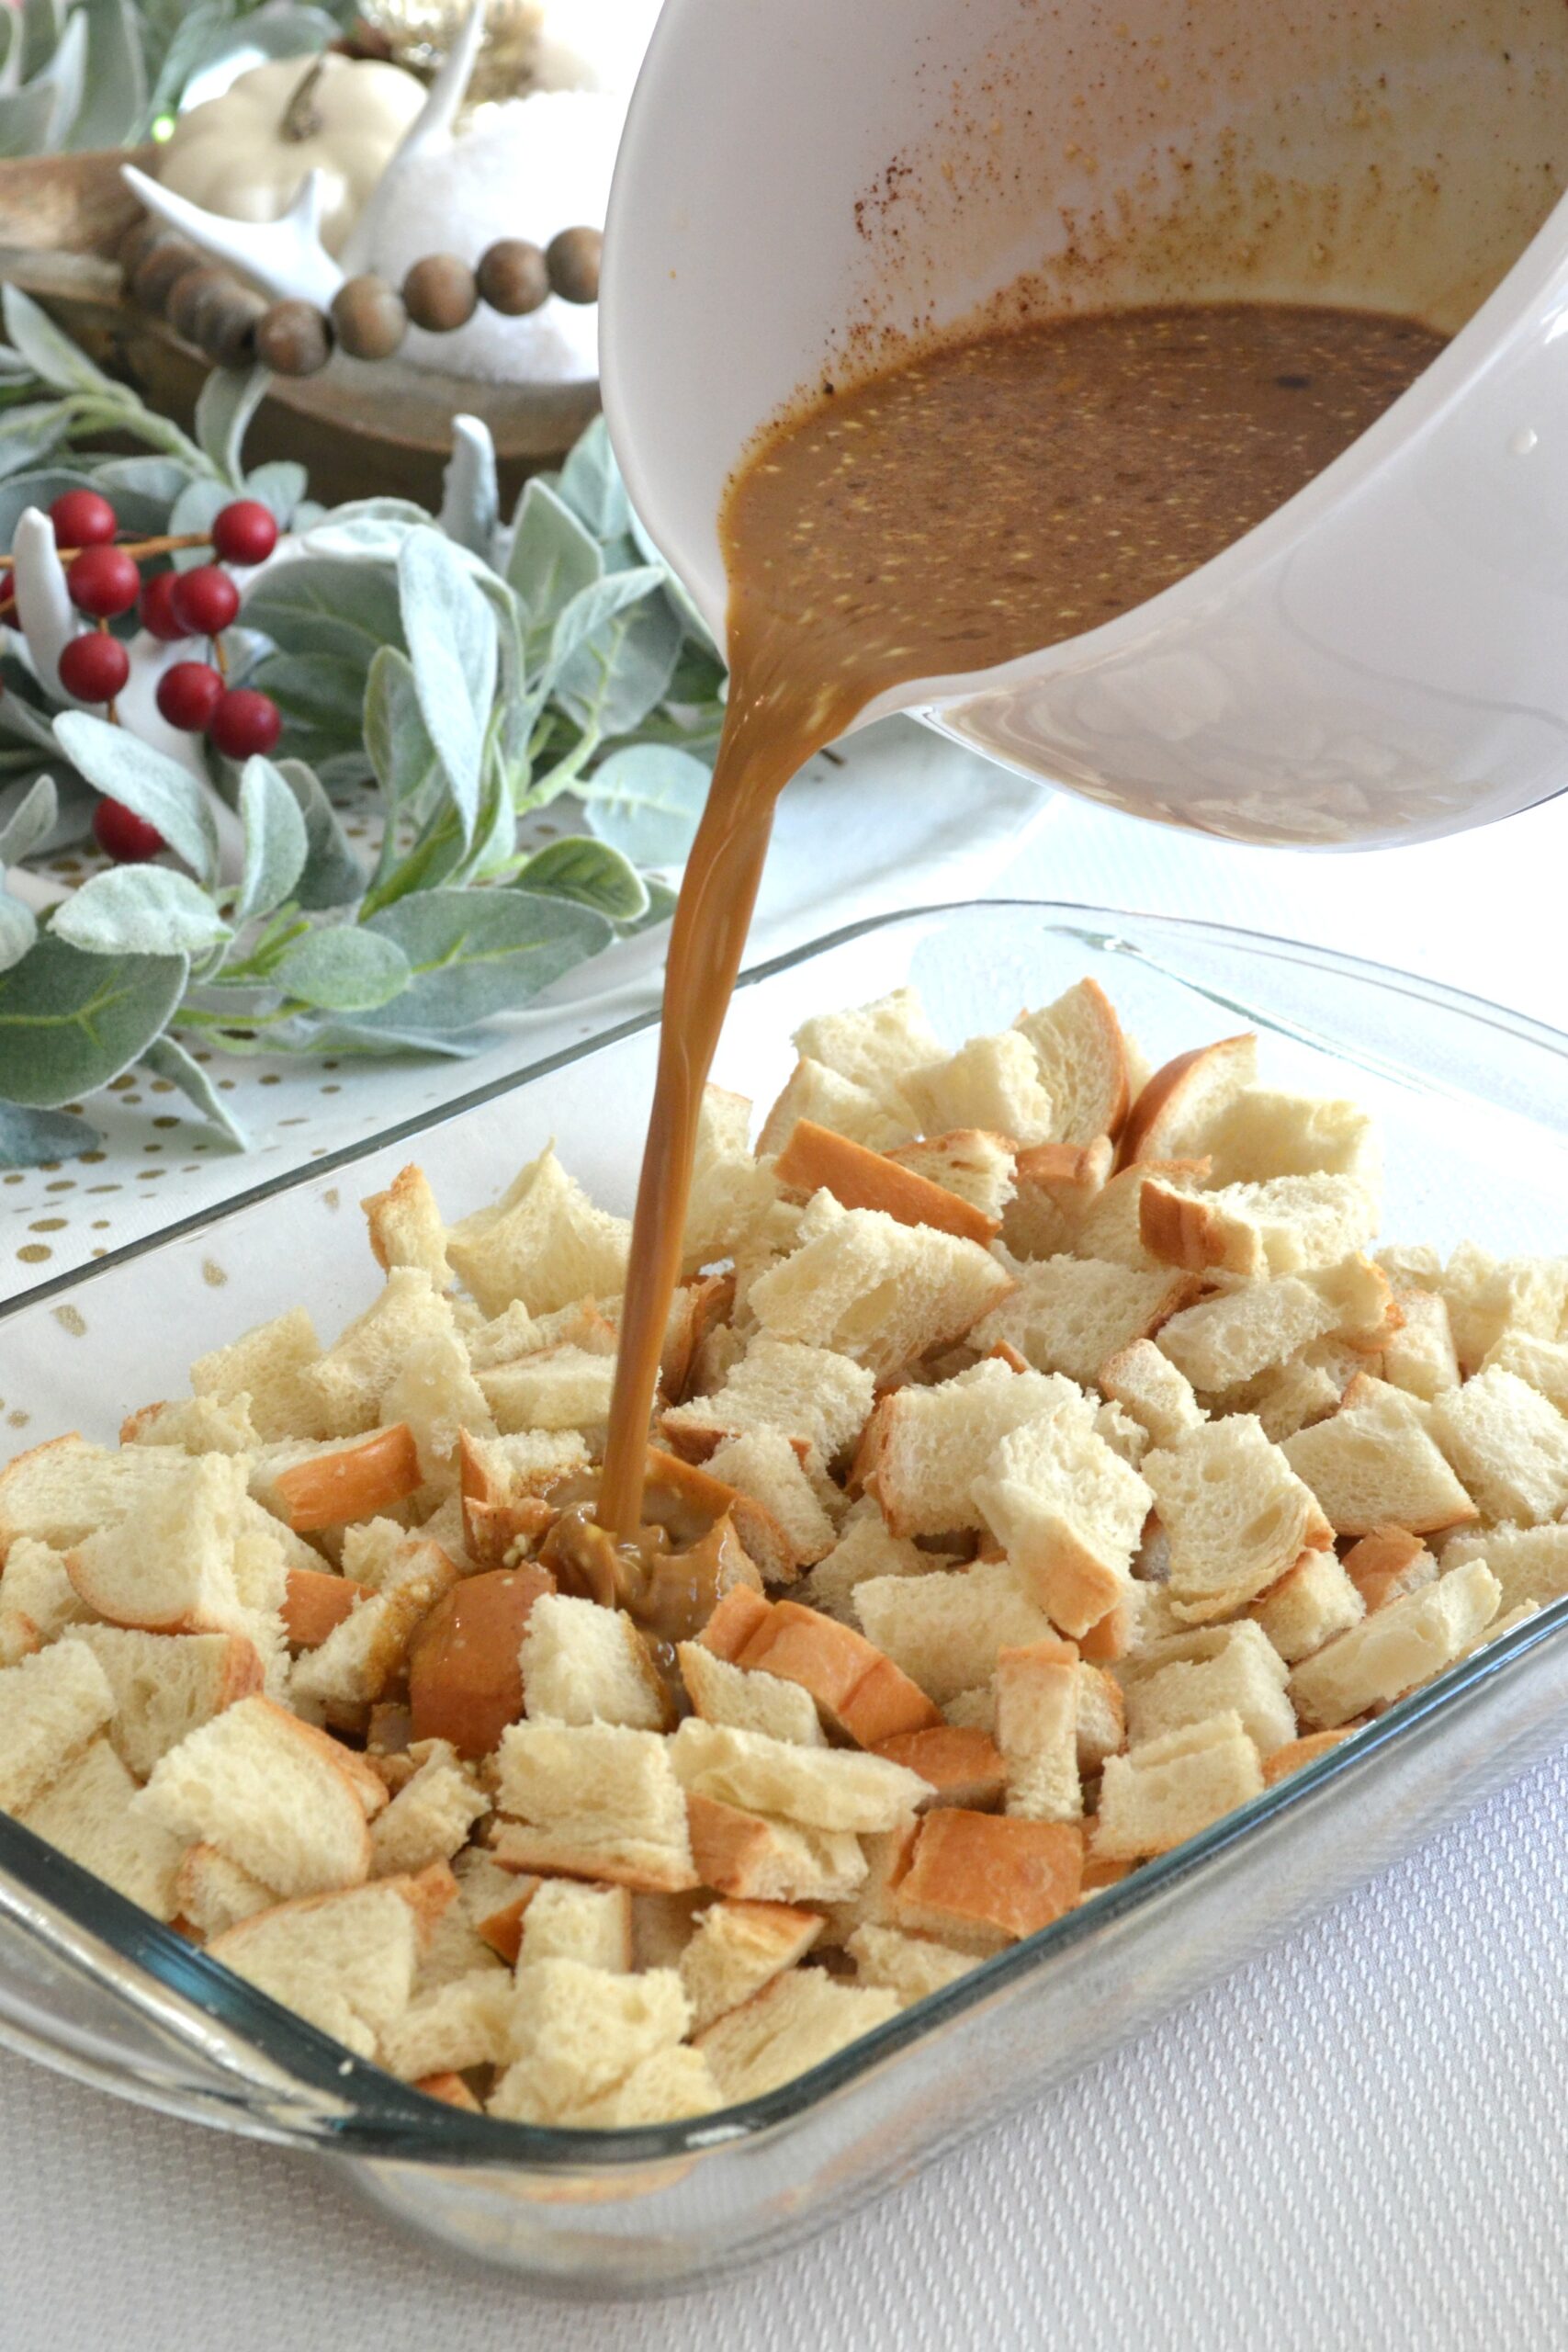
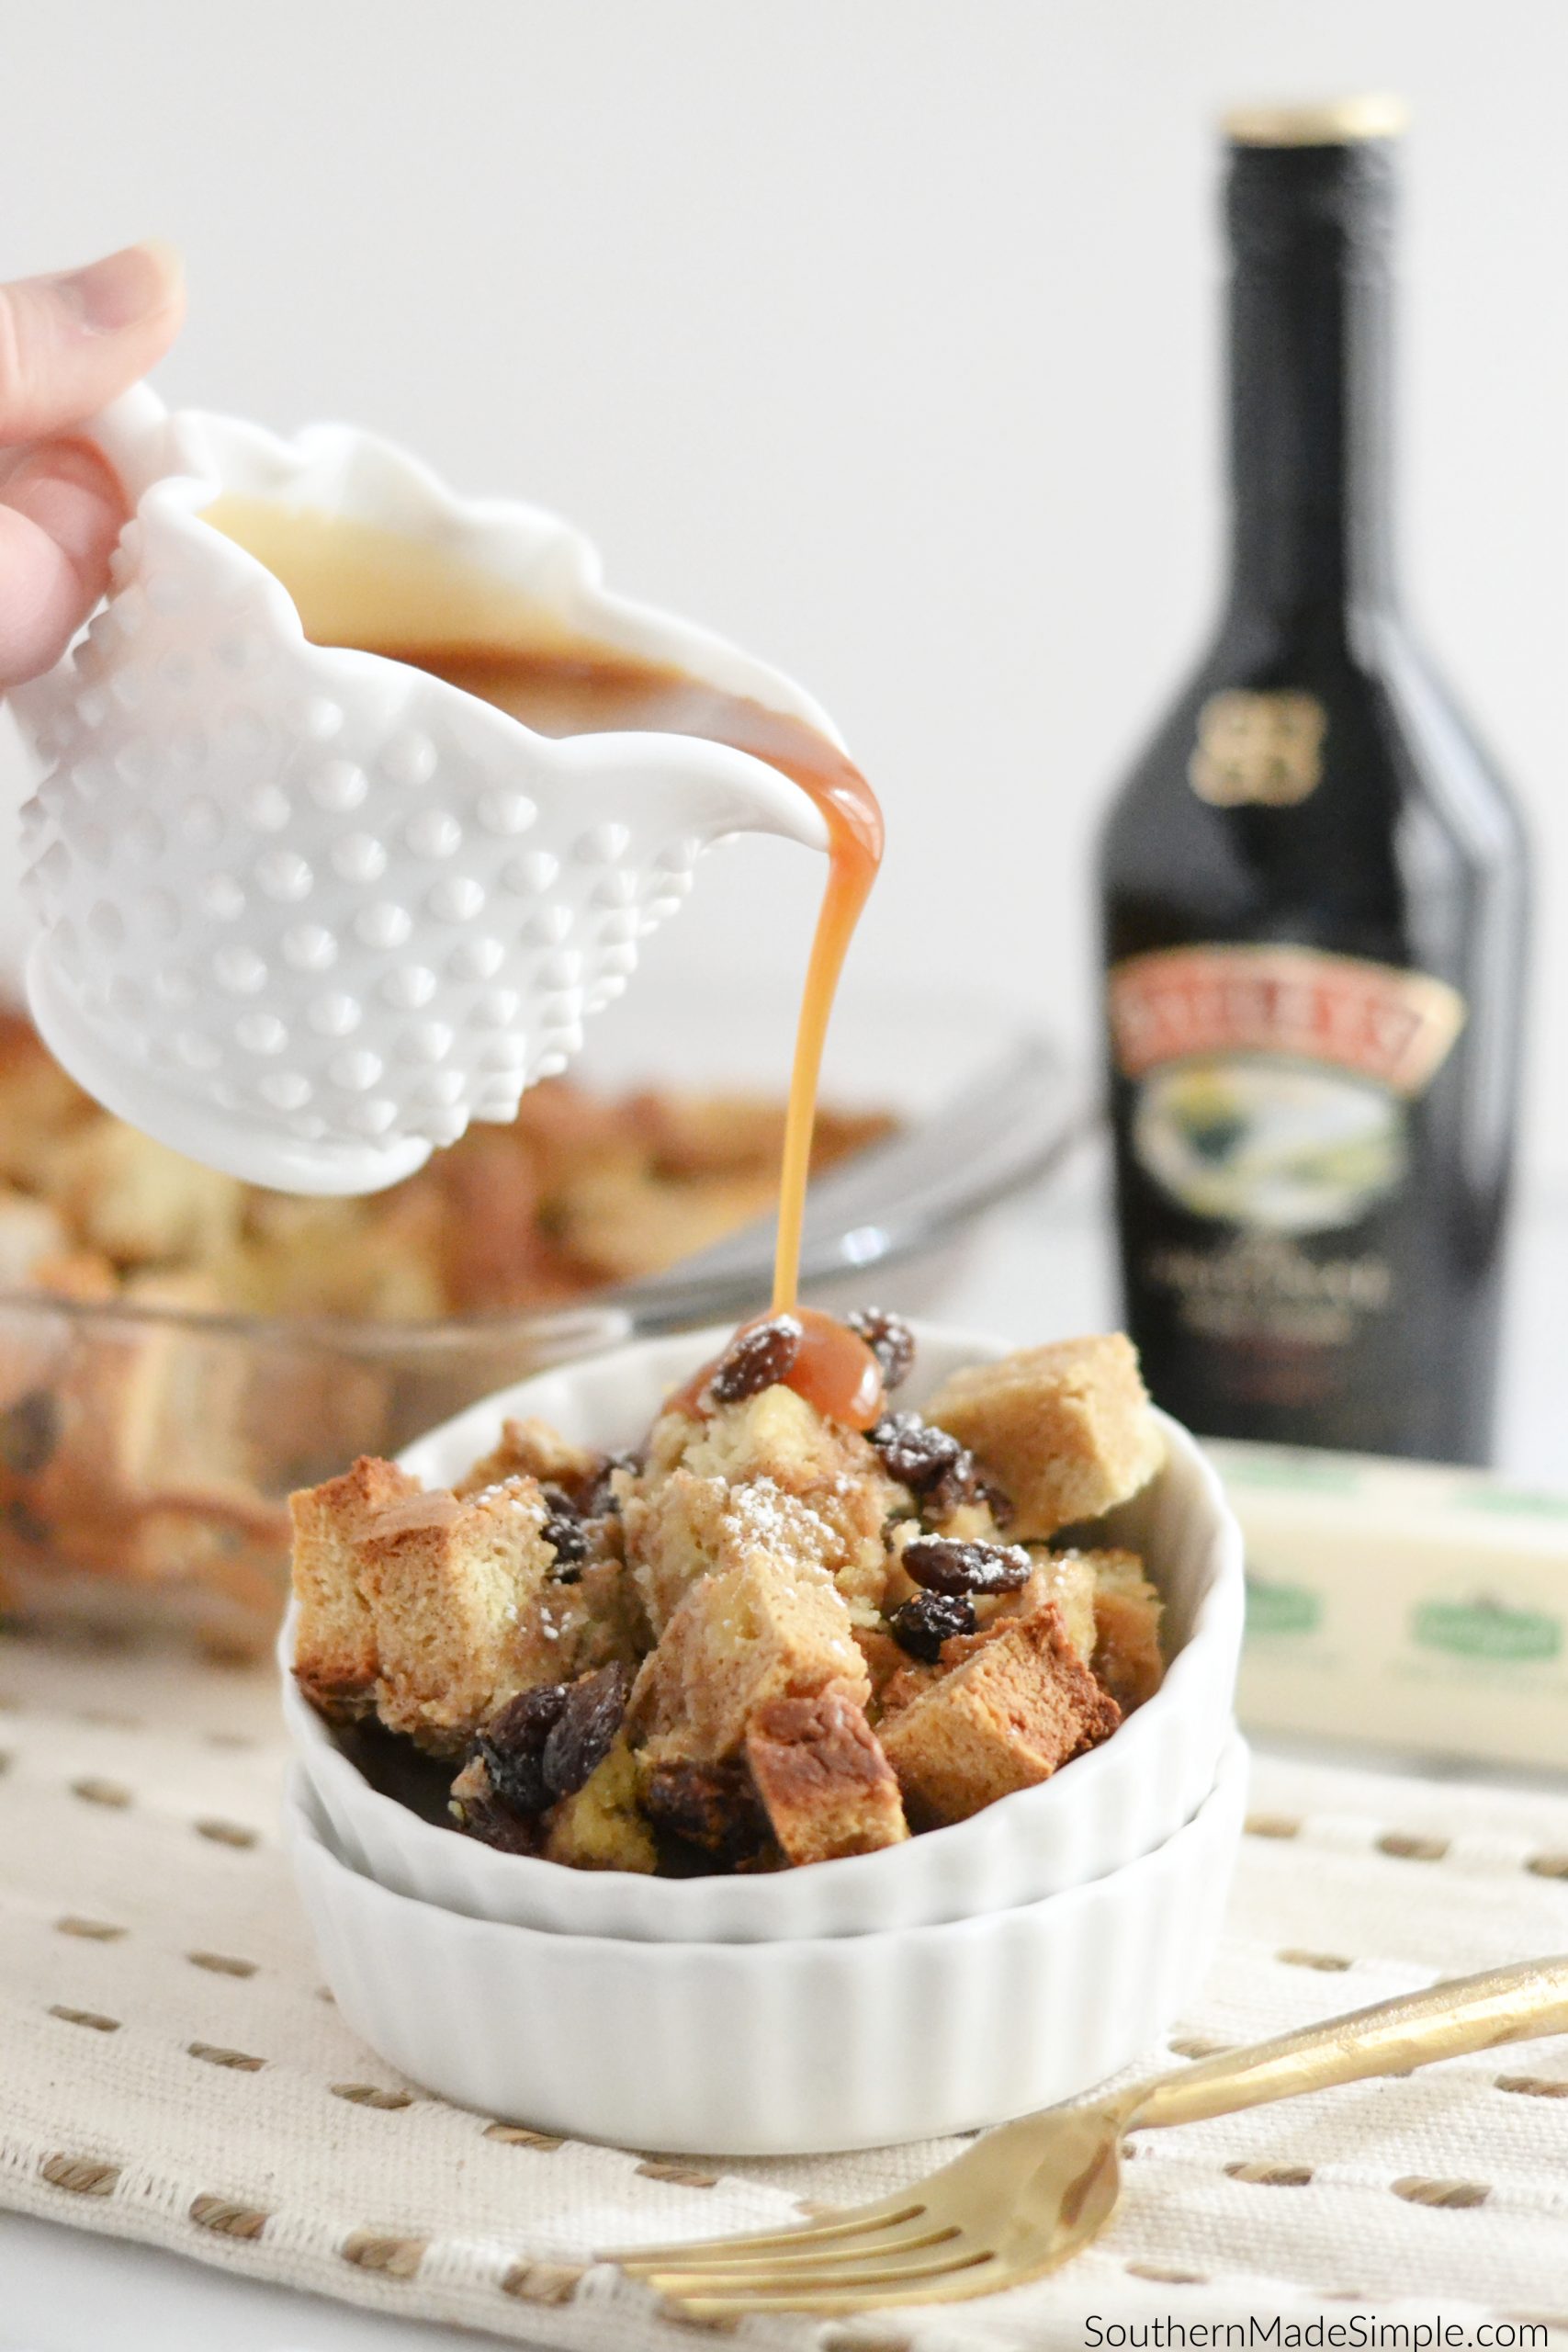
At the end of the day, I took the remaining soda bread, cubed it with a serrated knife and spread the bread cubes onto a baking sheet to lightly toast them. I whipped up a mixture of eggs, sugar, milk, plain yogurt, vanilla, cinnamon and a smidge of Bailey’s Irish Cream liqueur and poured it over the bread crumbs in a large 9×13 casserole dish and folded in a cup of raisins. I covered it and placed it in the fridge overnight to let the bread really soak up the liquid. The next morning I popped it in the oven and whipped up a homemade caramel sauce to pour over it when it came out of the oven. Making a bread pudding out of Irish Soda Bread is going to be an annual thing in our house for sure, and it’s a great way to use up day-old soda bread!


Here’s a full copy of my recipe if you’d like to give it a try:

Irish Soda Bread Pudding with Bailey's Caramel Cream Sauce
Print Recipe Pin Recipe

Irish Soda Bread Pudding with Bailey's Caramel Cream Sauce

Ingredients

For Soda Bread:

  • 4 cups all purpose flour
  • 1 tsp salt
  • 2 tsp baking soda
  • 1 3/4 cup buttermilk

For Irish Soda Bread Pudding:

  • 1 loaf Irish Soda Bread cubed
  • 1 cup raisins
  • 8 eggs
  • 1 cup milk
  • 1/4 cup Bailey's Irish Cream liqueur add more or less to taste
  • 1 cup plain yogurt
  • 1/2 cup white sugar
  • 1 tsp vanilla
  • 1 tsp cinnamon

For Bailey's Caramel Sauce:

  • 1 cup white sugar
  • 1/2 cup water
  • 5 Tbs Salted Irish Butter I use Kerrygold brand
  • 3/4 cup heavy whipping cream
  • 1/4 tsp vanilla
  • 2 Tbs Bailey's Irish Cream Liqueur more or less to taste

Instructions

For Irish Soda Bread:

  • Preheat oven to 425 F
  • Grease a round 9 inch cake pan and set aside
  • In a large mixing bowl, combine dry ingredients
  • Create a well in the center of the flour mixture and pour buttermilk into center
  • Using a rubber spatula, gently fold the flour mixture into the wet center in a circular motion, making sure to stir until ingredients are just combined. Be careful not to overwork the dough.
  • On a well floured surface, turn out dough and gently work it into an even round shape about 8 inches in diameter. I like to pat a little extra flour on top of mine, but that's optional.
  • Place dough in greased pan and make a cross using a knife in the top of the dough. Place another 9 inch round cake pan on top
  • Bake for 25 minutes, then remove top pan and continue to bake for an additional 10 minutes, or until a nice golden crust forms.

For Irish Soda Bread Pudding

  • Preheat oven to 300 F
  • Cube soda bread and place bread cubes on baking sheet
  • Lightly toast for 15-20 minutes
  • While bread is toasting, pour 1 cup of raisings into a bowl of warm water to rehydrate them
  • Pour toasted bread cubes into greased 9x13 casserole dish
  • In a large bowl, combine eggs, milk, yogurt, sugar, vanilla cinnamon and Irish cream liqueur
  • Drain water off of raising and toss them into the casserole dish with the bread cubes
  • Pour egg mixture over bread cubes, trying to make sure each cube of bread is covered with some of the mixture
  • For best results, cover and refrigerate overnight to allow the bread to really soak up the liquid. If time does not permit, you can go ahead and bake now.
  • Preheat oven to 350 F
  • Uncover dish and bake for 40-45 minutes
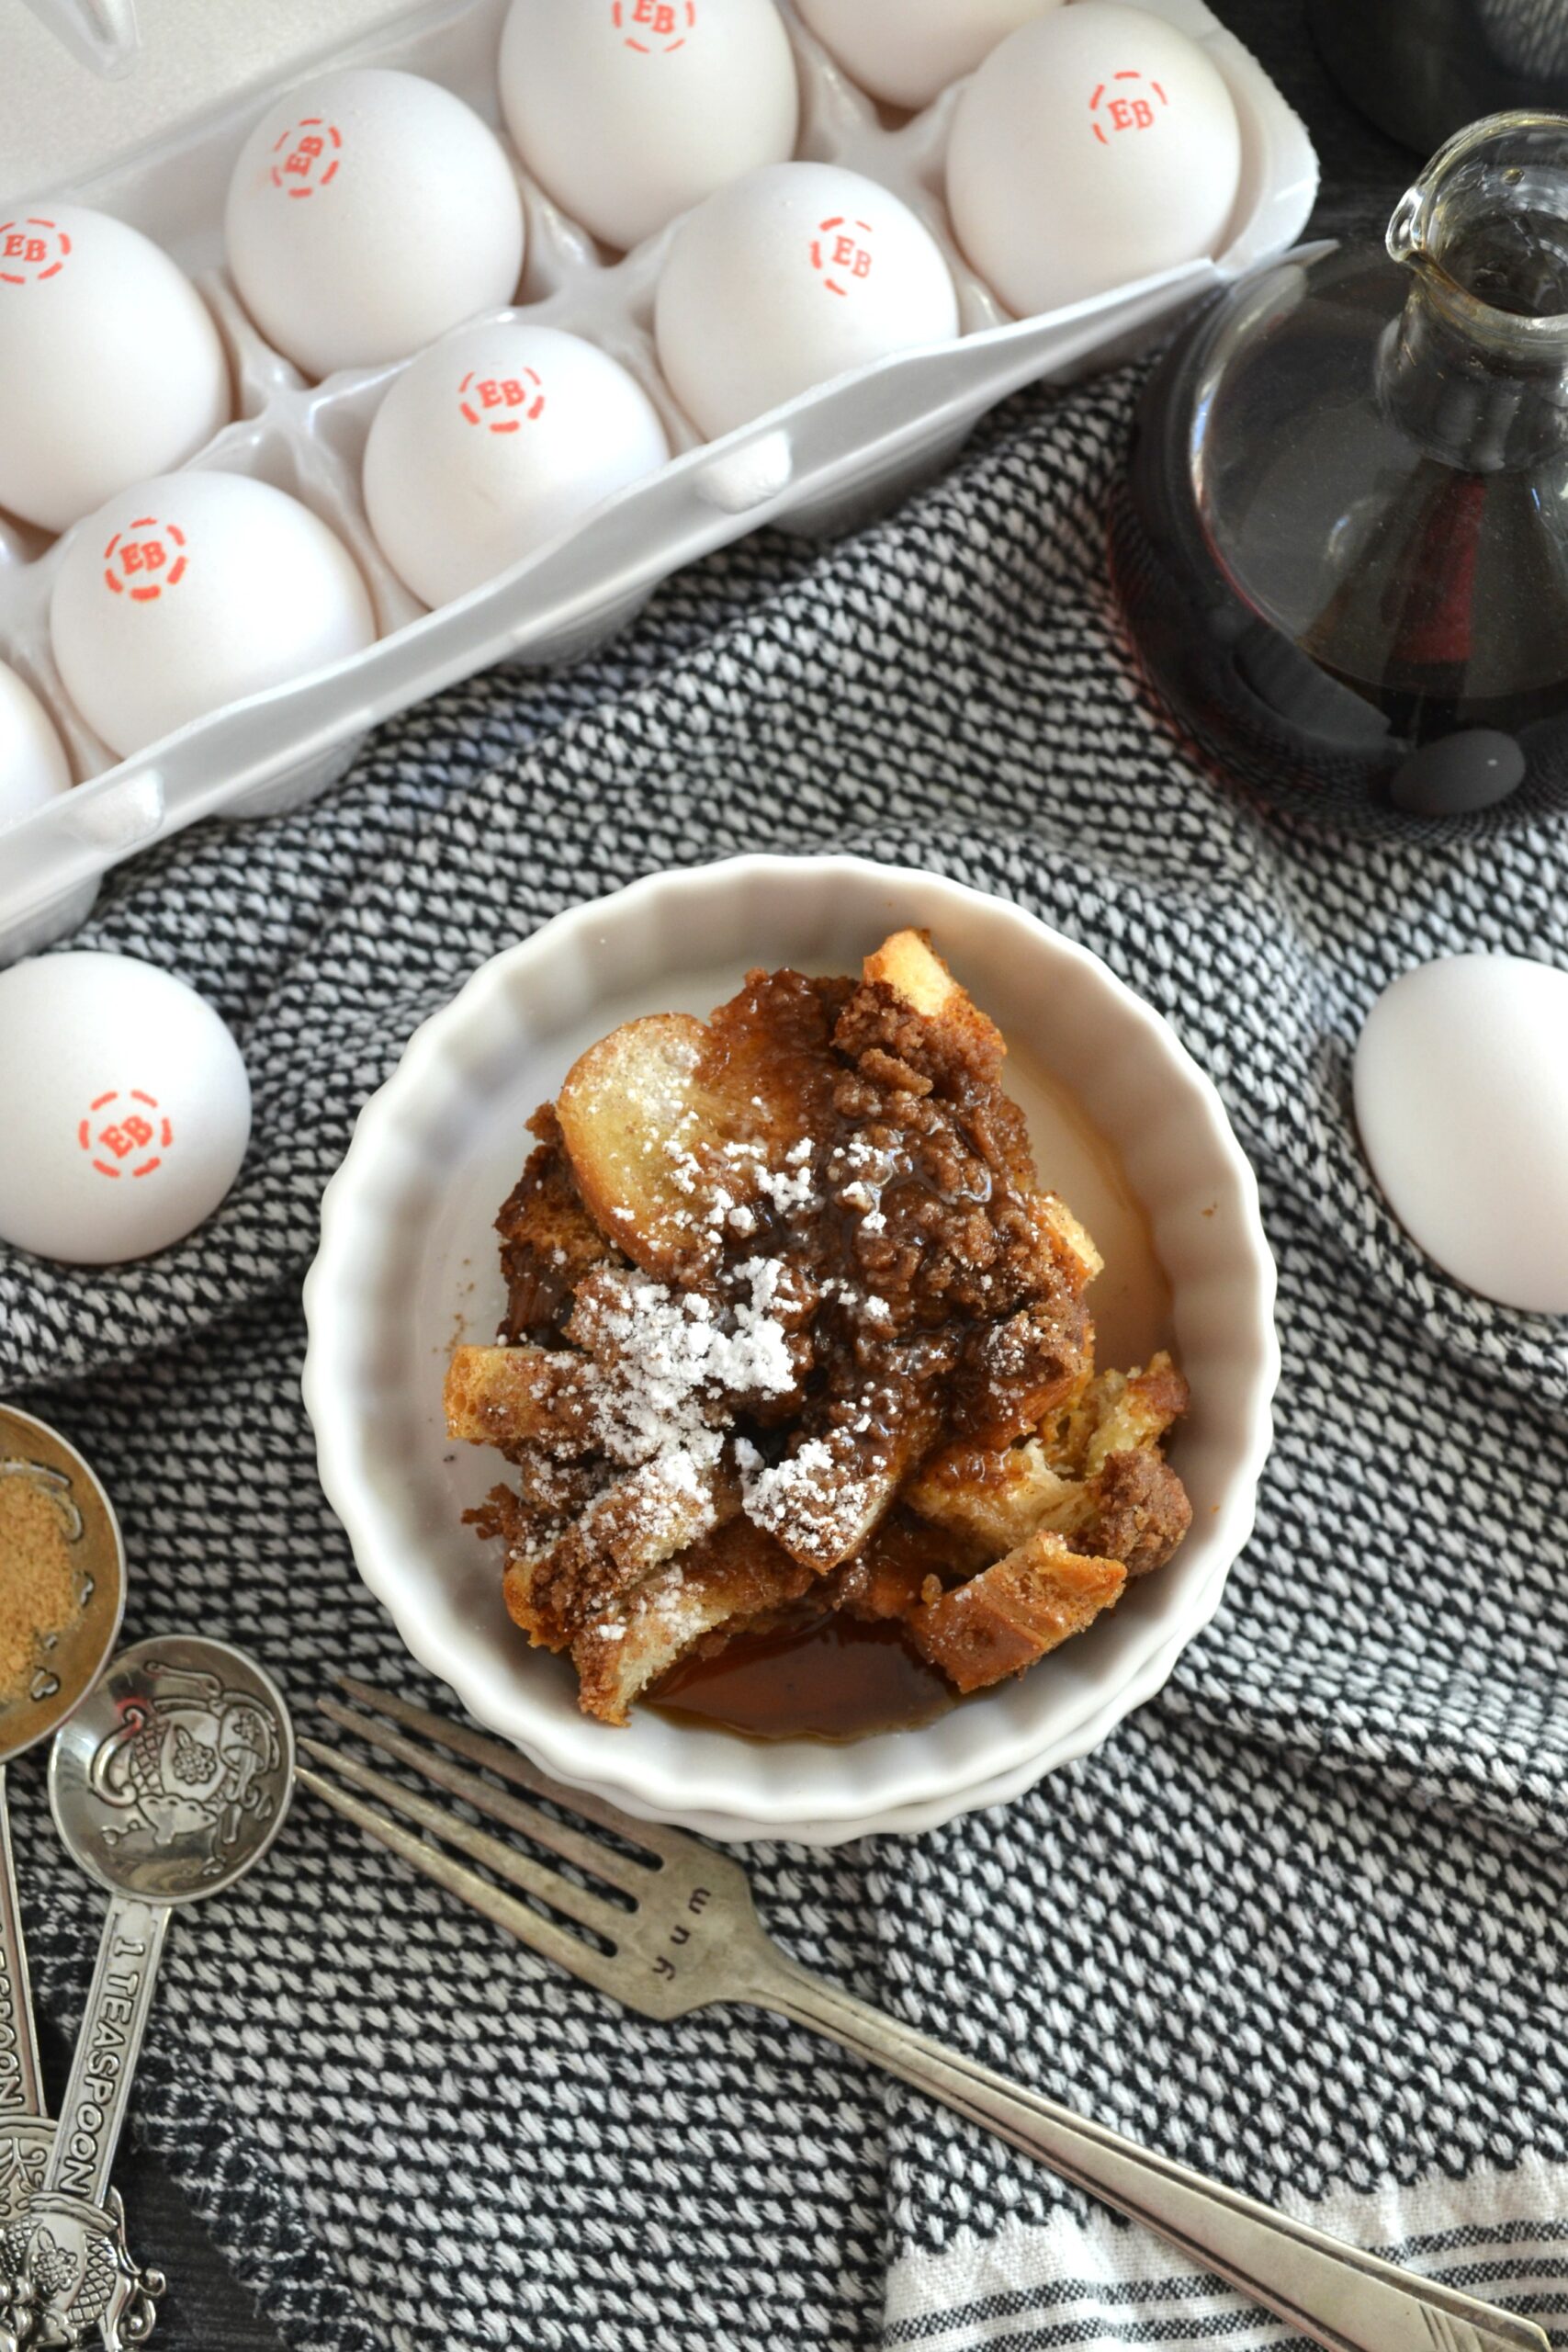
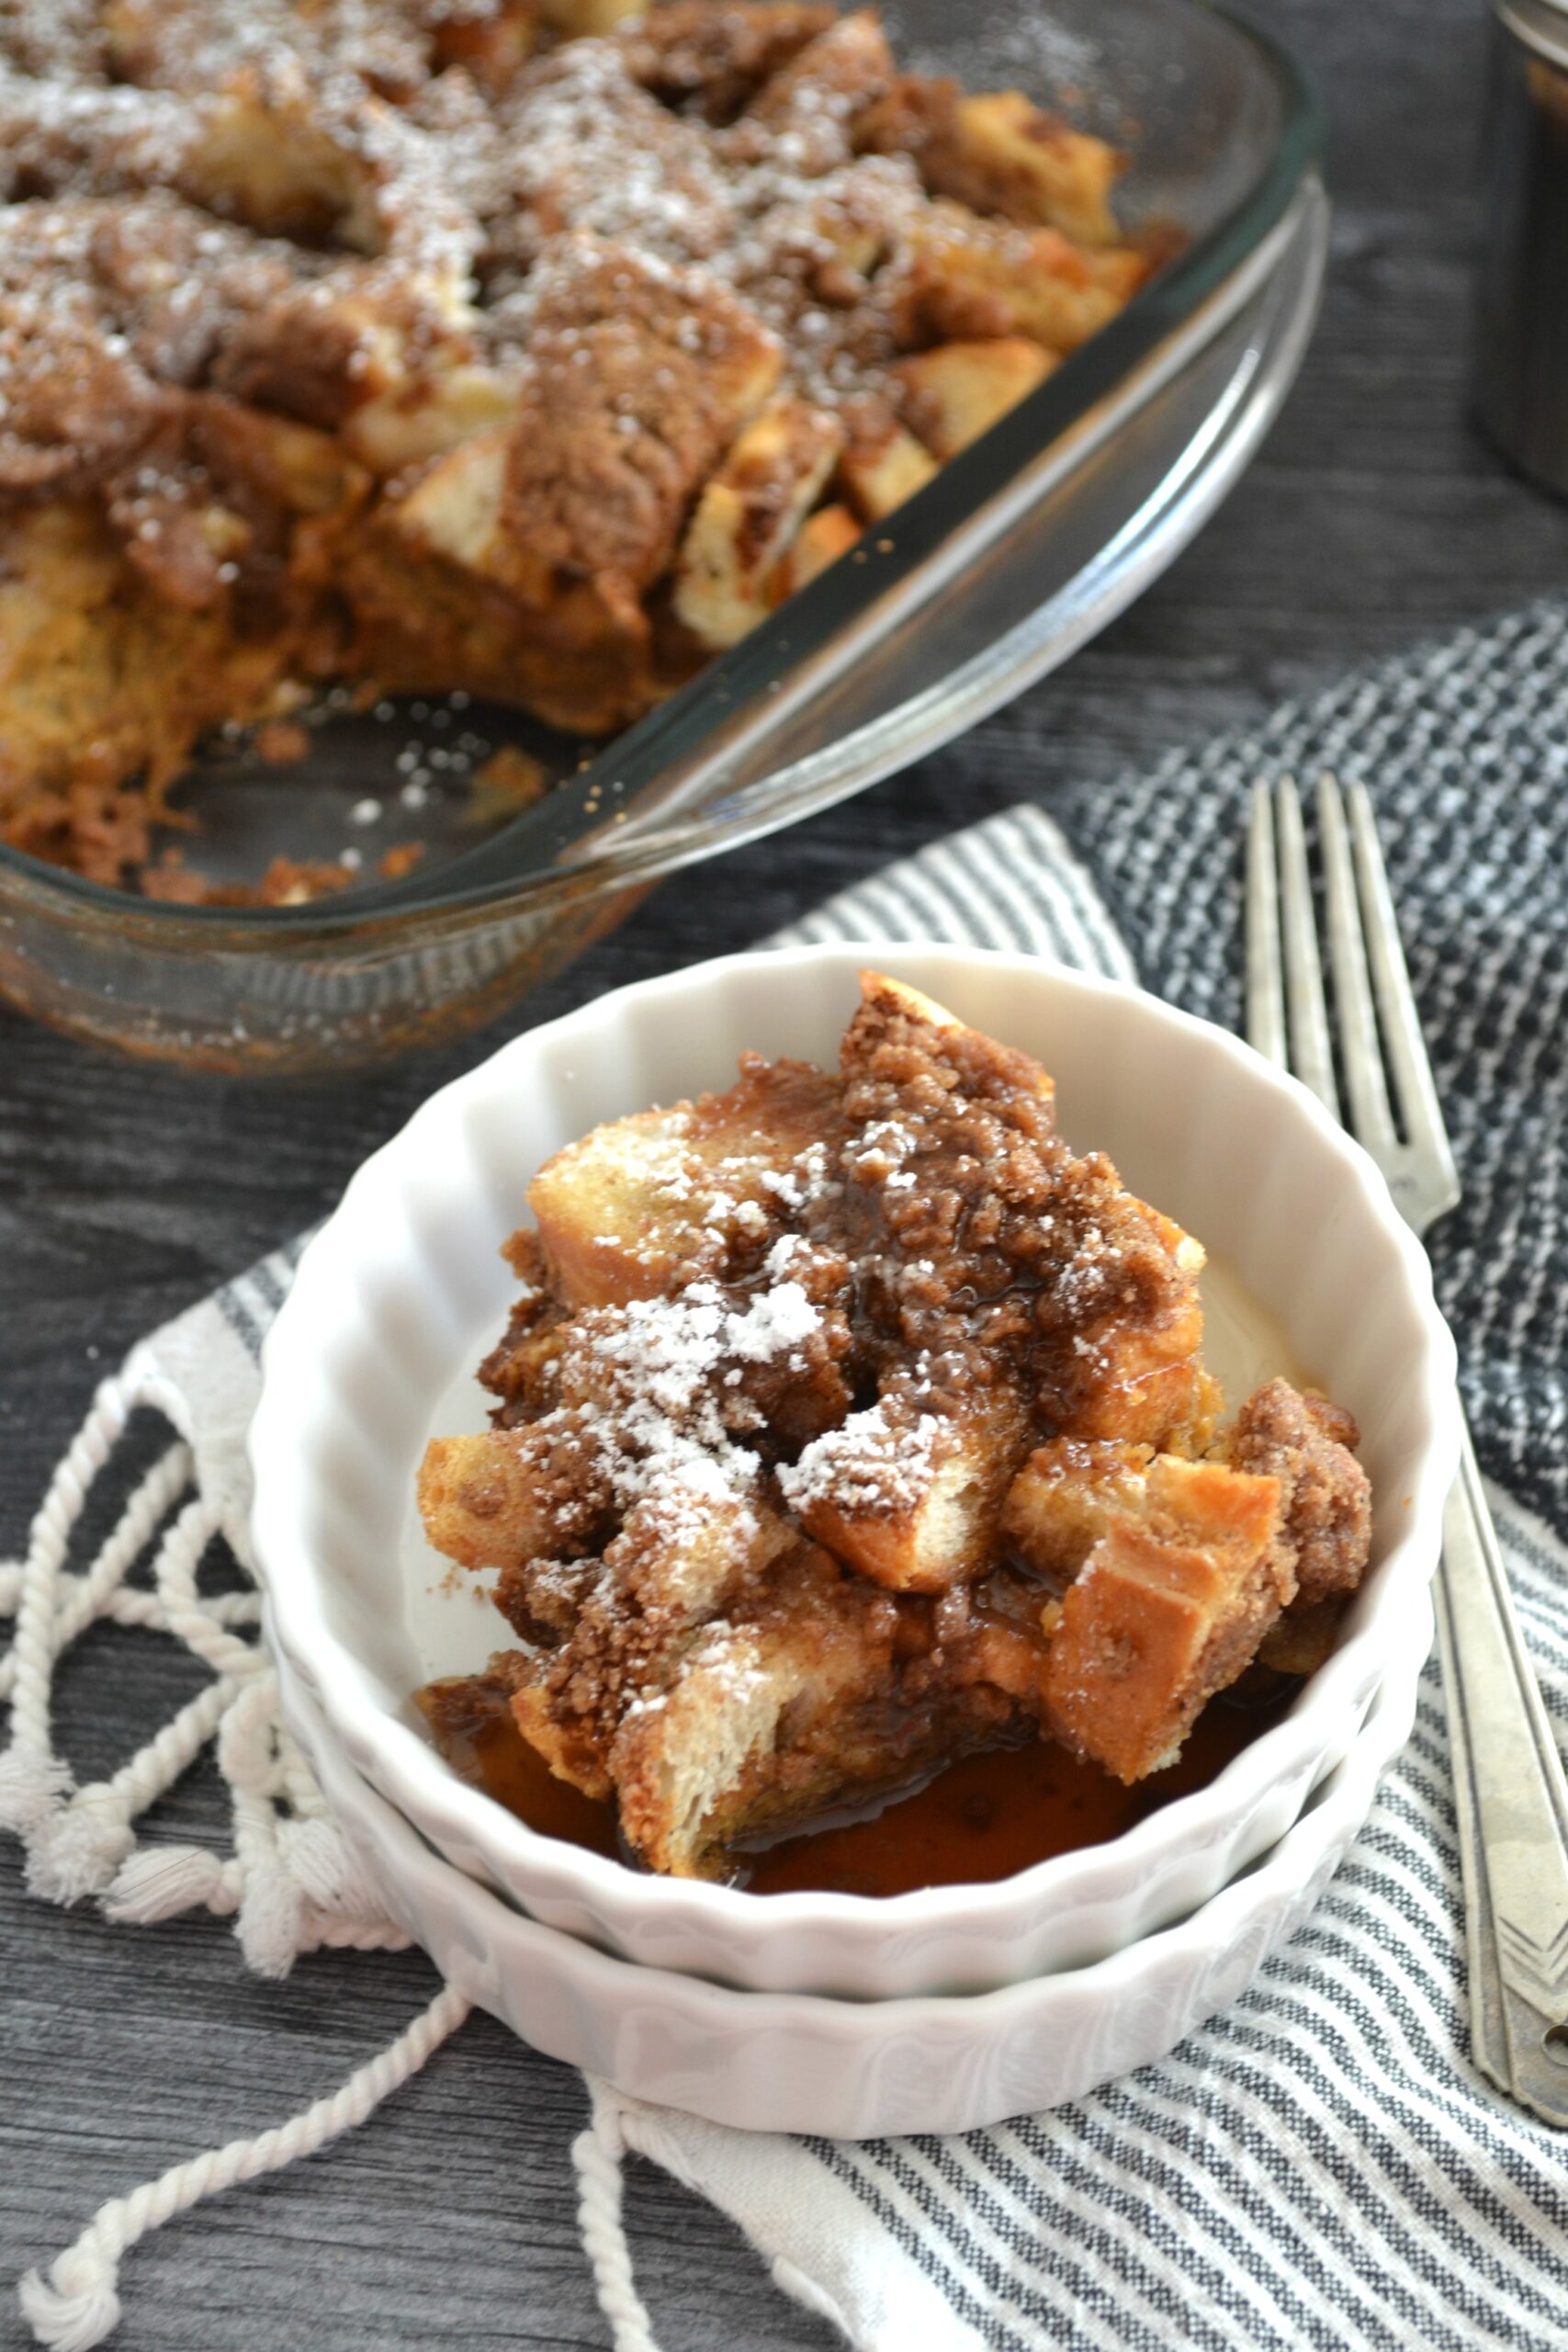
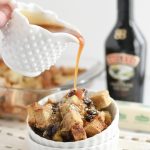
  • Serve with hot Bailey's Caramel Cream Sauce and enjoy!

Bailey's Caramel Cream Sauce:

  • Add 1/2 cup water to small saucepan and bring to a boil
  • Whisk sugar into boiling water and bring up to a rapid boil
  • Reduce heat to medium-low and cover with a lid. Allow to boil for 6-8 minutes, or until sugar and water begin to turn an amber brown color.
  • Gently add in cubed butter, making sure not to splatter the mixture onto your hands. Whisk vigorously as the mixture will begin to bubble quickly
  • Slowly add in the heavy whipping cream and whisk until foaming mostly subsides
  • Add in vanilla and liqueur. Bring mixture back to a boil just to thicken, then remove completely from heat and allow to cool slightly before serving.
  • Pour over Irish Soda Bread Pudding and store remaining in a jar and keep refrigerated. Enjoy!

Tried this recipe?

Tag me on Instagram: @SouthernMadeSimple or use the hashtag #SouthernMadeSimple and share your love of southern cuisine!

The caramel sauce will keep in a fridge for a few weeks, and in my eyes it’s basically the equivalent of liquid gold. It’s the star of this Irish Soda Bread Pudding, and I can assure you it’ll be good on just about anything. I only added a small amount of liqueur to mine, but you can certainly add more if that’s your thing! 

Irish Soda Bread Pudding with Bailey's Caramel Cream Sauce

If you like this recipe for Irish Soda Bread Pudding with Bailey’s Caramel Cream Sauce, be sure to check out these other fun recipes for St. Patrick’s Day right here on Southern Made Simple!

Irish Soda Bread |Shamrock Sugar Cookies | St. Patrick’s Day Sugar Wafers | St. Patrick’s Day Snack Crafts for Kids


Filed Under: Breakfast, Home Cookin' Tagged With: Bailey's Caramel Sauce, Irish soda bread, Irish Soda Bread Pudding, Soda Bread pudding

Strawberry Brownies

January 30, 2021 by Laura Tucker 6 Comments

These Strawberry Brownies are a sweet treat that I’ve had tucked away in my old recipe binder for nearly a decade. They’re a Valentine’s Day favorite around here, and they come together with just a few ingredients! They’re actually one of the very first recipes that I ever shared on this blog back in 2015, and now I’m bringing them back to life with a few new photos to share with you just in time to make your Valentine’s Day extra sweet!

Strawberry Brownies

Years ago before I had children, I taught Sunday school for a few years. The kids in my class would always request that I bring a plate full of these strawberry brownies, even though it wasn’t anywhere close to Valentine’s Day. I always kept a couple of boxes of Strawberry cake mix on hand so I could whip them up on the fly before Sunday School to surprise them with their favorite special treat. I’m always amazed at the wonders you can do with a simple box of cake mix. Next to sliced bread, I think they’re one of my favorite culinary conveniences!

Strawberry Brownies

The glaze on the brownies is the star of the show, and it’s poured over the baked brownies while they’re still hot right out of the oven. The brownies will soak up a good bit of the glaze, giving them a gooey and dense middle layer that is absolutely irresistible!

Strawberry Brownies

Here’s a free printable copy of the recipe if you’d like to give it a try!

Strawberry Brownies
Print Recipe Pin Recipe

Strawberry Brownies

Ingredients

For Strawberry Brownie Mix:

  • 1 box strawberry cake mix
  • 2 large eggs
  • 1/3 cup vegetable oil

For Glaze:

  • 1 cup powdered sugar
  • 2 Tbs water

Instructions

  • Preheat oven to 350 F
  • Spray an 8x8 square dish with nonstick cooking spray
  • Combine cake mix, eggs and vegetable oil until just combined and all lumps are smooth - do not not over mix! Batter will be very thick.
  • Pour into greased baking dish and bake 30-32 minutes, or until brownies are set (brownies will continue to cook and firm up a little while cooling, but you want them to still be a little dense in the middle)
  • In a separate bowl, whisk together powdered sugar and water and pour over brownies while they're still warm.
  • Allow brownies to mostly cool before cutting
  • Enjoy!

Tried this recipe?

Tag me on Instagram: @SouthernMadeSimple or use the hashtag #SouthernMadeSimple and share your love of southern cuisine!

Strawberry Brownies

If you like this recipe, be sure to check out these great recipes found right here on Southern Made Simple!

Strawberry Milkshake Cookies | Strawberry Lemonade | Strawberry French Toast Bake | Fresh Strawberry Pie |  Valentine’s Day Snack Crafts for Kids | Valentine Sugar Cookies


Happy Valentine’s Day, friends! Don’t forget to check out our brand new Etsy shop if you’re on the hunt for a perfect gift! 😉

Filed Under: Desserts, Home Cookin' Tagged With: cake mix brownies, Strawberry brownie recipe, strawberry brownies, strawberry cake mix brownies, strawberry valentine brownies, valentine's day, valentine's day brownies

How to Make a Kid Friendly Charcuterie Board

January 8, 2021 by Laura Tucker Leave a Comment

This shop has been compensated by Inmar Intelligence and its advertiser. All opinions are mine alone. #LANDOFROSTLUNCHES

As we’re marching onward into the new year, I’ve been reflecting on many of the changes and transitions my family made during the previous year. One of my goals for 2021 is to find ways to make those transitions we made feel a little more seamless in our daily lives, particularly the large transition of moving from traditional school to homeschool for my oldest daughter. Keeping a semi-flexible schedule and daily routine is important for all of us in the house, but keeping things fresh, fun and interesting is a top priority when it comes to not only school work, but preparing our meals as well.

How to make a Kid Friendly Charcuterie Board

One way I’m changing things up this year is letting my oldest daughter be much more hands-on in the kitchen during lunch time. While we aren’t ready to dive right into cooking with precise measurements, cook times and ingredients just yet, I still want her to become familiar with putting balanced meals together and show her that she can use her creativity in the kitchen just like she does in the classroom. One of our favorite ways to do that is to create kid friendly charcuterie boards filled with a balance of interesting colors, textures and wholesome goodies to fuel us through lunch and snack time!

How to make a Kid Friendly Charcuterie Board

Traditionally, charcuterie boards feature cured meats, dried fruits, cheeses and nuts. However, the beauty of creating charcuterie boards or “snack” boards is that there truthfully isn’t a wrong way to do it. The sky is the limit when it comes to what you can add to your own board! Because we love to make these boards to serve for lunch and then to munch on later in the afternoon for snack, I love to add fresh meats, fresh and dried fruits, nuts, a variety of cheeses and crackers.

One piece of advice that I feel is important when creating a charcuterie board with your children – listen to their cues when it comes to filling up the serving platter. If your child is easily over stimulated, scaling back on the variety of foods you include may be a good idea. On the flip side, you may have a little one who wants ALL the snacks, and that’s okay, too! Creating a charcuterie board is a great way to learn about the food pyramid and all of the different food groups. Let them pull things from the pantry and refrigerator that they truly love, all while showing them how to incorporate healthy and balanced options onto the board!

How to make a Kid Friendly Charcuterie Board

At the beginning of the week, I always make out my Publix shopping list and try to make sure I have plenty of fresh produce and other ingredients to build a charcuterie board on hand. In addition to fruits and veggies, I love to keep a variety of Land O’ Frost® premium meats on hand – particularly Land O’ Frost® Premium Meat Oven Roasted Turkey Breast and Land O’ Frost® Premium Meat Old World Style Black Forest Ham. These meats are a go-to staple for my family as they’re a healthy and affordable protein, contain no added hormones, no artificial flavors, and no by-products. Plus, Land O’ Frost is a family owned company, and I love having a large variety of products and flavors to choose from while shopping at my local Publix.

How to make a Kid Friendly Charcuterie Board

To add a little “pizzazz” to our charcuterie boards, I taught my daughter how to fold the meat accordion style and keep it in place using toothpicks. Not only was this a fun way to make our board look extra pretty, but it was also a great tool for improving her hand-eye coordination! We used cookie cutters to make fun shapes out of cheese slices, and this can also easily be done with the slices of meat on the board.

Here are a few of the things we added to our board to give you some ideas for how to create your own kid friendly charcuterie board:

Fresh Fruit (grapes, strawberries, blueberries)
Dried Fruit (raisins, yogurt covered cranberries)
Meat (we use Land O’ Frost® Oven Roasted Turkey Breast and Old World Style Black Forest Ham)
Nuts or granola
A variety of cheeses
Fresh Veggies (carrot sticks, broccoli, etc.)
Fruit Dip or Veggie Dip
Crackers or pretzels
Cured Meats (if your children are into it. We chose pepperoni!)

How to make a Kid Friendly Charcuterie Board

We’re looking forward to getting really creative in the kitchen in 2021 and perfecting our charcuterie board skills while learning about the importance of making mealtime balanced and fun. Next time you’re making your grocery list, make sure you swing by your local Publix to pick up all of your charcuterie boards needs, including Land O’ Frost premium meats to make your charcuterie board complete!

What things are you looking forward to in 2021? What are some of your favorite things to add to a charcuterie board? Leave a comment below and share your ideas! Happy New Year, friends!


Filed Under: Appetizers, Home Cookin' Tagged With: charcuterie board ideas, Kid Friendly Charcuterie board

2 Ingredient Fruit Dip

January 6, 2021 by Laura Tucker Leave a Comment

This 2 ingredient Fruit Dip is so simple, sweet and versatile! It’s a must-make if you love to make charcuterie or snack boards, and it also makes an awesome topping for pancakes, French toast, etc.! 

Charcuterie and snack boards have grown tremendously in popularity over the last 2-3 years it seems, and I am absolutely a fan of the craze. Not only are they a beautiful and an aesthetically pleasing way to serve finger foods for a gathering, but they’re also a perfectly acceptable way to transition snacks into a meal when cooking is the farthest thing from your mind. When I break out the giant serving platter and start pulling snacks out of the pantry and fridge, my family knows that this mama isn’t cooking anything else the rest of the day. 

2 Ingredient Fruit Dip

You may recall some of the charcuterie boards I’ve done in the past. My Halloween Charcuterie Board is a favorite of mine, and I also have a Sweet & Savory Charcuterie Board, a Spring-themed Charcuterie board and the Ultimate Summer Charcuterie board on the blog if you’re looking for a few ideas when creating your own. I love to incorporate a mix of both fresh and dried fruits on the boards I create, and I love to have a dip to serve alongside the fresh fruit or to smear on top of crackers. 

2 Ingredient Fruit Dip

Making a fruit dip is super simple, and this 2 Ingredient Fruit Dip is a go-to for me when making charcuterie boards. All you need to whip up this dip is a container of whipped topping and a container of strawberry (or whatever flavor you prefer) cream cheese!

Here’s a free printable copy of the recipe if you’d like to give it a try:

Print Recipe

2 Ingredient Fruit Dip

Ingredients

  • 1 8 oz container Cool Whip thawed
  • 1 8 oz container strawberry cream cheese spread softened

Instructions

  • Using a hand or stand mixer, combine thawed whipped topping and softened cream cheese and mix until smooth and there are no chunks of cream cheese left.
  • Serve immediately and refrigerate any leftovers.
  • Enjoy!

Tried this recipe?

Tag me on Instagram: @SouthernMadeSimple or use the hashtag #SouthernMadeSimple and share your love of southern cuisine!

If you want to lighten this dip up just a bit, you can swap out the whipped topping with a sugar free variety, or you can even make your own from scratch!

2 Ingredient Fruit Dip

This recipe will make more fruit spread than you’ll need for a charcuterie board, so my favorite thing to do with the leftovers is to serve it on top of French toast, pancakes or smeared over a bagel of piece of toast for breakfast. 

Looking for more Charcuterie Board Inspiration? Check out these posts right here on Southern Made Simple!

Spring Charcuterie Board | Ultimate Summer Charcuterie Board | Sweet and Savory Charcuterie Board | Halloween Charcuterie Board

Filed Under: Desserts, Home Cookin' Tagged With: 2 ingredient fruit dip, easy fruit dip, fruit dip for charcuterie boards, Strawberry fruit dip

Sugar Roasted Peanuts

December 29, 2020 by Laura Tucker Leave a Comment

Peanuts! Get your peanuts! Sugar roasted peanuts are a scrumptious snack that are very easy to make, and if you package them up and tie a ribbon around them, they make a wonderful treat to share with a friend! Growing up right next door to the peanut capital of the world, peanuts have always played a significant role in my life and the community that I was raised in. As the granddaughter of a peanut farmer, I’ve learned quite a bit over the years about the economical importance this tiny nut has had not only on my own family, but on the state of Alabama as a whole. They’re arguably one of the most important crops grown on American soil, and they’re loaded with important nutrients that just might surprise you! 

Sugar Roasted Peanuts

During peanut harvest season in the early fall, I shared my recipe for Instant Pot Boiled Peanuts – which are a true southern delicacy that most folks around here just can’t get enough of. I’ve even been known to eat them for breakfast, truth be told. While boiled peanuts are undoubtedly my favorite way to snack on these lovely little legumes, these sugar roasted peanuts come in at a close second. 

Sugar Roasted Peanuts

Most people know that peanuts are a great source of protein, but did you know that incorporating a handful of peanuts into your daily diet can reduce your risk of heart disease, diabetes, colon cancer and promote healthier cholesterol levels? (You can read more about the health benefits of peanuts here.)  Peanuts are actually classified as a superfood, which further proves that not all heroes wear capes! 😉 

Sugar Roasted Peanuts

These sugar roasted peanuts, or “candied peanuts” are vey easy to make. In fact, I use the same recipe when making my Sugar Roasted Pecans! I frequently make these around the holidays or for special occasions, but they’re great to make and eat any time of year. I love to add them to charcuterie boards, too! Here’s a free printable copy of the recipe if you’d like to give it a try!

Print Recipe

Sugar Roasted Peanuts

Ingredients

  • 1 16 oz container unsalted dry roasted peanuts
  • 1 egg white
  • 4 tsp water
  • 1 Tbs vanilla extract
  • 1 cup white granulated sugar
  • 2 tsp cinnamon
  • 3/4 tsp salt

Instructions

  • Preheat the oven to 250 F
  • Line baking sheet with parchment paper
  • Using a mixer, beat egg white until frothy. Add in water and vanilla and continue mixing
  • Stir in cinnamon, sugar and salt
  • Add in peanuts and coat with egg mixture completely using a large spoon
  • Spread the peanuts evenly on to the baking sheet and bake for 1 hour, being sure to stir every 15 minutes
  • Enjoy!

Tried this recipe?

Tag me on Instagram: @SouthernMadeSimple or use the hashtag #SouthernMadeSimple and share your love of southern cuisine!

The photo below is of my 2 year old daughter sneaking a peanuts while I was trying to photograph them. She crawled up in my lap while the camera was still in my hand, so I kept snapping photos to capture the sweet moment!

Sugar Roasted Peanuts

If you like this recipe, be sure to check out these other peanut favorites found right here on Southern Made Simple!

Instant Pot Boiled Peanuts | No Bake Peanut Butter Pie | Peanut Butter Fudge | Peanut Butter Rice Krispie Treats | Peanut Butter Corn Flake Candy

Filed Under: Appetizers, Desserts, Home Cookin' Tagged With: Candied peanuts, Cinnamon sugar roasted peanuts, Sugar roasted peanuts, sugared peanuts

Venison Sausage Balls

December 27, 2020 by Laura Tucker 1 Comment

We’re currently in the heart of deer season here in south Alabama, and my husband has been in the woods quite a bit lately trying to make sure our freezer is stocked with venison to last us a full year until next year’s deer season begins. These venison sausage balls are a quick, simple, no-fuss and no-fail appetizer that I love to whip up any ol’ time, but especially on game days when college football is on the big screen.

Venison Sausage Balls

These sausage balls only call for a handful of ingredients, and they take about 15 minutes to cook all the way through in the oven. My husband loves to eat them by themselves, but I personally love to dip them in a little bit of pepper jelly or drizzle a smidge of syrup over them to give them a bite of sweetness. If I’m lucky and there’s any leftovers the next morning, I love to pop them in the microwave and have them for breakfast!

Venison Sausage Balls

While this recipe calls for ground venison sausage, you can easily adapt this recipe to use pork sausage. If you want to spice things up a tad, spring for a spicy sausage blend instead of using mild! I use a combination of shredded cheddar and shredded mozzarella in the mixture because I believe the mozzarella adds in a little extra moisture to keep them from feeling dry. You can experiment with different cheeses if you so choose, and even add in a little creole or cayenne pepper to give them so extra flavor!

Venison Sausage Balls

To make sure my sausage balls are even in size so they will all cook evenly, I love to use a click-release cookie scoop and plop them right on top of the baking sheet without getting my hands dirty. If you happen to have any leftovers, just store them in an airtight container in the fridge. They’ll keep for 4-5 days, but they’ve certainly never lasted that long in my household!

Here’s a free printable copy of the recipe if you’d like to give it a try!

Venison Sausage Balls
Print Recipe Pin Recipe

Ingredients

  • 3 cups Bisquik baking mix
  • 1 lb ground venison or ground pork sausage
  • 1 cup shredded cheddar cheese
  • 1 cup shredded mozzarella cheese
  • 1 Tbsp Worcestershire Sauce
  • 2/3 cup whole milk

Instructions

  • Preheat oven to 400 F
  • Using a stand mixer, combine all ingredients and blend until well combined
  • Use a cookie scoop or your hands to roll out dough into ping-pong sized balls and place on a greased baking sheet
  • Bake for 15-17 minutes
  • Enjoy!

Tried this recipe?

Tag me on Instagram: @SouthernMadeSimple or use the hashtag #SouthernMadeSimple and share your love of southern cuisine!

Venison Sausage Balls

Looking for more great venison recipes? Check out these recipes found right here on Southern Made Simple!

Venison Meatloaf | Grilled BBQ Bacon Venison Burgers | Venison Country Fried Steak | Bacon Wrapped Venison Tenderloin | Venison Pot Roast | Venison Taco Bites

And while you’re at it, check out this roundup of other amazing venison recipes!

Do you have a favorite venison recipe you’d love to share? Or maybe a favorite game day (or any day) appetizer that’s your go-to this time of year? What would you pair with these venison sausage balls? Leave a comment below and share the love!


Filed Under: Appetizers, Breakfast, Home Cookin' Tagged With: Deer sausage balls, Game day sausage balls, Venison Recipes, Venison sausage balls

Comfort Food With A Twist: Loaded Turkey & Dressing Baked Potatoes

December 17, 2020 by Laura Tucker Leave a Comment

This post was sponsored by Southeastern Mills as part of an Influencer Activation for Influence Central and all opinions expressed in my post are my own.

For me, holiday cooking and baking is all about bringing out those family favorite recipes that exude comfort and nostalgia. Especially during a year that proved to be quite trying and difficult, I believe we all could use a little more comfort food to help warm our spirits and fill our bellies with goodness as we near the end of this year. Some of my absolute favorite comfort foods that we love to eat near the holidays are cornbread dressing, mashed potatoes, freshly carved turkey and a little gravy to go with it all.

Comfort Food With A Twist: Loaded Turkey & Dressing Baked Potato

And for those holiday feasts where comfort foods are often in abundance, sometimes it can be a bit of a challenge to “spruce” up the leftovers and enjoy them in a new and exciting way. Personally, I’m not a big fan of leftovers. I’ll eat leftovers once, maybe twice, and then I’m ready to move on, even if it is some of my favorite comfort foods. After Thanksgiving this year, I got a little experimental with our leftovers and created the ultimate holiday comfort food dish…with a twist. These Turkey and Dressing Loaded Baked Potatoes are a perfect portion of pillow-soft buttery baked potatoes, topped with homemade cornbread dressing, turkey, brown gravy and a smidge of cranberry sauce on top. Truthfully, I may never want these classic holiday dishes any other way now!

Comfort Food With A Twist: Loaded Turkey & Dressing Baked Potato

Cornbread dressing is a popular side dish in the southern portion of the United States. While others enjoy “stuffing” during the holidays, my family prefers cornbread dressing made with Southeastern Mills Cornbread Mix. I keep a variety of Southeastern Mills baking and gravy mixes on hand at all times. The made from scratch quality you find in Southeastern Mills baking and gravy mixes make meal prep easy and convenient any time of year, but especially right here at the holidays. The cornbread dressing made with Southeastern Mills Cornbread Mix is a star ingredient in these loaded baked potatoes, and I love the that I’m able to simply mix, bake and enjoy perfect cornbread every time I pour the batter into a skillet. Southeastern Mills baking and gravy mixes are the perfect complement to any meal, and they can be used in so many unique and non-traditional ways!

Ultimate Thanksgiving Loaded Baked Potato

When making cornbread dressing, you’ll want to make your cornbread a day or two in advance. You’ll start by preparing two packages of Southeastern Mills Cornbread mix according to package instructions. Allow it to cool completely, then crumble into very fine little pieces inside a gallon sized resealable bag. Seal it up and set it aside until you’re ready to prepare the dressing.

Comfort Food With A Twist: Loaded Turkey & Dressing Baked Potato

Freshly carved turkey is my favorite thing to serve alongside dressing, and pouring a little Southeastern Mills Roast Turkey Gravy Mix on top is like the icing on the cake. I love to serve gravy on top of mashed potatoes as well, so including it in these Loaded Turkey & Dressing Baked Potatoes to achieve the ultimate comfort food just felt so right. 

Comfort Food With A Twist: Loaded Turkey & Dressing Baked Potato

Making these Loaded Turkey & Dressing Baked Potatoes is as easy as 1-2-3. You’re basically just layering up those classic holiday dishes and using the potato as the vessel. You’ll start with a baked potato. You can bake them in the oven, or cook them in an instant pressure cooker to speed up the process a little bit. Once your potato is cooked, add a little salt and butter if you like. 

Comfort Food With A Twist: Loaded Turkey & Dressing Baked Potato

Next, spoon in a little bit of cornbread dressing, and use a fork to gently incorporate the dressing a little into the potato. Then, shred some turkey and add it on top of the potato. As I mentioned earlier, this is a really great way to get creative with holiday meal leftovers if you’re looking for a fun and delicious way to jazz up the giant turkey you prepared for the holidays! 

Comfort Food With A Twist: Loaded Turkey & Dressing Baked Potato

Finally, it’s time to top the potato with your favorite turkey and dressing toppings. Some people prefer gravy, other people prefer cranberry sauce, and then there are those people (I’m raising my hand high over here) that love to add both! The Roast Turkey Gravy Mix from Southeastern Mills was the perfect touch to top off these baked potatoes, and taking that first bite into this unconventional baked potato was truly comfort food at its finest! 

Comfort Food With A Twist: Loaded Turkey & Dressing Baked Potato

If you’d like to jazz up those holiday leftovers like I did, or if you’re looking for a fun and unique way to serve up traditional holiday menu items, you can find my recipe for these Loaded Turkey & Dressing Baked Potatoes, including the cornbread dressing below!

Print Recipe

Loaded Turkey & Dressing Baked Potatoes

Ingredients

For Cornbread Dressing

  • 2 packages Southeastern Mills Cornbread Mix prepared
  • 6-8 slices white sandwich bread gently torn into thumb size pieces
  • 2 large yellow or white onions very finely chopped
  • 1 bunch celery both ends removed and very finely chopped
  • 2 cups chicken broth
  • 1 26 oz family size can Cream of Chicken Soup
  • 1 Tbs rubbed sage
  • 1 tsp poultry seasoning
  • 1/2 tsp ground nutmeg

For Baked Potato

  • 3-4 large russet potatoes baked
  • 2-3 cups cooked shredded turkey
  • 1 package Southeastern Mills Turkey Gravy Mix prepared
  • Cranberry Sauce if desired

Instructions

For Cornbread Dressing

  • Prepare cornbread according to package instruction and allow to cool completely
  • Crumble cornbread into very fine pieces and seal in a sealable zipper bag and set aside over night
  • Grease a large casserole dish (9x13 or larger)
  • Grease a large casserole dish (9x13 or larger)
  • Combine very finely diced onions and celery in a stockpot and add just enough water to cover the top of the onions and celery
  • Boil until the celery is good and tender, or to your liking. Do not drain. You'll use the broth off of the vegetables in the dressing.
  • Transfer crumbled corn bread to a very large mixing bowl and place torn white bread right on top - do not stir in
  • Pour onion and celery mixture over cornbread, followed by the can of cream of chicken, 2 cups chicken broth, and your seasonings.
  • Pour into greased baking dish and bake uncovered for 55-60 minutes, or until bubbling and a nice thin crust has formed around the edges. Serve immediately

Assembling Baked Potato:

  • Layer prepared cornbread dressing, shredded turkey, Southeastern Mills Roast Turkey Gravy and cranberry sauce (if desired) and enjoy!

Tried this recipe?

Tag me on Instagram: @SouthernMadeSimple or use the hashtag #SouthernMadeSimple and share your love of southern cuisine!

Comfort Food With A Twist: Loaded Turkey & Dressing Baked Potato

Do you have a favorite way to jazz up holiday leftovers? Incorporating Southeastern Mills gravy and baking mixes into your holiday meals is a great way to elevate your meals with a made-from-scratch quality, so be sure to keep an eye out for them during your next grocery store run!

Filed Under: Home Cookin' Tagged With: Loaded thanksgiving baked potato, Southeastern Mills recipes

Overnight Gingerbread French Toast Casserole

December 11, 2020 by Laura Tucker 2 Comments

The house is quite as I’m sitting here typing this, sipping my coffee. My children are nestled all snug in their beds, while visions of every single toy they circled with a red crayon in the Target Christmas Catalog dance in their heads. The aroma coming from the kitchen is slowly creeping its way throughout the rest of the house, and I can hardly wait to sit down at the table with my family and a bowl full of this Overnight Gingerbread French Toast Casserole. Oh, if only I could capture the scent of this dish in a candle. It smells exactly like Christmas, and not the candy-cane or evergreen tree scent so many people try to make it. It smells like true homemade holiday magic, and the smell isn’t even the best part!

Overnight Gingerbread French Toast Casserole

French toast casseroles are pretty popular around here. I make them for my family quite a bit. I’ve made Strawberry French Toast Casserole, Mixed Berry French Toast Casserole, and I’ve even made a Pumpkin Cream Cheese French Toast Casserole, but there’s just something about this gingerbread version that really steals the show. Personally, I’m a huge fan of molasses and ginger together. Gingerbread in general gives me those warm-fuzzy Christmas feelings, and adding a little powdered sugar and maple syrup on top? Honey, that’s some sho’ nuff certified goodness.

Overnight Gingerbread French Toast Casserole

I typically use a loaf of Italian bread from the bakery at my grocery store to make any french toast casserole. Walmart always sells their loaves for $1 each, which is much cheaper than what you’ll find down the bread aisle! I simply slice the bread into thumb-sized pieces and toast them in the oven for about 15 minutes. Next, I whip up the egg mixture with a variety of spices typically found in gingerbread. Of course, molasses and ground ginger are a must in this recipe. I recommend using a milder version of molasses over blackstrap for this recipe.  Then, pour the egg mixture over the bread crumbs, cover, and refrigerate overnight for best results before baking.

Overnight Gingerbread French Toast Casserole

Try not to get too hung up on the “overnight” part of this recipe, though. If you don’t have that kind of time, don’t worry about it! You can certainly pop it into the oven right away if you need it in a hurry. It’ll still be fabulous, I promise! 😉 

Overnight Gingerbread French Toast Casserole

The cinnamon sugar crumble on top is probably my favorite part of this recipe. It gives a slight crunch that soaks up the warm syrup perfectly. Here’s a copy of the recipe if you’d like to give it a try!

Overnight Gingerbread French Toast Casserole
Print Recipe Pin Recipe

Overnight Gingerbread French Toast Casserole

Ingredients

For French Toast Casserole

  • 1 loaf Italian bread cubed
  • 8 large eggs
  • 1 cup milk
  • 1/2 cup plain Greek yogurt
  • 1/2 cup molasses
  • 1/2 cup sugar
  • 1 tsp vanilla
  • 1 tsp ground cinnamon
  • 1 tsp ground ginger
  • 1/2 tsp nutmeg
  • 1/4 tsp allspice
  • 1/4 tsp ground cloves

For Crumble Topping

  • 1 stick cold salted butter cubed
  • 1/2 cup all purpose flour
  • 1/2 cup brown sugar
  • 1 tsp cinnamon
  • 1/2 tsp nutmeg
  • 1/2 tsp ground ginger
  • 1/4 tsp allspice
  • 1/4 tsp ground cloves

Instructions

  • Cube loaf bread into small pieces and toast in over at 300 F for 15 minutes
  • Remove from oven and pour bread cubes in a greased 9x13 casserole dish
  • Preheat oven to 350 F
  • In a large mixing bowl, combine eggs, milk, greek yogurt, sugar, molasses, vanilla and spices
  • Pour egg mixture over the bread. Cover dish and set in refrigerator overnight or for at least 4 hours. See note.
  • Bake for 20 minutes, then add topping and bake for an additional 25 minutes.
  • Serve with maple syrup and/or powdered sugar. Enjoy!

Notes

For best results, allow bread mixture to set in refrigerator overnight or for a few hours before baking. However, baking at this point will be fine as well if you are in a hurry.

Tried this recipe?

Tag me on Instagram: @SouthernMadeSimple or use the hashtag #SouthernMadeSimple and share your love of southern cuisine!

What do you love to make for breakfast during the holidays? Leave a comment below and share the love!

Looking for more recipes similar to this Overnight Gingerbread French Toast Casserole? Check out these favorites found right here on Southern Made Simple! 

Strawberry French Toast Bake | Pumpkin Cream Cheese French Toast Bake | Mixed Berry French Toast Bake | Molasses Cookies | White Chocolate Drizzled Gingerbread Stars

Filed Under: Breakfast, Home Cookin' Tagged With: Christmas morning breakfast, Gingerbread french toast, gingerbread french toast bake, gingerbread french toast casserole, Holiday breakfast, Overnight Gingerbread French Toast Casserole

Soft & Chewy Chocolate Chip Cookies

December 9, 2020 by Laura Tucker Leave a Comment

Do you have a really good, classic, no-fail and dependable chocolate chip cookie recipe that you love to reach for when a cookie craving comes along? If not, allow me to introduce you to the new love in your life. Seriously. These Soft & Chewy Chocolate Chip Cookies are lightly crispy on the outside, perfectly soft and chewy on the inside and have an irresistible buttery and brown sugar flavor with the perfect chocolate chip-to-cookie ratio. I may be tooting my own horn a little bit here, but I’d say these chocolate chip cookies are pretty darn close to perfect.

Soft & Chewy Chocolate Chip Cookies

Chocolate chip cookies are the most googled cookie recipe of all time, and that holds especially true during the holidays. Many folks are grasping at things that bring them comfort and joy during this time of year, and that means savoring classic recipes that they know are good. And honestly, I think chocolate chip cookies would even bring the Grinch himself a little bit of joy and happiness. I’ve never seen a grumpy person with a stack of cookies and a glass of milk in their hands. 😉 

Soft & Chewy Chocolate Chip Cookies

The base of this recipe may look a little familiar to you, as it’s the same dough that I use in my Soft & Chewy White Chocolate Cranberry Cookies that I shared just a few weeks ago. It’s my go-to cookie dough for just about any cookie, especially ones that I really want to have that soft-batch bakery feel. 

Here’s a free printable copy of my recipe if you’d like to give it a try!

Print Recipe

Soft & Chewy Chocolate Chip Cookies

Ingredients

  • 3/4 cup salted butter room temperature
  • 1/2 cup brown sugar
  • 1/2 cup white sugar
  • 1 large egg
  • 1 Tbs vanilla flavoring
  • 2 cups all purpose flour
  • 1 tsp baking soda
  • 2 tsp corn starch
  • 2 cups milk chocolate chips

Instructions

  • In a large mixing bowl using a hand or stand mixer, combine butter, white sugar and brown sugar
  • Add in vanilla and egg and mix until incorporated
  • Slowly add in flour, baking soda and corn starch and mix until soft, thick dough forms
  • Add in chocolate chips and stir until just combined
  • Refrigerate 1 hour or longer (Don't skip this step!)
  • Preheat oven to 350 F and spray a baking sheet with nonstick cooking spray or use a non-stick silicone baking mat
  • Once dough is thoroughly chilled, roll or scoop into 1 1/2-2 inch balls and place an inch or more apart
  • Bake for 10-11 minutes. *Cookies will appear undercooked when first removed from the oven. Do not cook any longer - the cookies will continue to set while left to cool on the cookie sheet.
  • Allow to cool at least 10 minutes before serving. Enjoy!

Tried this recipe?

Tag me on Instagram: @SouthernMadeSimple or use the hashtag #SouthernMadeSimple and share your love of southern cuisine!

By the way, here’s a few of my must-haves in the kitchen when it comes to baking cookies. There’s still time to let Santa know about these items if you’re adding them to your wish list! 

Soft & Chewy Chocolate Chip Cookies

When these cookies first come out of the oven, they’re going to look a little undercooked. That’s exactly what you want them to look like. I promise. They’ll continue to cook a little while they’re cooling on the cookie sheet, and the texture will be everything you’ve ever wanted a cookie to be. You’ll definitely be going back for seconds and thirds. And then you’ll go back for another one to dunk into your coffee the next morning. I’m just speaking from experience here. 😉 

Soft & Chewy Chocolate Chip Cookies

If you like this recipe for Soft & Chewy Chocolate Chip Cookies, be sure to check out these other great recipes found right here on Southern Made Simple!

White Chocolate Cranberry Cookies | Molasses Cookies | Chocolate Covered Cherry Cookies | Soft Batch Candy Corn Cookies | Strawberry Milkshake Cookies

What types of cookies will you be baking during this holiday season? Do you like to try new-to-you recipes, or do you prefer to stick to the classics? Leave a comment below and tell me about your favorite kinds of cookies. I always love to hear what’s cooking in your kitchen!

Filed Under: Desserts, Home Cookin' Tagged With: Chocolate chip cookies, Classic chocolate chip cookies, Soft and chewy chocolate chip cookies

White Chocolate Peppermint Popcorn

December 3, 2020 by Laura Tucker Leave a Comment

Since we put up our Christmas tree and decorations last week, we’ve been spending a lot of family time watching kid friendly Christmas movies almost every night. We turn all of the lights in the house off except for the tree, lighted garland and a few flameless candles, and my two girls have been absolutely mesmerized over the new ambiance that the Christmas lights bring. Even though our girls are very young and their attention span can’t last the length of the movie, we still enjoy the time we spend together. I’ve also enjoyed making a special treat for us to munch on while we all curl up together and watch. Popcorn is always a must when watching movies, and I love to zhoosh it up a bit and make it feel a little more Christmas-y. This White Chocolate Peppermint Popcorn is the perfect blend of sweet and salty, and has been the perfect movie snack for us all to enjoy while watching the big screen!

White Chocolate Peppermint Popcorn

When I was in college, I worked at the local movie theater for about 2 1/2 years to help pay for my wedding. During that time I sort of had a love-hate relationship with popcorn. Sure, freshly buttered popcorn smells absolutely amazing, but for the entirety of those 2 1/2 years I smelled like popcorn too. My clothes, car, even my bedroom smelled like popcorn. I had to nearly crawl inside the giant popper each night to disassemble and clean the machine, and you would be amazed at how quickly that “extra butter” can get all over everything. 

So all that is to say, I never really popped popcorn very much after I left my job there. Popcorn was my supper many a night when I was working late, and I always felt that I had had my fill of it. But every now and then I circle back around to it, and adding fun toppings like melted white chocolate and crushed peppermint candies makes this snack irresistible!


White Chocolate Peppermint Popcorn

If you find yourself curling up on the couch this season to enjoy your favorite Christmas movies, here’s a few of my favorite things to cozy up with on movie night!

And if you want to spruce up your  popcorn and make it feel a little more festive, here’s a free printable copy of the recipe for you to try!

White Chocolate Peppermint Popcorn
Print Recipe Pin Recipe

Ingredients

  • 2 bags buttered popcorn popped
  • 1 8oz bag Wilton White Chocolate Melts
  • 1/8 tsp peppermint extract
  • 1 tsp fine red sugar sprinkles (feel free to add more or less!)
  • 10-12 peppermints crushed

Instructions

  • Pop popcorn according to package instructions, set aside
  • In a microwave safe bowl, pour in chocolate melts and microwave for 30 second intervals, stirring in between until completely melted
  • While chocolate is melting in microwave, carefully crush peppermints
  • Pour popcorn into a large mixing bowl and pour melted chocolate, crushed peppermints and sprinkles and stir until well coated
  • Pour popcorn onto a baking sheet and spread out to dry
  • After about 15-20 minutes, the chocolate should be dry and the popcorn is ready to eat. Enjoy!

Tried this recipe?

Tag me on Instagram: @SouthernMadeSimple or use the hashtag #SouthernMadeSimple and share your love of southern cuisine!

White Chocolate Peppermint Popcorn

And if you’re looking for a bit of a different flavor profile for your popcorn on movie night, check out these recipes for Caramel Apple Bourbon Popcorn and Smokin’ Sriracha Popcorn! 

Are you enjoying watching holiday movies this Christmas season? What are some of your favorite movies and snacks to enjoy? I’m always looking for a good recommendation! Leave a comment below and share the love!

Filed Under: Desserts, Home Cookin' Tagged With: Candied Popcorn, Christmas popcorn, Mint Chocolate Popcorn, Peppermint Popcorn, White chocolate peppermint popcorn

  • « Go to Previous Page
  • Go to page 1
  • Go to page 2
  • Go to page 3
  • Go to page 4
  • Interim pages omitted …
  • Go to page 35
  • Go to Next Page »

Primary Sidebar

Connect

  • Facebook
  • Instagram
  • Pinterest
  • Twitter

Lookin’ for something in particular?

Welcome

ProfileImage
"Hi there! I'm Laura, and I'm a child of God, a wife, and a mother of two. My roots are planted deep in rural Alabama. Monograms, crafting and Southern cuisine - yes, these are a few of my favorite things! Join me as I grow my family in the beautiful South where the tea is sweet, the accents are sweeter, & someone's heart is always being blessed." [Read more...]

Subscribe via E-Mail

Footer

  • Facebook
  • Instagram
  • Pinterest
  • Twitter
Disclosure:
My site may contain affiliate links, which means that if you buy the products featured, I receive a small percentage of the sale price at no extra expense to you. Thanks for visiting Southern Made Simple!
By using this website you agree to our:

Privacy Policies

Copyright © 2023 · Foodie Pro Theme by Shay Bocks · Built on the Genesis Framework · Powered by WordPress