• Skip to primary navigation
  • Skip to main content
  • Skip to primary sidebar
  • Skip to footer

Southern Made Simple

Keeping things simple with a smidge of Southern charm

  • Home
  • About Me
    • Policies
    • Work With Me / Media Kit
  • Home Cookin’
    • Appetizers
    • Breakfast
    • Main Course Meals
    • Desserts
    • Recipe Index
  • My Favorite Things
    • DIY Projects
    • Farmhouse Finds
    • Product Reviews
    • VBS Resources
  • For the Kids
    • Cloth Diapering
    • Kids Fashion
    • Parenting and Lifestyle
  • Etsy Shop
  • Contact

Appetizers

Labor Day Grilling: Mexican Street Corn

September 2, 2021 by Laura Tucker Leave a Comment

This Mexican Street Corn is an easy and flavorful way to transform an ear of corn into something truly scrumptious – just in time for Labor Day!

Labor Day is a holiday that is often overlooked as a significant holiday, but there truly is much to celebrate on the first Monday in September each year. Labor Day was created to honor and celebrate the works and contributions of the American worker. America depends on the works of its citizens to be the great country that it is, and having a day to recognize not only the present day workers, but the hard work and sweat other Americans have put in before us to make our nation great is absolutely a day worth celebrating. Instead of cramming in a bunch of activities or knocking things off of our to-do lists, my family tries to relax and enjoy our time by firing up the grill, fixing up some of our favorite foods and fellowshipping with one another. 

Labor Day Grilling: Mexican Street Corn

Corn on the cob is a summertime staple in our house. Each year we plant a small crop of corn to fill our freezer, and preparing it on the grill is one of our favorite ways to enjoy it during the warmer months. When I was in the FFA during high school, one of the first things we learned was that corn is the only crop grown in all 50 states. If you look closely at the FFA emblem, you’ll notice that it’s actually a cross section of corn, symbolizing the unity of all 50 states through agriculture. Each time I sink my teeth into a juicy ear of corn, I think about the American farmer and the agricultural workers. Labor Day is the perfect time to tip our hats to the farmer who labors endlessly to supply the food on our tables, and if you’re firing up the grill this Labor Day weekend, I encourage you to take a moment and surround yourself with gratitude as you  enjoy the foods you eat.

Labor Day Grilling: Mexican Street Corn

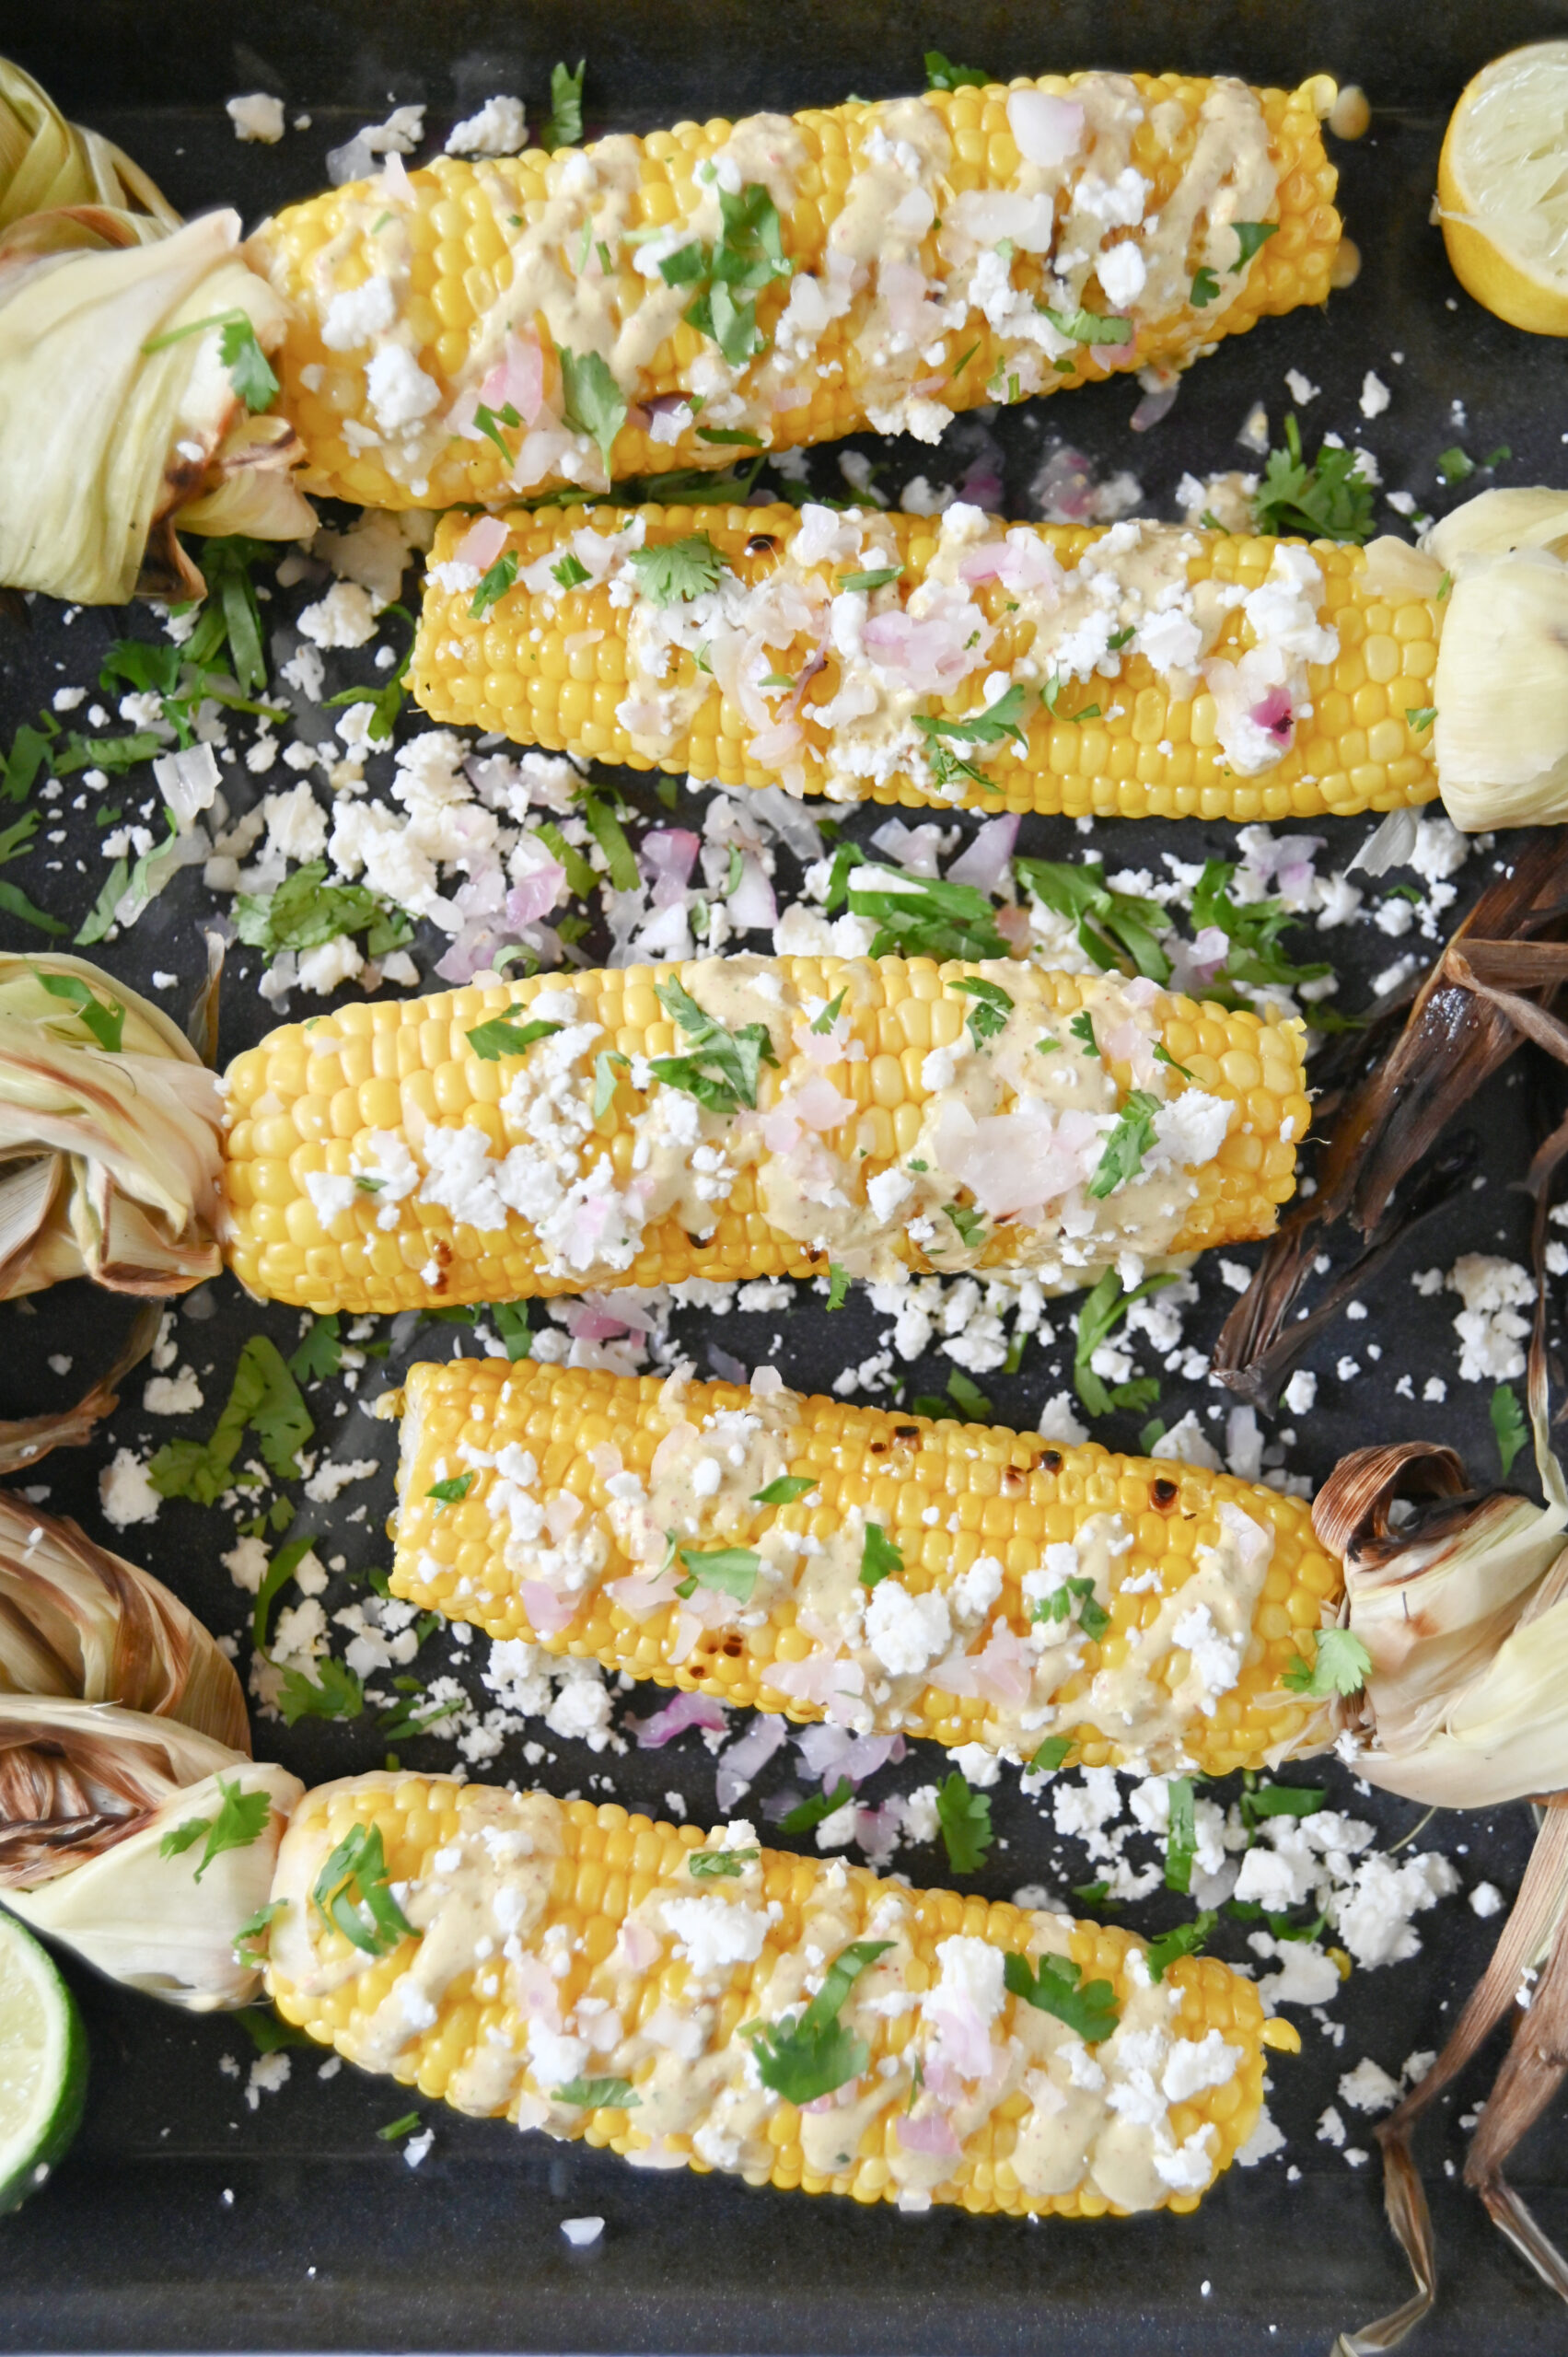
While you can never go wrong with boiled corn, a pad of butter and a little salt, sometimes I love to really spruce it up and serve it street-style. Mexican street corn is typically served smothered with a creamy mayonnaise/sour cream based sauce with spices and fresh cilantro. It’s certainly different from the traditional way I grew up eating corn, but it’s colorful and vibrant flavors always leave me coming back for seconds and thirds!


Here’s what you’ll need to get started:

Labor Day Grilling: Mexican Street Corn
Print Recipe Pin Recipe

Ingredients

  • 5-6 ears corn
  • 1/4 cup mayonnaise
  • 1/4 cup sour cream
  • 1/2 cup finely crumbled cotija cheese (feta also works great with this recipe)
  • 1 tsp Tajin spice (you can also use chili powder)
  • 1/4 tsp cayenne pepper
  • 1/2 tsp freshly minced garlic
  • 1 Tbs diced pickled jalapenos (fresh works great as well)
  • 1/4 cup fresh cilantro + extra for garnish
  • 1/2 red onion
  • 1 small lime
  • butter

Instructions

  • Preheat grill to medium heat
  • Pull outer husks on ears of corn down to the base of the corn and remove the silks the best you can
  • Fold husks back over corn and submerge in a large bowl of water for 8-10 minutes
  • Remove corn from water and shake off excess water. Place corn directly on grill and grill for about 15-20 minutes, turning the corn every 5 minutes or so
  • During the last 5 minutes of grilling, add halved or quartered red onion and lime halves to the grill
  • While corn is grilling, add mayonnaise, sour cream, cotija cheese, garlic, spices, jalapenos and cilantro into a blender and blend until smooth
  • Remove corn from grill and peel back husks
  • Add a little butter to the corn, then spoon cilantro lime sauce on top
  • Garnish with diced grilled onion, fresh cilantro, extra cotija cheese and a squeeze of lime juice
  • Enjoy!

Tried this recipe?

Tag me on Instagram: @SouthernMadeSimple or use the hashtag #SouthernMadeSimple and share your love of southern cuisine!


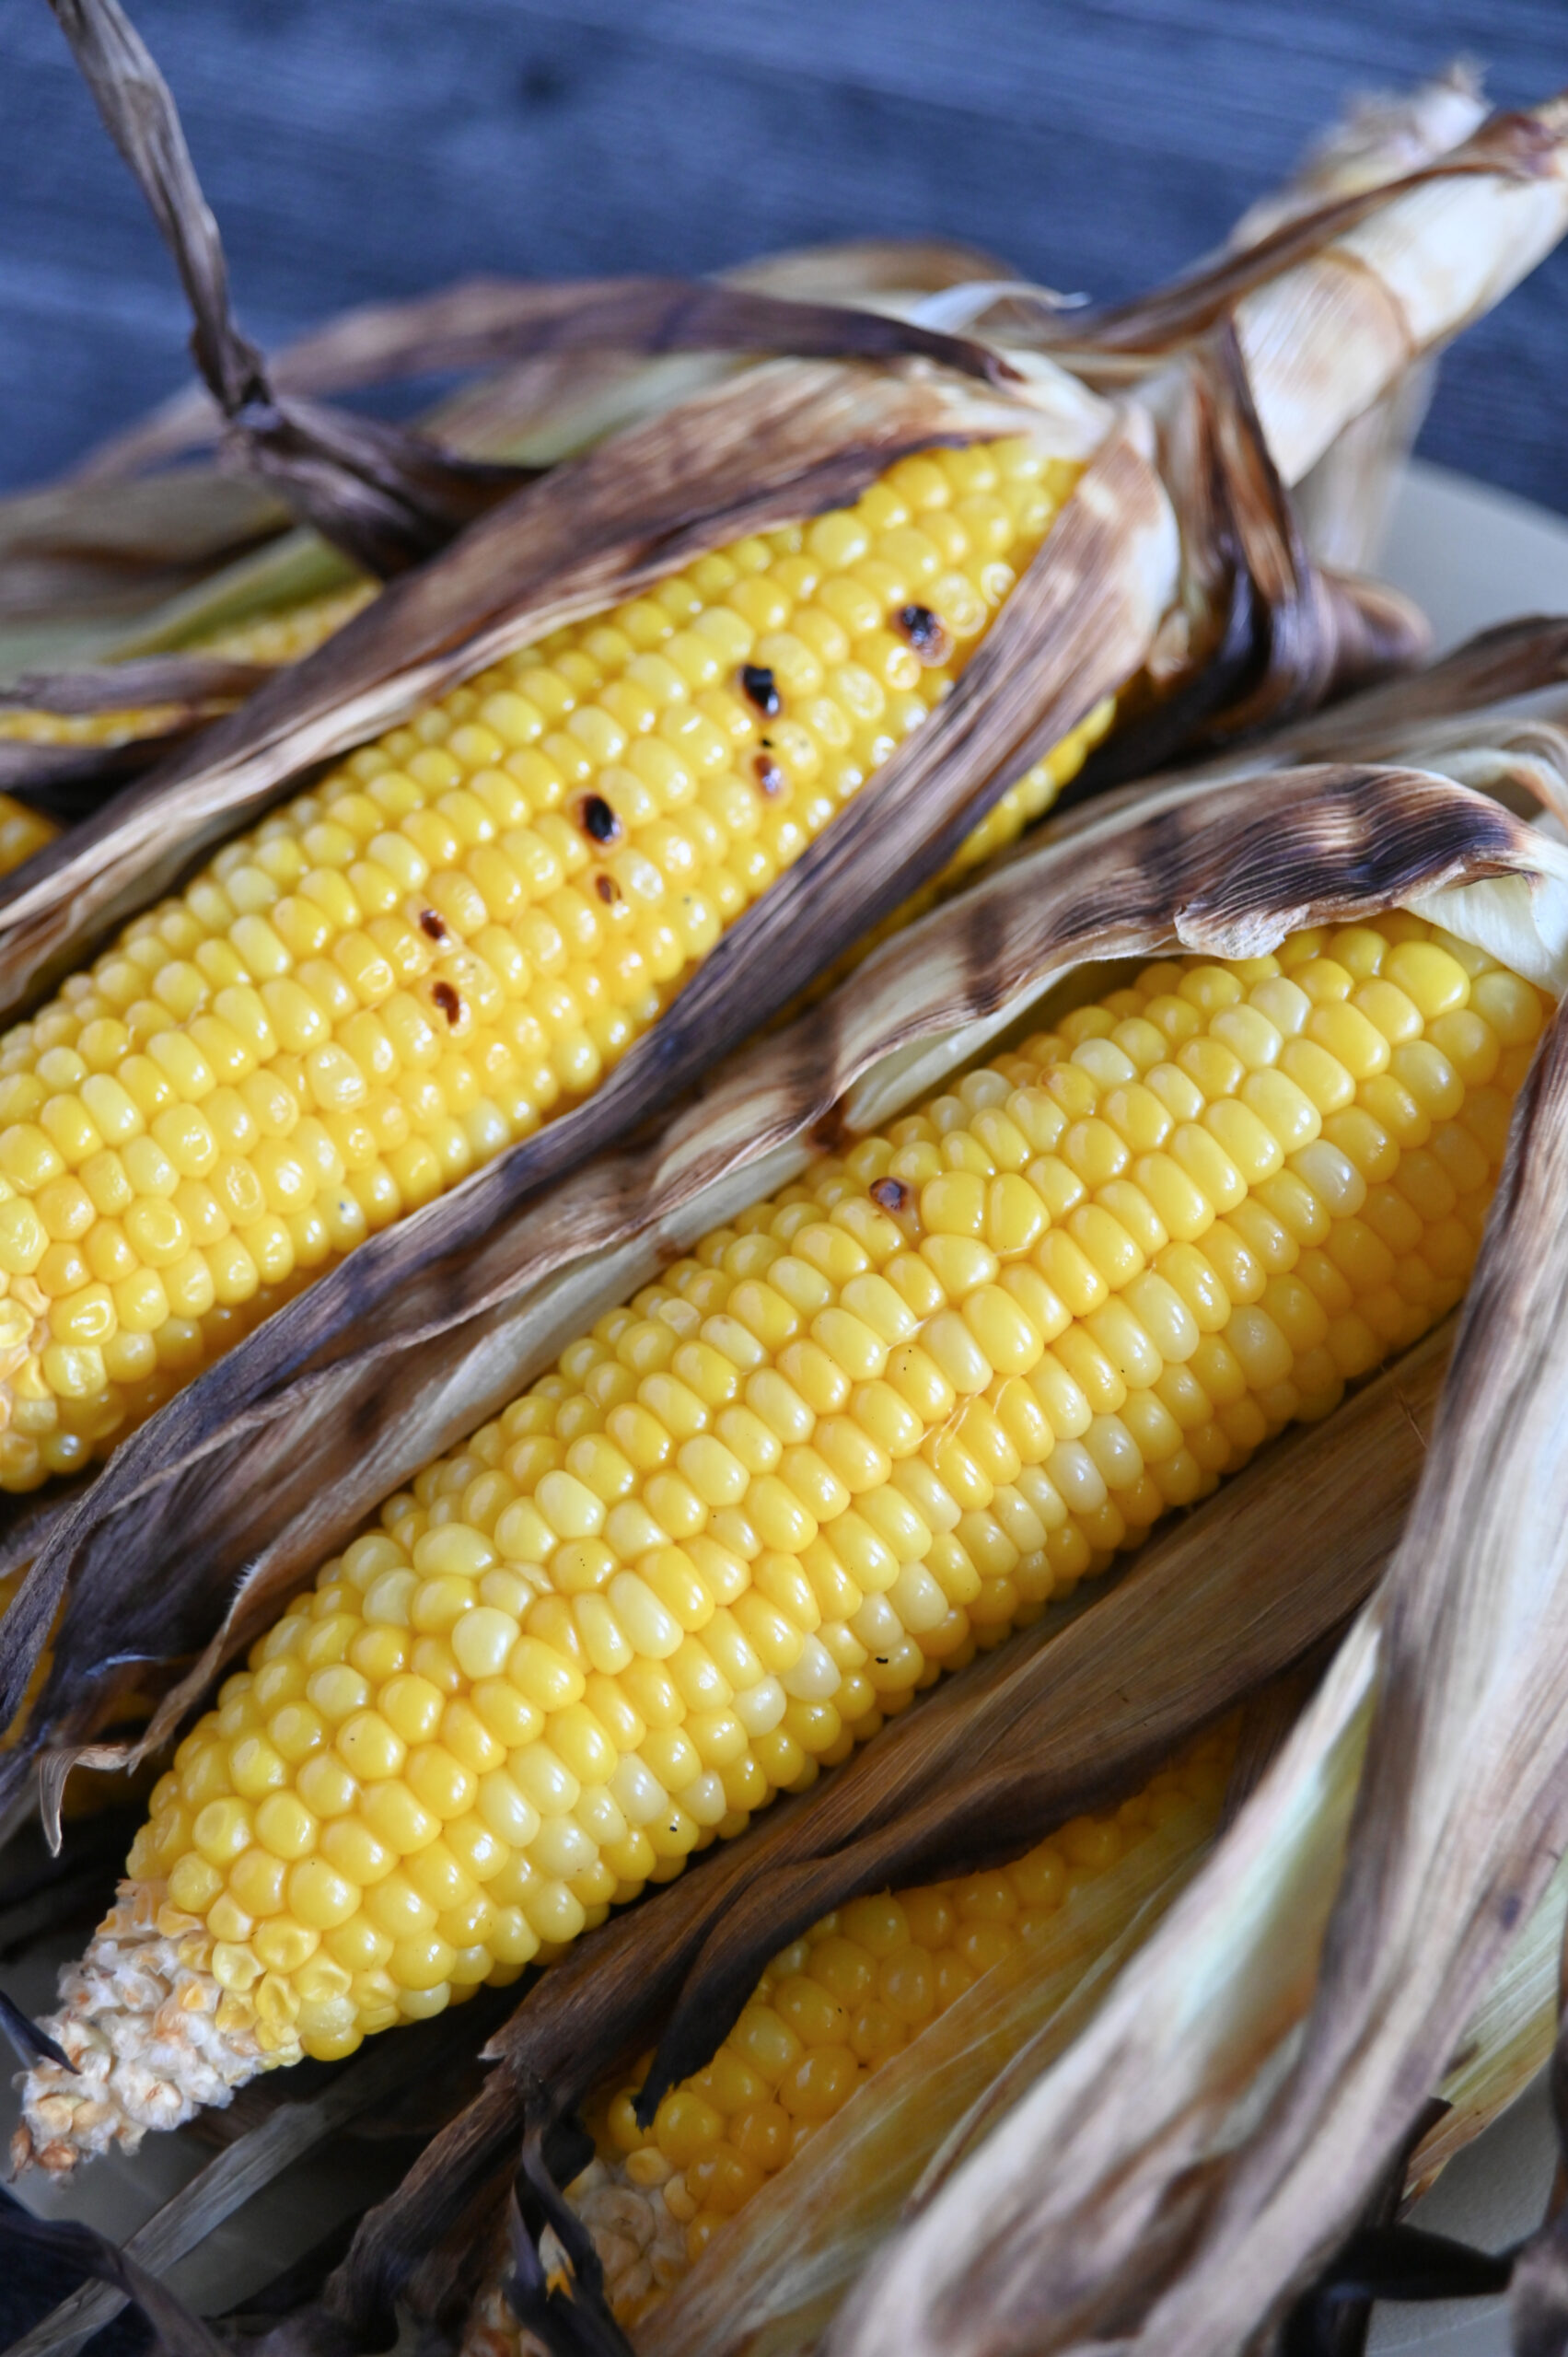
When making Mexican Street Corn, we place the corn directly onto the grill in the husk. This way, it prevents the kernels from directly touching the grill and gives the corn a sort of steamed effect. To prepare corn this way, you’ll want to first pull the outer husks down to the base of the corn and remove the silks the best you can. Fold the husks back over the corn and submerge the ears of corn in a large bowl of water for 8-10 minutes. This will really help pull moisture into the corn to create perfectly juicy kernels. Remove the corn from the water and shake off any excess water. Place the corn directly on the grill (heated to a medium heat) and grill for about 15 to 20 minutes, turning the corn every 5 minutes or so. With just a few minutes remaining in the grill time, add half a red onion and a lime cut in half to cook on the grill.

Next – the creamy cilantro sauce! This is quite possibly my favorite part of this recipe. I’m always reaching for one more spoonful of this sauce to spread on my corn, and you can easily adjust the spice level to suit your own tastes. In a blender, combine mayonnaise, sour cream, cotija cheese, garlic, spices, jalapenos and cilantro. I prefer to blend this mixture until mostly smooth and all cilantro has broken down, but you can leave it a little chunky if you prefer. 

Labor Day Grilling: Mexican Street Corn

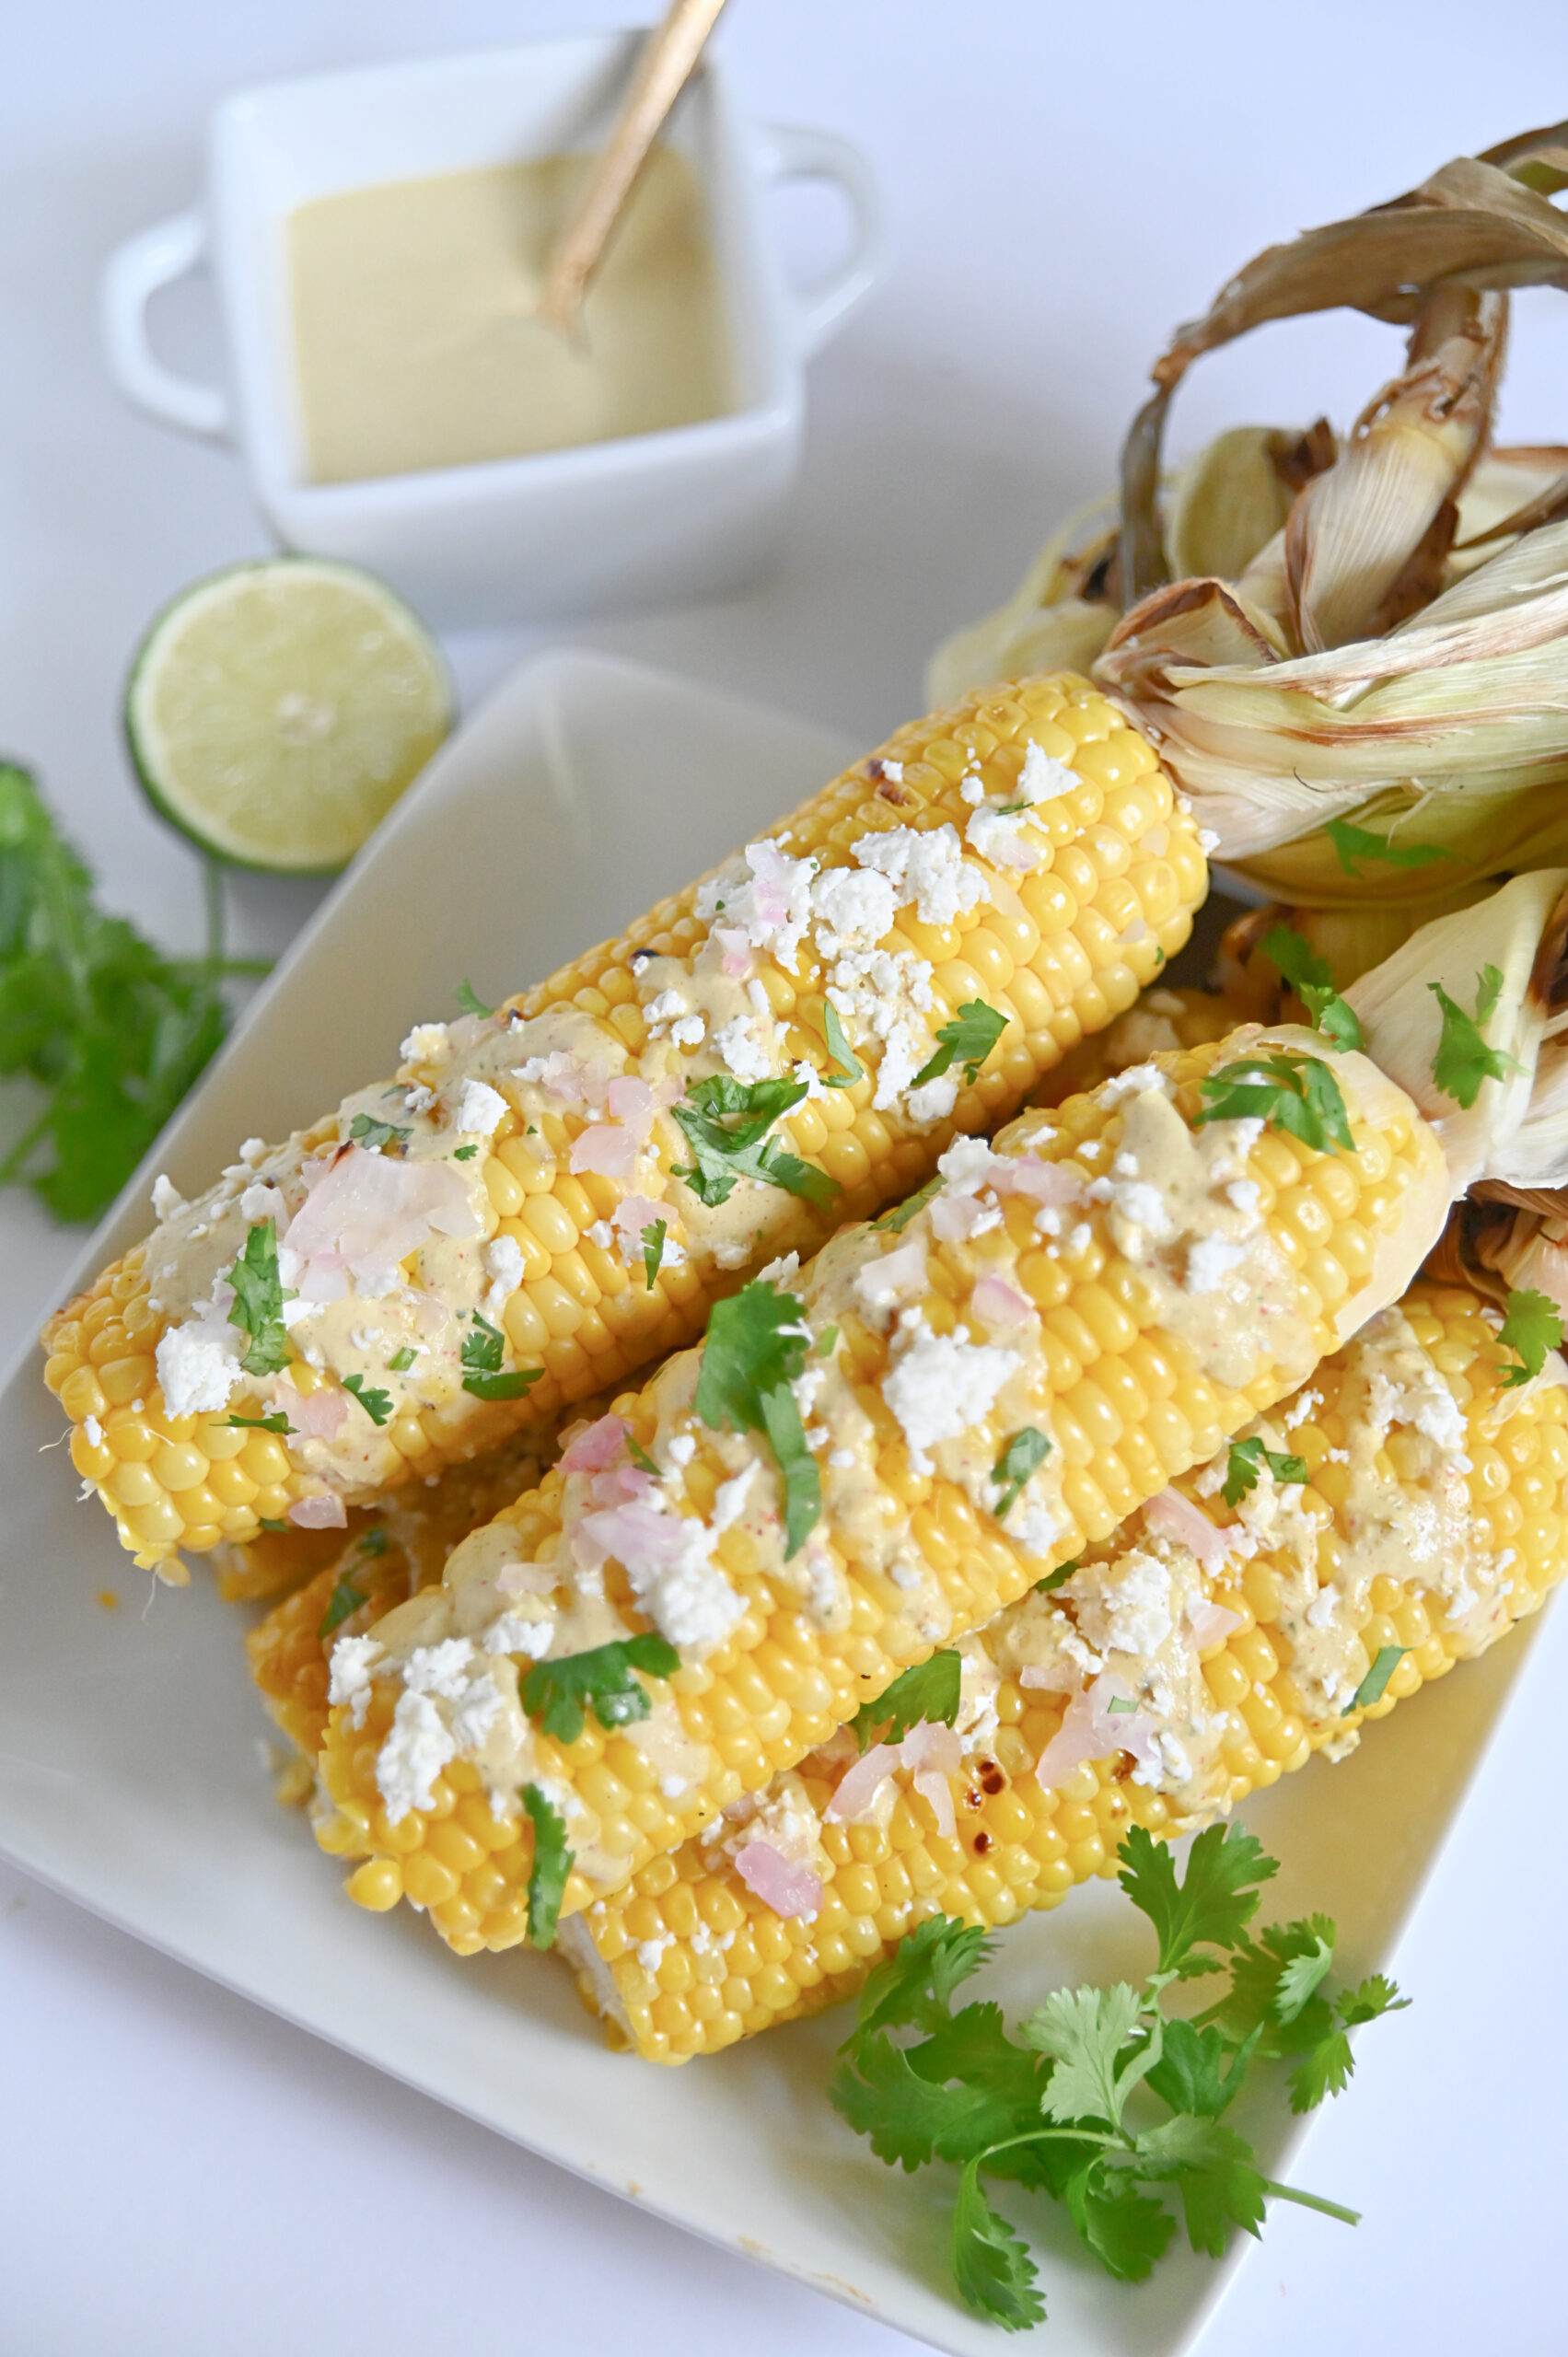
When the corn comes off of the grill, peel back the husks and spoon a helping of the creamy cilantro sauce on top. I like to dice up the grilled onion and sprinkle that over my corn, as well as add some extra crumbled cotija cheese and fresh cilantro. I then squeeze the lime over the ears of corn before devouring it.

If you’re kicking back this labor day weekend and plan on firing up the grill, give this Mexican Street corn recipe a try! It’s a delicious way to spruce up corn on the cob, and it also supports some of the most important laborers our great country has – the American farmer. Happy Labor Day! 


Filed Under: Appetizers, Home Cookin' Tagged With: Grilled Corn, Spicy Street Corn, Street Corn

Cream Cheese and Bacon Egg Salad

April 25, 2021 by Laura Tucker 3 Comments

Old fashioned egg salad isn’t for everyone. I totally get that. For me, egg salad falls into my “trust issues” category when it comes to food. I love egg salad, but I don’t love everyone’s egg salad. I’ve been to too many potlucks where I bit into a tiny triangular egg salad sandwich, only to find that whoever made it put something crunchy in it, like raw onions. The audacity.

Cream Cheese and Bacon Egg Salad

I’m teasing, of course. I know the way that I prefer my egg salad is not the same way that others might prefer it, but this particular post is to tell you about my absolute favorite way to eat egg salad, as it may be a little unconventional to some. If you want a sure fire way to hit a home run with your egg salad, you’ll need two things:

Cream cheese + Bacon

Real bacon. Not those artificial bacon bits. You’ll start with boiling your eggs, peeling and then separating the yolks from the whites. While the eggs are boiling, go ahead and get your bacon cooking. You’ll want to make sure when cooking your bacon that you don’t cook it to a crisp. You want the bacon to still be a little soft. It’s all fun and games until someone breaks a tooth hitting a piece of overcooked bacon in their egg salad. To quickly chop the bacon, I turn to these trusty herb shears to get the job done. If you don’t have a pair of herb shears in your kitchen, I highly recommend them!

Using a hand or a stand mixer, combine cooked egg yolks, softened cream cheese and softened butter until smooth. Next, add in mayonnaise, sweet relish and a little salt and pepper to taste. Next, fold in the bacon pieces and diced egg whites. Cover and chill for about an hour before serving. Here’s a free printable copy of my recipe if you’d like to give it a try!

(Note: This recipe is doubled to feed a larger crowd. Feel free to reduce the ingredients as you see fit.)

Cream Cheese and Bacon Egg Salad
Print Recipe Pin Recipe

Cream Cheese and Bacon Egg Salad

Ingredients

  • 1 dozen hard boiled eggs peeled
  • 1 8oz package cream cheese softened
  • 4 Tbs salted butter softened
  • 6-8 slices bacon cooked until just slightly crispy and chopped into small pieces
  • 4 Tbs mayonnaise
  • 3 tsp sweet pickle relish more or less to taste
  • salt & pepper to taste

Instructions

  • After your eggs are boiled and peeled, slice each egg in half and place the yolks inside a large mixing bowl. Dice the egg whites and set aside.
  • Using a stand or a hand mixer, combine egg yolks, cream cheese and butter together until smooth.
  • Fold in remaining ingredients, making sure egg whites are folded in last.
  • Cover in an air tight container and refrigerate before serving
  • Serve on your choice of bread or crackers and enjoy!

Notes

This recipe is intended to feed several, so feel free to cut the recipe in half if you're just making enough for a few!

Tried this recipe?

Tag me on Instagram: @SouthernMadeSimple or use the hashtag #SouthernMadeSimple and share your love of southern cuisine!

My favorite way to eat this Cream Cheese and Bacon Egg Salad is on a fresh croissant from the grocery store bakery. You can usually find them fresh daily in 4-6 count packs. I also like to add a little lettuce to mine. Sometimes, though, I just prefer it with club or Ritz crackers. You can’t go wrong either way!

Cream Cheese and Bacon Egg Salad

Are you a fan of egg salad? (And completely out of curiosity – do you like onions in it? No shame, no shame!) If you’ve never tried egg salad with cream cheese and real bacon pieces in it, definitely give this Cream Cheese and Bacon Egg Salad a try! It’s a staple in my house during the summer months when sandwiches are on our lunch menu nearly every day!

Want to serve egg salad in a fun way? Add it along with a variety of different crackers to a summer charcuterie board, just like this one!

Filed Under: Appetizers, Casseroles & Comfort Foods, Home Cookin' Tagged With: bacon, Egg Salad, egg salad recipe, recipe, sandwich, Sliders

Corned Beef & Cabbage Egg Rolls

March 7, 2021 by Laura Tucker Leave a Comment

St. Patrick’s Day has been heavy on my brain for the last few weeks, and last weekend I decided to do a little fusion of Irish and Asian cuisine when I made these scrumptious Corned Beef & Cabbage Egg Rolls! They’re very similar to a classic reuben, only wrapped up and fried to golden perfection and dipped in a little thousand island!

Corned Beef & Cabbage Egg Rolls

Y’all already know how I feel about egg rolls. You’ve seen them quite a few times here on Southern Made Simple! (Cajun Dirty Rice Egg Rolls, BBQ Egg Rolls, Taco Egg Rolls, Sweet Potato Casserole Egg rolls – just to name a few!) I’m not sure what my fascination is exactly, but I just can’t get enough of them. They’re a great appetizer that you get to eat with your hands, and honestly what’s not to love about that?!

Corned Beef & Cabbage Egg Rolls

Usually during this time of year you can find corned beef brisket for a pretty good price in the supermarkets. My friend Kathleen over at Grits and Gouda has a wonderful and simple tutorial for how to cook your corned beef in the Instant Pot, which is exactly how I cooked mine to make these corned beef & cabbage egg rolls! 

Corned Beef & Cabbage Egg Rolls

To make these egg rolls, simply prepare the brisket and allow it to cool. Shred the brisket as finely as you can, then layer a small amount onto an egg roll wrapper, followed by a layer of shredded swiss cheese and then a layer of shredded angel hair cabbage. Roll it all up, drop it in the fryer for a few minutes and voila! 

Here’s a printable version of the full recipe if you’d like to give it a try:

Corned Beef & Cabbage Egg Rolls
Print Recipe Pin Recipe

Corned Beef and Cabbage Egg Rolls

Ingredients

For Corned Beef Brisket:

  • 3-4 lbs Corned Beef Brisket + seasoning packet included with corned beef
  • 1 medium onion sliced
  • 2 cups water

For Egg Rolls:

  • 1 package egg roll wrappers you can find these in the produce section
  • 1 bag shredded angel hair cabbage
  • 2 cups shredded swiss cheese
  • Shredded corned beef brisket
  • Thousand Island for dipping
  • oil for frying

Instructions

For Corned Beef Brisket:

  • To prepare the corned beef brisket, I use my Instant Pot. Place brisket inside Instant pot and pour water, seasoning packet and onion on top. (If you don't want to use an Instant pot, prepare the brisket according to package instructions if available)
  • Secure lid and make sure the valve is set to seal.
  • Set Instant Pot to manual high pressure and cook for 1 1/2 hours
  • Allow the Instant Pot to release pressure naturally for roughly 15 minutes, then do a quick release.
  • Remove brisket to a cutting board or large plate and allow to rest until mostly cool.
  • Shred the brisket with a fork, and then use a knife to cut the shredded meat into smaller portions to make wrapping in an egg roll wrapper easier.

To Assemble Egg Rolls:

  • Preheat oil in deep fryer to 350 F
  • Lay egg roll wrapper sideways with one corner pointing towards you.
  • About 1/4 of the way up the egg roll wrapper, layer a small portion of shredded corned beef, followed by shredded swiss cheese and then shredded cabbage. Be careful not to overfill. Roll the wrapper carefully, tucking in sides midway through the roll. Seal edges with either water or an egg wash.
  • Start by frying just one egg roll at a time - submerge egg roll in preheated oil for 4-5 minutes, turning once during cook time.
  • Remove from oil and transfer to wire rack to drip off excess oil. Cut into egg roll to make sure it is fully cooked all the way through. If not, adjust your cook time slightly.
  • Fry remaining batch of egg rolls and serve with Thousand Island sauce or your favorite dipping sauce. Enjoy!

Tried this recipe?

Tag me on Instagram: @SouthernMadeSimple or use the hashtag #SouthernMadeSimple and share your love of southern cuisine!

Corned Beef & Cabbage Egg Rolls

If you have extra egg rolls left over, I’ve found that they reheat best when popped in an air fryer for a few minutes. I like to dip mine in thousand island dressing, but Russian dressing or even a BBQ sauce would be a great option! While this dish isn’t truly an Irish dish, it’s still a fun little twist on the classic Irish Corned Beef and Cabbage dish, and it’s a perfect appetizer to serve for your St. Patrick’s Day celebration! 

Looking for a few more St. Patrick’s Day inspired dishes? Here’s a few you might like!

Irish Soda Bread | Irish Soda Bread Pudding with Bailey’s Caramel Cream Sauce | Bailey’s No Bake Cheesecake Trifles |  Shamrock Sugar Cookies | St. Patrick’s Day Sugar Wafers | St. Patrick’s Day Snack Crafts for Kids

Filed Under: Appetizers, Home Cookin' Tagged With: Corned Beef and Cabbage Egg Rolls, Corned Beef Brisket Instant Pot, Irish Egg Rolls, Irish Pub Appetizers, Reuben Egg Rolls, St. Patrick's Day recipes

Celebrating National Peanut Month – Peanut Snack Board

March 1, 2021 by Laura Tucker Leave a Comment

Growing up right next door to the peanut capital of the world in the wiregrass region of Alabama, I’m no stranger to the importance of peanuts and the impact they have had in our great state. I am the proud granddaughter of a peanut farmer who farmed peanuts in Dale County for over 65 years, starting at the young age of 13. My hometown of Enterprise, AL has a statue seated in the center of downtown dedicated to the boll weevil, which crippled the cotton industry and forced farmers to turn to peanuts in order to keep their farms and families alive. The growth of peanut production had a profound impact on the economy, and now approximately half of all peanuts produced in the United States are grown right here in Alabama.

Peanut Snack Board

March 1st kicks off National Peanut Month, and what better way to celebrate the crop that turned our state around than with a peanut-themed snack board filled to the brim with all sorts of peanut concoctions and confections! My family loves to make snack boards on the weekend and graze on them all throughout the day. Making a peanut-themed snack board is perfect for getting a good dose of protein and many other nutrients. Peanuts are actually considered a superfood as they deliver superior health benefits in a very small serving. In fact, studies have shown that small amounts of peanut consumption has been associated with a reduced risk of cancer, diabetes and heart disease. Grabbing a handful of lightly salted peanuts to snack on is an excellent choice for your health, and indulging in the goodness of creamy peanut butter cup or peanut butter cookie is certainly good for the soul!

Sugar Roasted Peanuts

Included in my peanut-themed snack board are peanuts served 4 ways: boiled, roasted, sugar roasted and parched. Each way is deliciously different from the next, and it offers a little something for everybody to accommodate their taste preferences. Boiled peanuts are certainly the way to my heart and will always take first prize in my book, but sugar roasted peanuts come in at a respectable second. 

Instant Pot Boiled Peanuts

Also included in my peanut-themed snack board is an assortment of peanut goodies, such as peanut butter cookies, peanut butter cups, peanut butter flavored cereal, various peanut candies and a small bowl of peanut butter to spread on graham crackers. Adding a small bowl of jelly to the board is also a fun idea and allows snackers to make their own mini PB&J crackers!

Peanut Snack Board

I’ve always felt that peanuts are a part of my DNA. There’s just something so euphoric about pulling fresh peanuts off the vine, cracking open a parched peanut at a ball game, or dropping a batch of green peanuts into a pot to boil. I’ll always remember the amazing smell of the peanut mills driving through my hometown growing up, and I’ll always be grateful for the impact they had on my grandfather’s family as the years went on. 

Peanut Snack Board

Throughout the month of march, I encourage you to intentionally incorporate peanuts into your diet and to scope out ways to support local farmers and purchase peanuts grown right here in Alabama. It may not be harvest season, but you can still shop local and benefit Alabama farmers by visiting your local co-op to find a variety of peanuts to stock your own peanut-themed snack board!

Filed Under: Appetizers, Home Cookin' Tagged With: alabama peanuts, Peanut snack board, peanut themed snack board, peanut themed snacks

How to Make a Kid Friendly Charcuterie Board

January 8, 2021 by Laura Tucker Leave a Comment

This shop has been compensated by Inmar Intelligence and its advertiser. All opinions are mine alone. #LANDOFROSTLUNCHES

As we’re marching onward into the new year, I’ve been reflecting on many of the changes and transitions my family made during the previous year. One of my goals for 2021 is to find ways to make those transitions we made feel a little more seamless in our daily lives, particularly the large transition of moving from traditional school to homeschool for my oldest daughter. Keeping a semi-flexible schedule and daily routine is important for all of us in the house, but keeping things fresh, fun and interesting is a top priority when it comes to not only school work, but preparing our meals as well.

How to make a Kid Friendly Charcuterie Board

One way I’m changing things up this year is letting my oldest daughter be much more hands-on in the kitchen during lunch time. While we aren’t ready to dive right into cooking with precise measurements, cook times and ingredients just yet, I still want her to become familiar with putting balanced meals together and show her that she can use her creativity in the kitchen just like she does in the classroom. One of our favorite ways to do that is to create kid friendly charcuterie boards filled with a balance of interesting colors, textures and wholesome goodies to fuel us through lunch and snack time!

How to make a Kid Friendly Charcuterie Board

Traditionally, charcuterie boards feature cured meats, dried fruits, cheeses and nuts. However, the beauty of creating charcuterie boards or “snack” boards is that there truthfully isn’t a wrong way to do it. The sky is the limit when it comes to what you can add to your own board! Because we love to make these boards to serve for lunch and then to munch on later in the afternoon for snack, I love to add fresh meats, fresh and dried fruits, nuts, a variety of cheeses and crackers.

One piece of advice that I feel is important when creating a charcuterie board with your children – listen to their cues when it comes to filling up the serving platter. If your child is easily over stimulated, scaling back on the variety of foods you include may be a good idea. On the flip side, you may have a little one who wants ALL the snacks, and that’s okay, too! Creating a charcuterie board is a great way to learn about the food pyramid and all of the different food groups. Let them pull things from the pantry and refrigerator that they truly love, all while showing them how to incorporate healthy and balanced options onto the board!

How to make a Kid Friendly Charcuterie Board

At the beginning of the week, I always make out my Publix shopping list and try to make sure I have plenty of fresh produce and other ingredients to build a charcuterie board on hand. In addition to fruits and veggies, I love to keep a variety of Land O’ Frost® premium meats on hand – particularly Land O’ Frost® Premium Meat Oven Roasted Turkey Breast and Land O’ Frost® Premium Meat Old World Style Black Forest Ham. These meats are a go-to staple for my family as they’re a healthy and affordable protein, contain no added hormones, no artificial flavors, and no by-products. Plus, Land O’ Frost is a family owned company, and I love having a large variety of products and flavors to choose from while shopping at my local Publix.

How to make a Kid Friendly Charcuterie Board

To add a little “pizzazz” to our charcuterie boards, I taught my daughter how to fold the meat accordion style and keep it in place using toothpicks. Not only was this a fun way to make our board look extra pretty, but it was also a great tool for improving her hand-eye coordination! We used cookie cutters to make fun shapes out of cheese slices, and this can also easily be done with the slices of meat on the board.

Here are a few of the things we added to our board to give you some ideas for how to create your own kid friendly charcuterie board:

Fresh Fruit (grapes, strawberries, blueberries)
Dried Fruit (raisins, yogurt covered cranberries)
Meat (we use Land O’ Frost® Oven Roasted Turkey Breast and Old World Style Black Forest Ham)
Nuts or granola
A variety of cheeses
Fresh Veggies (carrot sticks, broccoli, etc.)
Fruit Dip or Veggie Dip
Crackers or pretzels
Cured Meats (if your children are into it. We chose pepperoni!)

How to make a Kid Friendly Charcuterie Board

We’re looking forward to getting really creative in the kitchen in 2021 and perfecting our charcuterie board skills while learning about the importance of making mealtime balanced and fun. Next time you’re making your grocery list, make sure you swing by your local Publix to pick up all of your charcuterie boards needs, including Land O’ Frost premium meats to make your charcuterie board complete!

What things are you looking forward to in 2021? What are some of your favorite things to add to a charcuterie board? Leave a comment below and share your ideas! Happy New Year, friends!


Filed Under: Appetizers, Home Cookin' Tagged With: charcuterie board ideas, Kid Friendly Charcuterie board

Sugar Roasted Peanuts

December 29, 2020 by Laura Tucker Leave a Comment

Peanuts! Get your peanuts! Sugar roasted peanuts are a scrumptious snack that are very easy to make, and if you package them up and tie a ribbon around them, they make a wonderful treat to share with a friend! Growing up right next door to the peanut capital of the world, peanuts have always played a significant role in my life and the community that I was raised in. As the granddaughter of a peanut farmer, I’ve learned quite a bit over the years about the economical importance this tiny nut has had not only on my own family, but on the state of Alabama as a whole. They’re arguably one of the most important crops grown on American soil, and they’re loaded with important nutrients that just might surprise you! 

Sugar Roasted Peanuts

During peanut harvest season in the early fall, I shared my recipe for Instant Pot Boiled Peanuts – which are a true southern delicacy that most folks around here just can’t get enough of. I’ve even been known to eat them for breakfast, truth be told. While boiled peanuts are undoubtedly my favorite way to snack on these lovely little legumes, these sugar roasted peanuts come in at a close second. 

Sugar Roasted Peanuts

Most people know that peanuts are a great source of protein, but did you know that incorporating a handful of peanuts into your daily diet can reduce your risk of heart disease, diabetes, colon cancer and promote healthier cholesterol levels? (You can read more about the health benefits of peanuts here.)  Peanuts are actually classified as a superfood, which further proves that not all heroes wear capes! 😉 

Sugar Roasted Peanuts

These sugar roasted peanuts, or “candied peanuts” are vey easy to make. In fact, I use the same recipe when making my Sugar Roasted Pecans! I frequently make these around the holidays or for special occasions, but they’re great to make and eat any time of year. I love to add them to charcuterie boards, too! Here’s a free printable copy of the recipe if you’d like to give it a try!

Print Recipe

Sugar Roasted Peanuts

Ingredients

  • 1 16 oz container unsalted dry roasted peanuts
  • 1 egg white
  • 4 tsp water
  • 1 Tbs vanilla extract
  • 1 cup white granulated sugar
  • 2 tsp cinnamon
  • 3/4 tsp salt

Instructions

  • Preheat the oven to 250 F
  • Line baking sheet with parchment paper
  • Using a mixer, beat egg white until frothy. Add in water and vanilla and continue mixing
  • Stir in cinnamon, sugar and salt
  • Add in peanuts and coat with egg mixture completely using a large spoon
  • Spread the peanuts evenly on to the baking sheet and bake for 1 hour, being sure to stir every 15 minutes
  • Enjoy!

Tried this recipe?

Tag me on Instagram: @SouthernMadeSimple or use the hashtag #SouthernMadeSimple and share your love of southern cuisine!

The photo below is of my 2 year old daughter sneaking a peanuts while I was trying to photograph them. She crawled up in my lap while the camera was still in my hand, so I kept snapping photos to capture the sweet moment!

Sugar Roasted Peanuts

If you like this recipe, be sure to check out these other peanut favorites found right here on Southern Made Simple!

Instant Pot Boiled Peanuts | No Bake Peanut Butter Pie | Peanut Butter Fudge | Peanut Butter Rice Krispie Treats | Peanut Butter Corn Flake Candy

Filed Under: Appetizers, Desserts, Home Cookin' Tagged With: Candied peanuts, Cinnamon sugar roasted peanuts, Sugar roasted peanuts, sugared peanuts

Venison Sausage Balls

December 27, 2020 by Laura Tucker 1 Comment

We’re currently in the heart of deer season here in south Alabama, and my husband has been in the woods quite a bit lately trying to make sure our freezer is stocked with venison to last us a full year until next year’s deer season begins. These venison sausage balls are a quick, simple, no-fuss and no-fail appetizer that I love to whip up any ol’ time, but especially on game days when college football is on the big screen.

Venison Sausage Balls

These sausage balls only call for a handful of ingredients, and they take about 15 minutes to cook all the way through in the oven. My husband loves to eat them by themselves, but I personally love to dip them in a little bit of pepper jelly or drizzle a smidge of syrup over them to give them a bite of sweetness. If I’m lucky and there’s any leftovers the next morning, I love to pop them in the microwave and have them for breakfast!

Venison Sausage Balls

While this recipe calls for ground venison sausage, you can easily adapt this recipe to use pork sausage. If you want to spice things up a tad, spring for a spicy sausage blend instead of using mild! I use a combination of shredded cheddar and shredded mozzarella in the mixture because I believe the mozzarella adds in a little extra moisture to keep them from feeling dry. You can experiment with different cheeses if you so choose, and even add in a little creole or cayenne pepper to give them so extra flavor!

Venison Sausage Balls

To make sure my sausage balls are even in size so they will all cook evenly, I love to use a click-release cookie scoop and plop them right on top of the baking sheet without getting my hands dirty. If you happen to have any leftovers, just store them in an airtight container in the fridge. They’ll keep for 4-5 days, but they’ve certainly never lasted that long in my household!

Here’s a free printable copy of the recipe if you’d like to give it a try!

Venison Sausage Balls
Print Recipe Pin Recipe

Ingredients

  • 3 cups Bisquik baking mix
  • 1 lb ground venison or ground pork sausage
  • 1 cup shredded cheddar cheese
  • 1 cup shredded mozzarella cheese
  • 1 Tbsp Worcestershire Sauce
  • 2/3 cup whole milk

Instructions

  • Preheat oven to 400 F
  • Using a stand mixer, combine all ingredients and blend until well combined
  • Use a cookie scoop or your hands to roll out dough into ping-pong sized balls and place on a greased baking sheet
  • Bake for 15-17 minutes
  • Enjoy!

Tried this recipe?

Tag me on Instagram: @SouthernMadeSimple or use the hashtag #SouthernMadeSimple and share your love of southern cuisine!

Venison Sausage Balls

Looking for more great venison recipes? Check out these recipes found right here on Southern Made Simple!

Venison Meatloaf | Grilled BBQ Bacon Venison Burgers | Venison Country Fried Steak | Bacon Wrapped Venison Tenderloin | Venison Pot Roast | Venison Taco Bites

And while you’re at it, check out this roundup of other amazing venison recipes!

Do you have a favorite venison recipe you’d love to share? Or maybe a favorite game day (or any day) appetizer that’s your go-to this time of year? What would you pair with these venison sausage balls? Leave a comment below and share the love!


Filed Under: Appetizers, Breakfast, Home Cookin' Tagged With: Deer sausage balls, Game day sausage balls, Venison Recipes, Venison sausage balls

Instant Pot Boiled Peanuts

September 15, 2020 by Laura Tucker Leave a Comment

These Instant Pot Boiled Peanuts are a certified southern delicacy, and the cook time is cut in half thanks to pressurized cooking! Go ahead and crack a few open – I bet you can’t eat just one!

Instant Pot Boiled Peanuts

I believe in the root of my soul that there is no southern delicacy finer than fresh boiled peanuts. There may be some that would challenge me on that notion, but they are entitled to their wrong opinion. There’s just something about seeing a hand painted sign on the side of the road that says “Fresh Boiled P-Nuts” that sparks a knee-jerk reaction to pull over right away and get a sack full. It’s like it’s just embedded in our DNA or something.

My grandfather was a peanut farmer in the Wiregrass area of Alabama, also known by many as The Peanut Capital of the World. Growing up in the southeastern corner of Alabama, peanuts were part of our culture. I remember many long days and nights as a child picking peanuts off of their vine while gathered around a truck bed packed to the brim, and I remember my parents getting out a huge stock pot and boiling the peanuts for hours, just so we could enjoy a batch of boiled peanuts. Those were some good memories.

Instant Pot Boiled Peanuts

This past weekend we made a visit to Enterprise, AL where I grew up to visit my mother. Her brother has been farming peanuts for what seems like forever, and we were all thrilled when he pulled into her driveway with a truck bed full for us to pick and bring back home with us. Once I got home, I poured my sack of green peanuts into my sink and washed all of the Alabama clay off of them to prep them to boil. Instead of reaching for my large stock pot, though, I reached for my Instant Pot to get the job done a little quicker.

Instant Pot Boiled Peanuts
Print Recipe Pin Recipe

Instant Pot Boiled Peanuts

Equipment

  • Instant pot or pressure cooker

Ingredients

  • 2 lbs fresh green peanuts
  • 1/2 cup iodized salt
  • 10 cups water

Instructions

  • Thoroughly wash and rinse any dirt and debris off of peanuts
  • Add 2 lbs of peanuts to instant pot and cover with water
  • Add salt and stir using a large wooden or slotted spoon
  • Close lid and seal properly
  • Cook on high pressure for 60 minutes
  • Allow pressure to release naturally
  • Remove lid and allow peanuts to sit in their salty water for an additional hour
  • Serve and enjoy

Notes

Please note that this recipe uses green peanuts and not dried or raw peanuts. If using raw peanuts, soak the peanuts for 30 minutes prior to cooking and increase cook time by 25-30 minutes.

Tried this recipe?

Tag me on Instagram: @SouthernMadeSimple or use the hashtag #SouthernMadeSimple and share your love of southern cuisine!

After washing and rinsing the peanuts, I measured out 2 lbs worth and placed them inside my instant pot. I added 10 cups of water to cover my peanuts – but make sure you check your pot to make sure you’re not going past the recommended fill line. I then added in the salt and gave it a good stir. I set the the timer for 60 minutes on high pressure, then let the pressure naturally release after the timer went off. Overall, this equates to about 2 hours worth of cook time when you count the time it takes for the pot to come to pressure and to release pressure.

But we’re not quite done just yet. If you’re ready to dig into the boiled peanuts at this point, by all means go ahead. They’ll be delicious. However, my personal preference is to let them sit in the salty water for at least another hour. This really makes a big difference in the saltiness in my opinion, so taste test first before deciding to let them soak any longer. The key to that perfectly salty peanut flavor is in the soaking!

What’s the difference in green peanuts and raw peanuts?

I remember being so confused by the idea of “green” peanuts as a child. Really, they’re not green at all. This term simply means that they’ve been harvested straight from the ground and still retain a lot of their moisture, making a superior boiled peanut in my opinion. The term “raw peanuts” means that they’ve been sitting out for several days after harvest and have had more time to dry out a bit. Raw peanuts are 100% fine to boil, you’ll just have to soak them for a bit and increase their cook time a smidge.

Instant Pot Boiled Peanuts

My recipe for Instant Pot Boiled Peanuts is pretty simple – just water and salt is all you need. If you feel up to it, you can experiment with peanut flavors by adding in a little creole or hot sauce into the pot to create “Cajun” boiled peanuts. I typically add about 1/8 cup creole seasoning to mine to get that scrumptious spicy Cajun flavor!

If you’re looking for some more peanut goodness, I’ve got you covered! You’ll LOVE these peanut recipes found right here on Southern Made Simple!

No Bake Peanut Butter Pie | Peanut Butter Fudge | Peanut Butter Rice Krispie Treats | Peanut Butter Corn Flake Candy

Filed Under: Appetizers, Home Cookin' Tagged With: alabama boiled peanuts, boiled peanuts, green boiled peanuts, How to make boiled peanuts, Instant pot boiled peanuts, pressure cooker boiled peanuts, southern boiled peanuts

Sweet Heat Zucchini Pickles

June 27, 2020 by Laura Tucker Leave a Comment

This recipe for sweet heat zucchini pickles has the perfect mixture of sweet, tangy and a touch of heat. Pile them on top of a burger, heap them on a sandwich or just eat them straight out of the jar!

Sweet Heat Zucchini Pickles…

Read More »

Filed Under: Appetizers, Home Cookin' Tagged With: Pickled Zucchini, Sweet Zucchini Pickles, Zucchini Pickles

Sweet Heat Squash Pickles

June 25, 2020 by Laura Tucker Leave a Comment

This recipe for sweet heat squash pickles has the perfect mixture of sweet, tangy and a touch of heat. Pile them on top of a burger, heap them on a sandwich or just eat them straight out of the jar!

Sweet Heat Squash Pickles …

Read More »

Filed Under: Appetizers, Home Cookin' Tagged With: Crookneck Squash Pickles, Squash Pickles, Summer Squash Pickles, Sweet Squash Pickles, Yellow Squash Pickles

  • Go to page 1
  • Go to page 2
  • Go to page 3
  • Interim pages omitted …
  • Go to page 8
  • Go to Next Page »

Primary Sidebar

Connect

  • Facebook
  • Instagram
  • Pinterest
  • Twitter

Lookin’ for something in particular?

Welcome

ProfileImage
"Hi there! I'm Laura, and I'm a child of God, a wife, and a mother of two. My roots are planted deep in rural Alabama. Monograms, crafting and Southern cuisine - yes, these are a few of my favorite things! Join me as I grow my family in the beautiful South where the tea is sweet, the accents are sweeter, & someone's heart is always being blessed." [Read more...]

Subscribe via E-Mail

Footer

  • Facebook
  • Instagram
  • Pinterest
  • Twitter
Disclosure:
My site may contain affiliate links, which means that if you buy the products featured, I receive a small percentage of the sale price at no extra expense to you. Thanks for visiting Southern Made Simple!
By using this website you agree to our:

Privacy Policies

Copyright © 2023 · Foodie Pro Theme by Shay Bocks · Built on the Genesis Framework · Powered by WordPress