• Skip to primary navigation
  • Skip to main content
  • Skip to primary sidebar
  • Skip to footer

Southern Made Simple

Keeping things simple with a smidge of Southern charm

  • Home
  • About Me
    • Policies
    • Work With Me / Media Kit
  • Home Cookin’
    • Appetizers
    • Breakfast
    • Main Course Meals
    • Desserts
    • Recipe Index
  • My Favorite Things
    • DIY Projects
    • Farmhouse Finds
    • Product Reviews
    • VBS Resources
  • For the Kids
    • Cloth Diapering
    • Kids Fashion
    • Parenting and Lifestyle
  • Etsy Shop
  • Contact

recipe

Cream Cheese and Bacon Egg Salad

April 25, 2021 by Laura Tucker 3 Comments

Old fashioned egg salad isn’t for everyone. I totally get that. For me, egg salad falls into my “trust issues” category when it comes to food. I love egg salad, but I don’t love everyone’s egg salad. I’ve been to too many potlucks where I bit into a tiny triangular egg salad sandwich, only to find that whoever made it put something crunchy in it, like raw onions. The audacity.

Cream Cheese and Bacon Egg Salad

I’m teasing, of course. I know the way that I prefer my egg salad is not the same way that others might prefer it, but this particular post is to tell you about my absolute favorite way to eat egg salad, as it may be a little unconventional to some. If you want a sure fire way to hit a home run with your egg salad, you’ll need two things:

Cream cheese + Bacon

Real bacon. Not those artificial bacon bits. You’ll start with boiling your eggs, peeling and then separating the yolks from the whites. While the eggs are boiling, go ahead and get your bacon cooking. You’ll want to make sure when cooking your bacon that you don’t cook it to a crisp. You want the bacon to still be a little soft. It’s all fun and games until someone breaks a tooth hitting a piece of overcooked bacon in their egg salad. To quickly chop the bacon, I turn to these trusty herb shears to get the job done. If you don’t have a pair of herb shears in your kitchen, I highly recommend them!

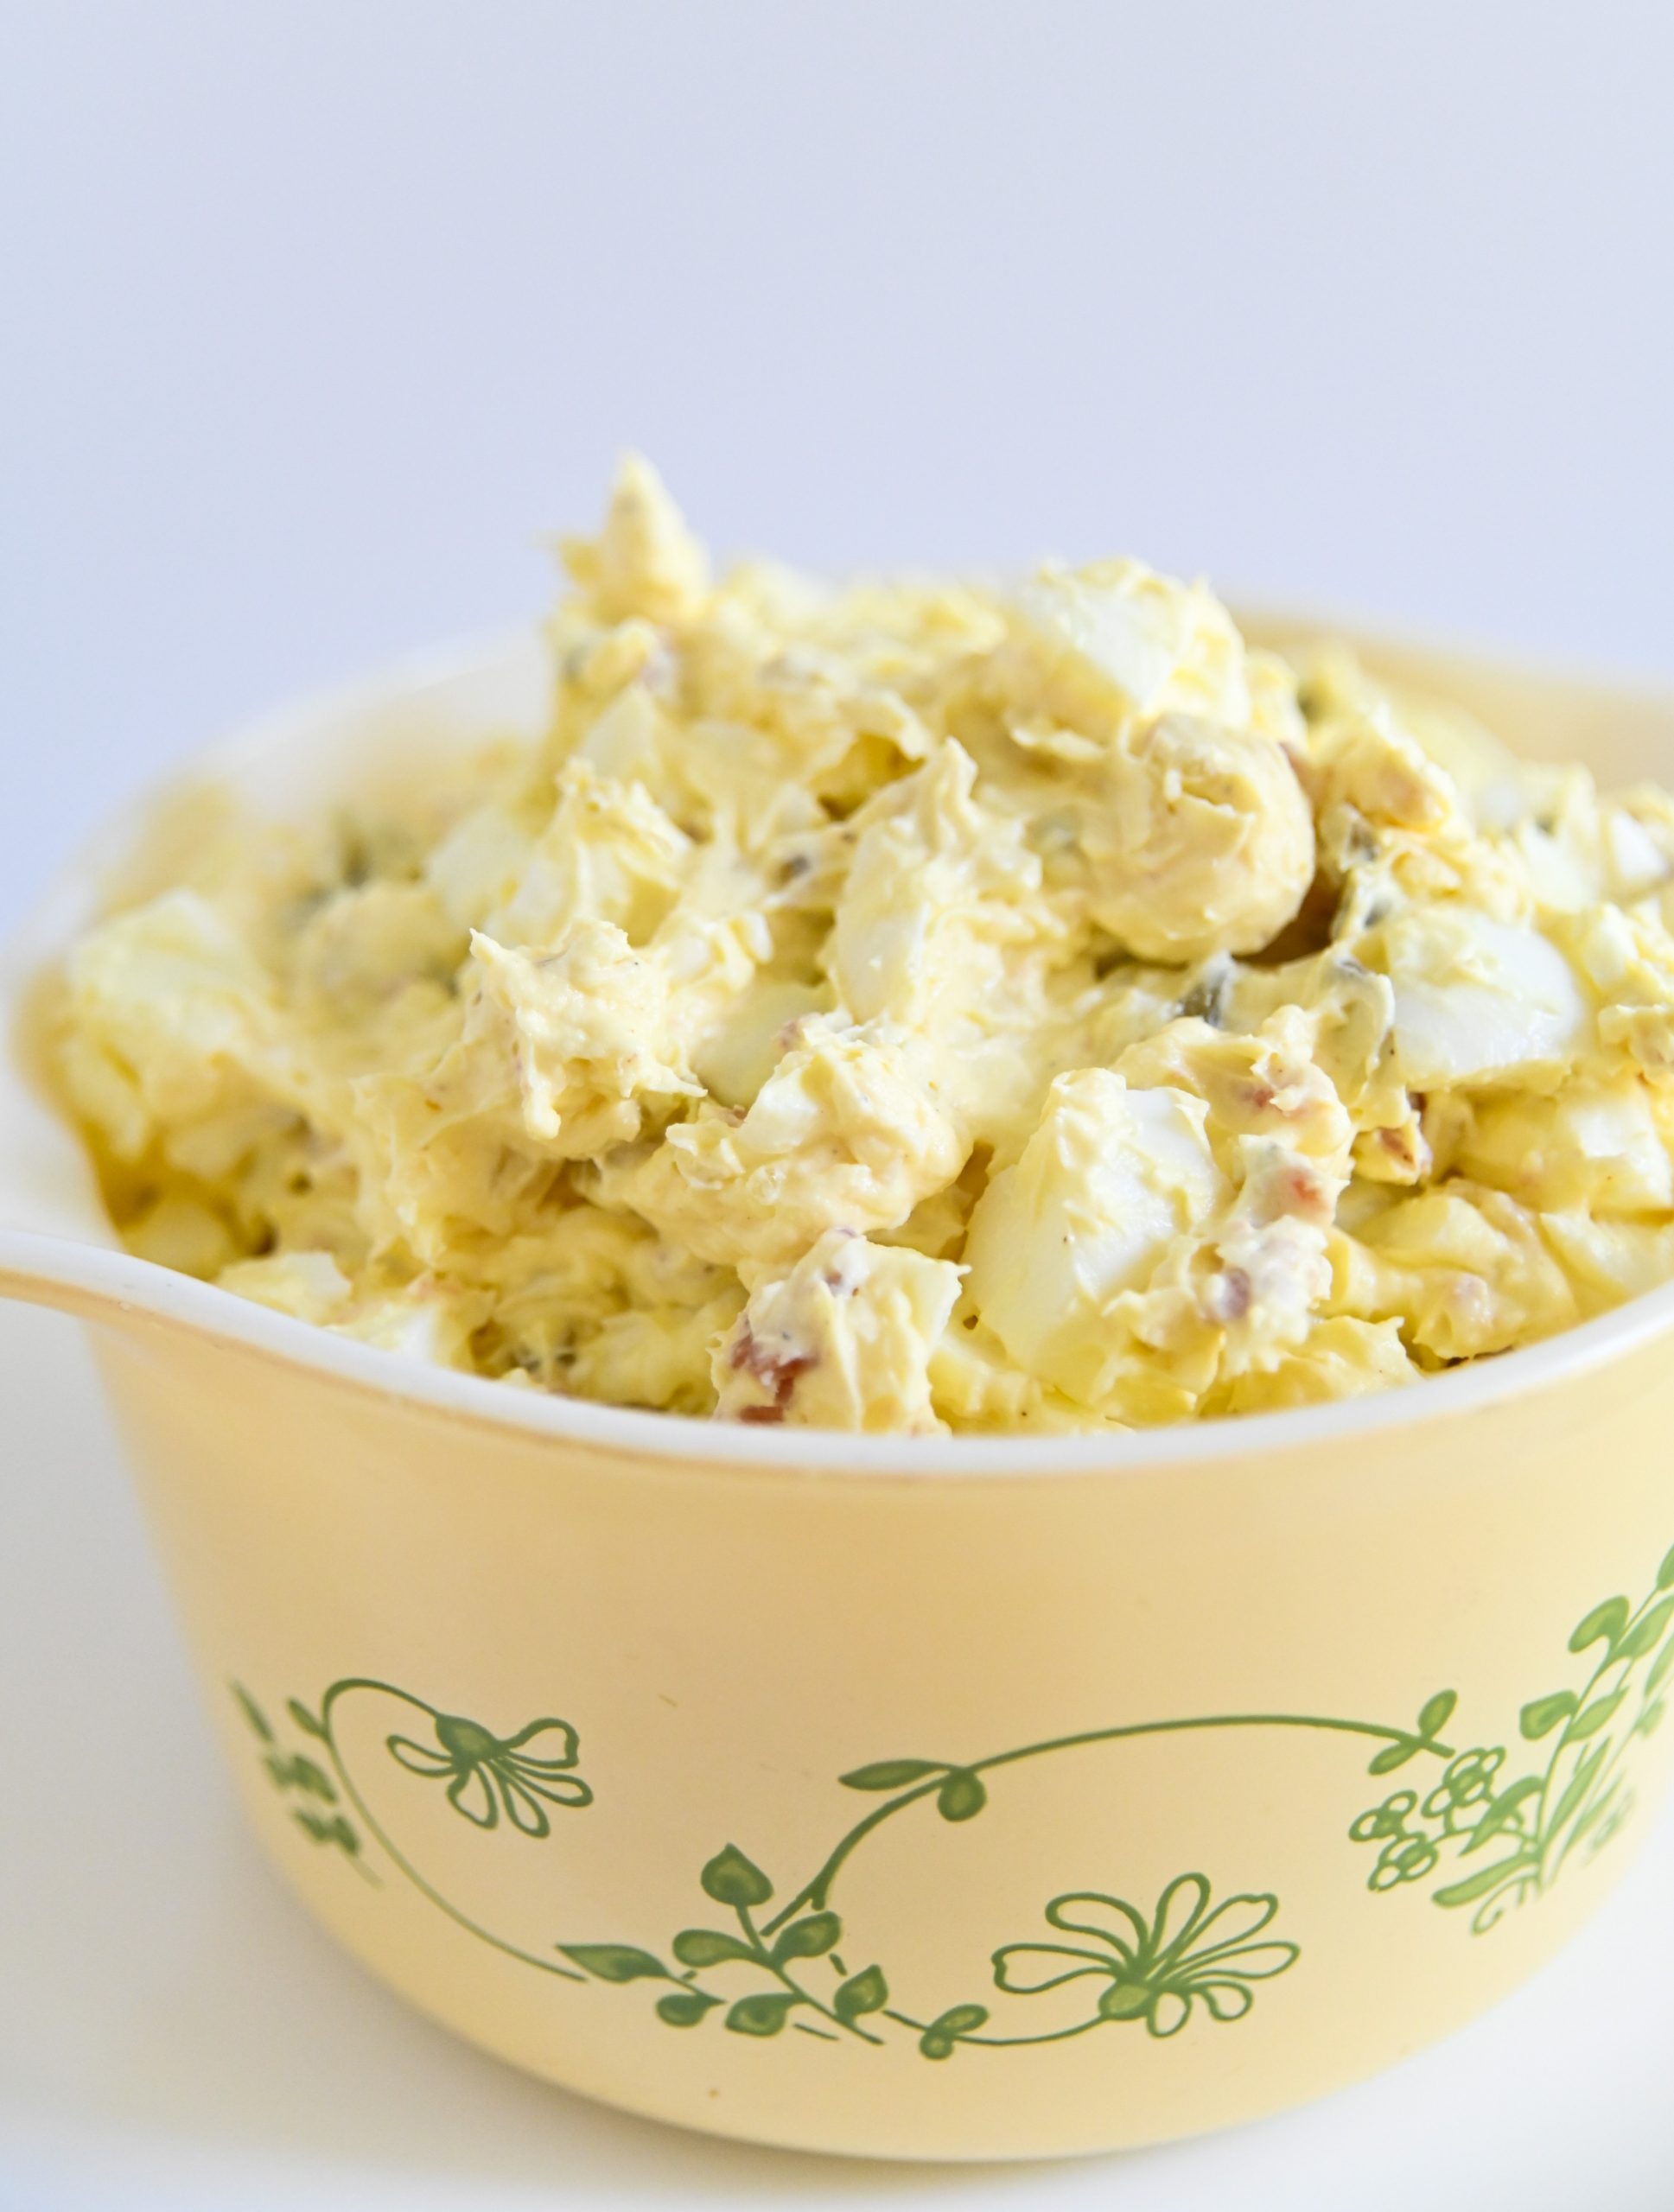
Using a hand or a stand mixer, combine cooked egg yolks, softened cream cheese and softened butter until smooth. Next, add in mayonnaise, sweet relish and a little salt and pepper to taste. Next, fold in the bacon pieces and diced egg whites. Cover and chill for about an hour before serving. Here’s a free printable copy of my recipe if you’d like to give it a try!

(Note: This recipe is doubled to feed a larger crowd. Feel free to reduce the ingredients as you see fit.)
Cream Cheese and Bacon Egg Salad
Print Recipe Pin Recipe

Cream Cheese and Bacon Egg Salad

Ingredients

  • 1 dozen hard boiled eggs peeled
  • 1 8oz package cream cheese softened
  • 4 Tbs salted butter softened
  • 6-8 slices bacon cooked until just slightly crispy and chopped into small pieces
  • 4 Tbs mayonnaise
  • 3 tsp sweet pickle relish more or less to taste
  • salt & pepper to taste

Instructions

  • After your eggs are boiled and peeled, slice each egg in half and place the yolks inside a large mixing bowl. Dice the egg whites and set aside.
  • Using a stand or a hand mixer, combine egg yolks, cream cheese and butter together until smooth.
  • Fold in remaining ingredients, making sure egg whites are folded in last.
  • Cover in an air tight container and refrigerate before serving
  • Serve on your choice of bread or crackers and enjoy!

Notes

This recipe is intended to feed several, so feel free to cut the recipe in half if you're just making enough for a few!

Tried this recipe?

Tag me on Instagram: @SouthernMadeSimple or use the hashtag #SouthernMadeSimple and share your love of southern cuisine!

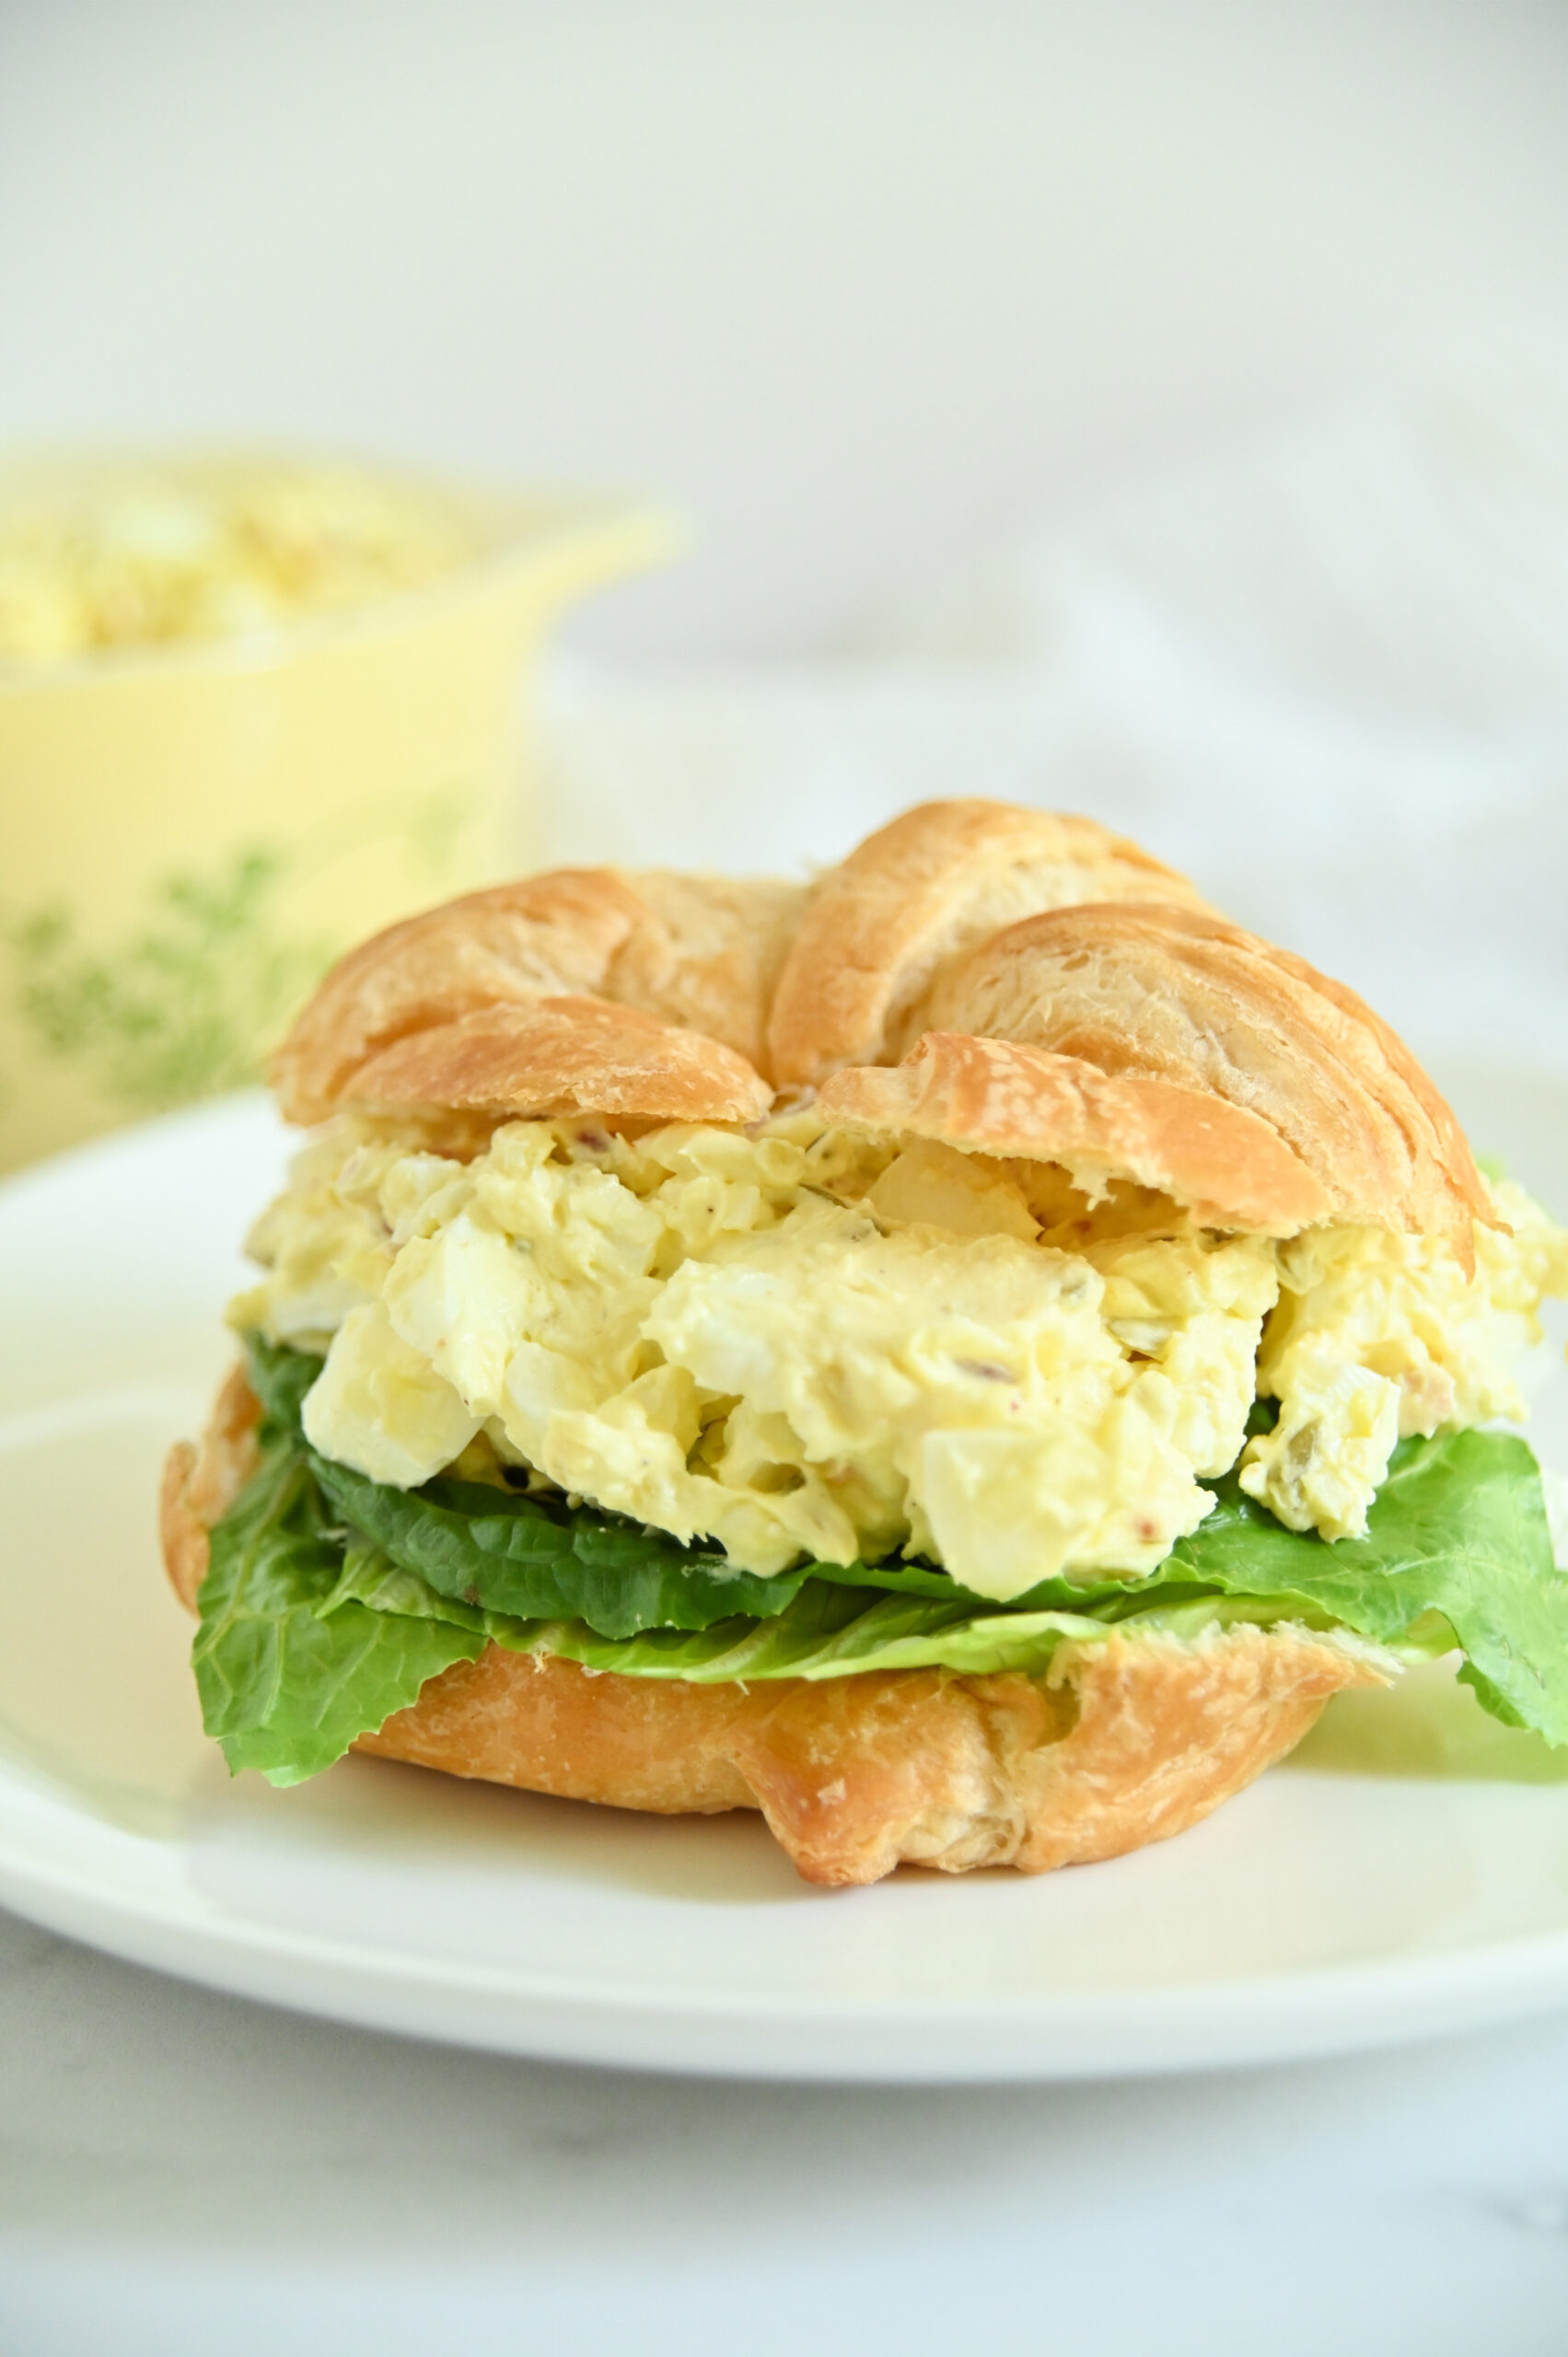
My favorite way to eat this Cream Cheese and Bacon Egg Salad is on a fresh croissant from the grocery store bakery. You can usually find them fresh daily in 4-6 count packs. I also like to add a little lettuce to mine. Sometimes, though, I just prefer it with club or Ritz crackers. You can’t go wrong either way!

Cream Cheese and Bacon Egg Salad

Are you a fan of egg salad? (And completely out of curiosity – do you like onions in it? No shame, no shame!) If you’ve never tried egg salad with cream cheese and real bacon pieces in it, definitely give this Cream Cheese and Bacon Egg Salad a try! It’s a staple in my house during the summer months when sandwiches are on our lunch menu nearly every day!

Want to serve egg salad in a fun way? Add it along with a variety of different crackers to a summer charcuterie board, just like this one!

Filed Under: Appetizers, Casseroles & Comfort Foods, Home Cookin' Tagged With: bacon, Egg Salad, egg salad recipe, recipe, sandwich, Sliders

Easy Peasy Peanut Butter Pie

September 11, 2019 by Laura Tucker 38 Comments

This recipe and photographs for Easy Peasy Peanut Butter Pie were updated September 2019. Affiliate links may be included throughout this post at absolutely no cost to you.

No matter where you are in the world, there’s always that one thing that immediately takes you right back home. One of the most beautiful things about the United States is that each and every state has something unique that sets it apart from the rest. I pride myself on having roots planted deep within the Alabama clay, and I love to celebrate my Southern heritage because it’s a building block in the foundation of who I am (and this very blog, too!)

Easy Peasy Peanut Butter Pie…

Read More »

Filed Under: Current Giveaways, Desserts, Home Cookin' Tagged With: natural peanut butter, Peanut butter, peanut butter pie, recipe

Cheesy Bacon & French Onion Spinach Dip Recipe

January 6, 2016 by Laura Tucker 6 Comments

If you’re anything like me, you may have a hard time incorporating certain greens into your diet. I like most veggies, but I don’t just love them. It’s something I should really try to change about my tastes and my lifestyle, because vegetables are good for you! I just have a hard time straying from the norm. You know, peas, green beans, corn, and…yeah. That’s about it when it comes to actually making it to a dinner plate in this house. The only time I would ever eat spinach on purpose is on my Subway sandwich when it’s hidden amongst the lettuce and tomatoes. It’s like I said, I don’t dislike veggies, I just don’t really know to incorporate them into foods that I definitely love.

I tried hiding spinach in my smoothies for a little while. It lasted about a week. I could tolerate it in my smoothie, but I soon found out I was pregnant and then quickly found the smoothies to be absolutely repulsive. That’s pregnancy for ya! Now that I’m no longer pregnant, I still just can’t bring myself to drink them. However, I’ve now found a new way to incorporate spinach into my diet. Now, I’m not saying that dish is healthy at all. In a perfect world, it would be fat free...just like every other food would be, but let’s just celebrate one small victory at a time here. I’m eating lots of spinach these days, and it’s in the form of a hot, savory and cheesy bowl of deliciousness. Say hello to your new favorite dip recipe: Cheesy Bacon & French Onion Spinach Dip.

BOOM! You’re welcome. 😉

Cheesy Bacon & French Onion Spinach Dip Recipe - This dip is SO delicious and so simple to make! You can even prepare it ahead of time and bake when you're ready!

Forget what you think you know about spinach dip. Before I first made this dip, I thought of spinach dip as that super bland dip you can buy in the chip aisle next to that less than stellar cheese in a jar stuff. It’s typically served room temp and it’s pretty lackluster next to other dishes in a spread. This dip is anti that, y’all. But what about those regular hot spinach dips that are pretty good and not from a can? Forget ’em. They’re likely missing that special oomph. They’re probably missing that extra somethin’ somethin’ that you really want in a dip. You know, that va va voom! But not this dip, y’all. This one is in a league of it’s own….

Read More »

Filed Under: Appetizers, Home Cookin' Tagged With: appetizer, dip recipe, recipe, spinach dip

Grinchy-Green Christmas Fluff

December 7, 2015 by Laura Tucker 5 Comments

You’re a SWEET One, Mr. Grinch! Grinchy-Green Christmas Fluff

You're a SWEET One, Mr. Grinch! {Grinchy-Green Christmas Fluff Recipe}…

Read More »

Filed Under: Desserts, Home Cookin' Tagged With: Christmas, dessert, recipe, The Grinch

Pumpkin Layered Cheesecake Recipe

November 23, 2015 by Laura Tucker Leave a Comment

Cheesecake.

It’s a beautiful thing, y’all. When I count my blessings, I count cheesecake twice. It’s basically the 8th wonder of the world if we want to get real here. At least, in my mind it is. 😉

You’d THINK a girl like me who loves cheesecake more than most would’ve been to The Cheesecake Factory a time or two. But nope! I really haven’t. Sadly, the closest I’ve gotten to The Cheesecake Factory is an episode of The Big Bang Theory. Weep not for me, my cheesecake lovin’ friends. I will go forth into the golden gates of cheesecake heaven one glorious day, and I will indulge. Hard.

In the mean time, I’ll just make my own! Now, I don’t know that this could hold a candle anywhere near to what The Cheesecake Factory cranks out, but this pumpkin layered cheesecake recipe is pretty ding dong good if I do say so myself! Right on time for Thanksgiving, too! 🙂

Pumpkin Layered Cheesecake Recipe - Perfect for a Thanksgiving dessert!

You may have seen me share my love of all things pumpkin before. It’s something I just can’t keep a secret! I recently shared a delicious recipe for Glazed Pumpkin Praline Mini Cakes, which would also be an AH-MAZING addition to the Thanksgiving dessert table. Just sayin’.

Right now, though, I’m all about this cheesecake. It’s pretty simple to make, and it only calls for 1/2 cup of pumpkin puree (which means you can totally use the remaining pumpkin puree to make those mini cakes I just shared.) #Yourewelcome

Here’s what you’ll need for this dish:

Ingredients:

  • 2 packages cream cheese, softened
  • 1/2 cup sugar
  • 1/2 tsp vanilla extract
  • 2 eggs
  • 1/2 cup pumpkin puree
  • 1/2 tsp cinnamon
  • 1/4 tsp nutmeg
  • 1 9 inch graham cracker crust pie shell

Directions:

  1. Preheat oven to 350 F
  2. Using a mixer, beat together cream cheese, vanilla and sugar in a large bowl until smooth. Then add in eggs.
  3. Dip out 1 cup of cream cheese mixture and set aside.
  4. Try really hard not to lick the spoon.
  5. Pour remaining mixture into pie crust.
  6. Using your reserved cream cheese mixture, blend in pumpkin, cinnamon and nutmeg.
  7. Pour pumpkin mixture on top of cream cheese mixture in the pie crust.
  8. Bake for 35-40 minutes, or until the center of the pie is mostly set.
  9. Allow to cool completely, then refrigerate for 3 or more hours.
  10. Enjoy!
Are you a cheesecake lover, too? Maybe you’re crazy about pumpkin like I am? Do you have another fabulous cheesecake recipe you’d like to share? I’d LOVE to hear about it!

Filed Under: Desserts, Home Cookin' Tagged With: cheesecake, pumpkin, pumpkin puree, recipe, thanksgiving

Copycat Peppermint Patties

November 14, 2015 by Laura Tucker Leave a Comment

I’ve definitely been on a peppermint kick here lately. I’ve been having so much fun buying stocking stuffers and Christmas gifts for my 6 month old this week, and it’s just really put me in the holiday spirit! While I’m not ready to start decorating my house yet (that absolutely comes AFTER Thanksgiving in this house), smelling and using peppermint essential oil certainly makes me want to!

I recently posted a delicious recipe for double mint brownies using peppermint essential oil. I mentioned how it would be a great gift to package up and give to family members or friends for the holidays. I then started brainstorming some other ways that I could use peppermint oil in the kitchen. I wanted to think of some yummy treats that would also be great to share with others as a gift. Then I thought of these:

Say hello to my little friends!

Copycat Peppermint Patty Recipe using Peppermint Essential Oil

I was so excited to try my hand at making these. They’re pretty darn close to real peppermint patties as far as taste goes. They’re just missing that perfectly pressed/processed round shape that the real ones have. But who needs that anyway, right?! These are also a little bit healthier that the real deal, too. Here’s what you’ll need to make these:

Ingredients:

  • 1/2 cup refined coconut oil (It doesn’t have a coconutty taste)
  • 1/2 tsp vanilla
  • 3 or 4 tbs corn syrup (Honey also works great!)
  • 6-7 drops peppermint essential oil (You can also use 1 tsp peppermint extract instead of EO)
  • Chocolate almond bark or baking chips, melted

Copycat Peppermint Patty Recipe using Peppermint Essential Oil

Directions:

  1. Mix coconut oil, peppermint oil, corn syrup and vanilla together in a mixing bowl. The coconut oil will start to soften as you mix. (Tip: Before mixing, slightly melt the coconut oil in the microwave for a few seconds to ensure that you can stir it easily. Do not melt so much as to make it completely liquid.)
  2. Place the mixture in the freezer for 10 minutes to allow it to harden a bit.
  3. Line a baking sheet with wax paper.
  4. Once the filling has hardened in freezer, take it out and dip out spoonfuls of the filling onto the wax paper. If you’d like, press them into a flatter shape. Be careful though, because the coconut oil will melt very quickly if you use your hands to press them.
  5. Place back into the freezer for another 10 or so minutes.
  6. Melt chocolate
  7. Remove patties from freezer. Using a spoon, pour chocolate over each patty. *Note: You may find that the chocolate doesn’t stick right away because the coconut oil melts quickly. That’s OK. You’re going to repeat this process a second time, and it will stick much better the second time.
  8. Place back in freezer for another 10 minutes. Remove and pour chocolate over each patty once more. If you’d like, you can repeat the process a third time to cover the bottom with chocolate
  9. Place in freezer or refrigerator for a final time to allow to harden. Once you’ve done this, you’re all done! Enjoy!

While these can sit out, they are best stored in the refrigerator. Coconut oil can quickly melt if it is ever at a temperature slightly hotter than room temp.

If you’re making these to give as a little DIY gift, you can put them in a cute little Christmas tin or put in a cellophane bag and tie with a ribbon like I did! These are so yummy and just melt in your mouth. Anyone who loves chocolate and mint together would love these for sure!

If you would like to learn more about essential oils, I recommend checking out this post that my sister wrote. You can find it here: Getting Into Essential Oils as a Skeptic. It’s packed full of great into and tips on how to get started.

Filed Under: Desserts, Home Cookin' Tagged With: copycat peppermine patties, DIY, Essential oil, holiday candy, peppermint essential oil, Peppermint Patties, recipe

Glazed Pumpkin Praline Mini Cakes

November 9, 2015 by Laura Tucker 3 Comments

I have a problem, y’all.

When Fall rolls around each year and I see that the grocery store has moved the pumpkin puree to the end cap or center aisle (hello impulse shoppers!), it’s like moths to the flame. Every time. No lie. There is no buying just one can. I’ll buy seven! There’s just something about this time of year that sends my mind in a tizzy. If you could hear the voices inside my head, they’d probably sound something like this:

Pumpkin Meme

I mean, I don’t mean to be THAT girl, but I cannot deny my love for pumpkin. There’s just so many things you can do with it. What’s not to love?!

I found this recipe scribbled down in a 3 ring binder in my recipe collection. I made it several years ago and actually forgot all about it! I did a little tweaking and turned it into something new that I am absolutely loving. These little cakes are so stinkin’ delicious. Make sure you have a tall glass of milk on hand, because you’re gonna want it after you have one of these bad boys!

These Pumpkin Praline mini cakes are SO delicious and perfect for a holiday treat!

Ingredients:

  • 2 sticks butter, room temp
  • 1 cup canned pumpkin (roughly half the can)
  • 1 egg
  • 1 tsp vanilla flavoring
  • 2 c all purpose flour
  • 1/2 c sugar
  • 1/2 c brown sugar
  • 1 tsp baking soda
  • 1 tsp baking powder
  • 2 tsp cinnamon
  • 1 tsp pumpkin pie spice
  • dash of salt

Glaze:

  • 3 tbs butter
  • 1/2 cup brown sugar
  • 1/4 c milk
  • 1 1/2 c powdered sugar
  • chopped pecans (No limit. Use however much you like!)

Directions:

  1. Preheat oven to 350 F
  2. In a large bowl, combine flour, baking powder & soda, cinnamon, pumpkin pie spice and salt
  3. In another bowl, cream butter, sugar and brown sugar together
  4. Blend egg, vanilla and pumpkin into butter/sugar mixture
  5. Mix flour mixture into the butter/sugar mixture
  6. On a greased cookie sheet, drop a tablespoonfuls of the batter spaced roughly 1-2 inches apart
  7. Bake for 10-11 minutes
  8. Remove the cookies and immediately transfer them to a wire rack to finish cooling completely
  9. Prepare glaze as follows:
    • Glaze: In a small saucepan, stir butter and sugar over medium heat and allow to bubble. Stirring constantly, cook for roughly 1 minute. The sauce will begin to thicken slightly. Pour milk into mixture and stir.
    • Beat in powdered sugar and continue to cook for another 2-3 minutes. The sauce should thicken considerably. You’re going to want to frost the cookies quickly, as this sauce will harden fast.
    • I personally dunked the cakes into the sauce, allowing only the top to be glazed (pictured below), but you can also brush the glaze on with a basting brush.
    • Pumpkin Praline Mini Cakes Recipe
    • While the glaze is still wet on the cakes, sprinkle with pecans. Using a spoon, drizzle a little more of the sauce over the pecans.
    • Enjoy!

What are some of your favorite fall sweet treats? I absolutely love cooking with pumpkin and am always looking for a new way to use it in the kitchen! If you try this recipe for glazed pumpkin praline mini cakes, I’d love to hear your thoughts on it!

Filed Under: Desserts, Home Cookin' Tagged With: dessert, fall dessert, praline, pumpkin, pumpkin cake, pumpkin spice, recipe

Super Simple Cornbread Casserole Recipe

October 31, 2015 by Laura Tucker Leave a Comment

There’s always that one dish at Thanksgiving dinner that you just CAN’T EVEN wait to stuff your face with. Some may say that’s true about almost everything on the table at Thanksgiving, and I’m over here raising my hand agreeing with you! But there’s usually that one that you KNOW you’ll be having seconds (or thirds,I won’t judge) of.

This casserole is that dish for me. When I think of comfort food, cornbread casserole is one of the first that comes to mind for me. It’s full of warm, creamy, and savory corn-tasticness that almost melts in your mouth. It’s SO simple to make, too! I usually always have the ingredients on hand, because I love to take this dish to church events and family gatherings. It’s always on my menu for Thanksgiving dinner, but it’s great any time of year. I’ve had several people ask me for this recipe, and I’m so happy to share it with y’all!

This is a MUST have on the dinner table during Thanksgiving! Simple Cornbread Casserole - made with Greek yogurt

Ingredients:

  • 1 Box Jiffy Corn Muffin Mix
  • 1 can corn, drained
  • 1 can cream style corn
  • 1/4 cup sugar (I use Stevia or Splenda)
  • 1 cup sour cream (I use Greek yogurt)
  • 1 egg, beaten
  • 1/4 cup butter, melted

Directions:

  1. Preheat oven to 350. Spray 9×13 casserole dish with non-stick spray
  2. Combine all ingredients and pour into dish
  3. Bake for 35-40 minutes, or until set
  4. Enjoy!

If you’re looking for something with a little spice, try adding a can of Mexican corn in place of the regular corn. You could even substitute Mexican cornbread in place of the Jiffy Mix!

Do you have a favorite dish during the holidays that you’re always SO excited to eat? I always love to hear others share what they MUST have during Thanksgiving or Christmas dinner!

Filed Under: Home Cookin' Tagged With: casserole, cornbread, recipe, thanksgiving

Primary Sidebar

Connect

  • Facebook
  • Instagram
  • Pinterest
  • Twitter

Lookin’ for something in particular?

Welcome

ProfileImage
"Hi there! I'm Laura, and I'm a child of God, a wife, and a mother of two. My roots are planted deep in rural Alabama. Monograms, crafting and Southern cuisine - yes, these are a few of my favorite things! Join me as I grow my family in the beautiful South where the tea is sweet, the accents are sweeter, & someone's heart is always being blessed." [Read more...]

Subscribe via E-Mail

Footer

  • Facebook
  • Instagram
  • Pinterest
  • Twitter
Disclosure:
My site may contain affiliate links, which means that if you buy the products featured, I receive a small percentage of the sale price at no extra expense to you. Thanks for visiting Southern Made Simple!
By using this website you agree to our:

Privacy Policies

Copyright © 2023 · Foodie Pro Theme by Shay Bocks · Built on the Genesis Framework · Powered by WordPress